Advertisement
Quick Links
Programming Guide
August 2019
IMPORTANT - PLEASE NOTE:
All Bear awning motors require isolation during installation and for
subsequent servicing. It is highly recommended that each awning is fitted
with a 3-pin plug and connected to an external GPO or similar accessible
isolation point. Hard wiring is to be avoided where possible.
Advertisement

Summary of Contents for AAG Bear MOT4001
- Page 1 Programming Guide August 2019 IMPORTANT - PLEASE NOTE: All Bear awning motors require isolation during installation and for subsequent servicing. It is highly recommended that each awning is fitted with a 3-pin plug and connected to an external GPO or similar accessible isolation point.
-
Page 2: Table Of Contents
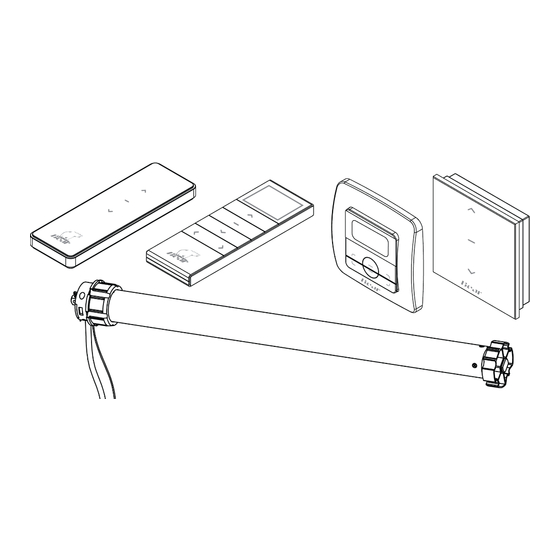
Bear Motor Product Specification TABLE OF CONTENTS PAGE # Scope General Specifications Remote & Motion Sensor Configurations (inc. P2 location) Blind Types Set Upper and Lower Blind Limits on Motor Pair Remote with Motor Set Solar Sun & Wind Sensor Set the Number of Channels on Remote Adding a Remote/Channel 10.0... - Page 3 3.0 Remote Configurations: The images below demonstrate where the important function buttons are for each style of remote. Including Up/Down/Stop/P1/P2. OLD STYLE REMOTE (PRE 2016) NEW STYLE REMOTE 2016 Rev D...
- Page 4 NEW STYLE REMOTE 2018 RTS WALL SWITCHES OLD & NEW STYLE 2016/2018 NOTE: All motors are to be wired with individual wall switches. When a new remote, e.g. 15 channel remote, is to be set to the motor that specific motor will need to be powered OFF and ON. Rev D...
- Page 5 MOTION SENSOR 2019 PAIRING INSTRUCTIONS Step 1: Awning power should be ON. If remote is multi-channel, select channel and extend awning. Step 2: Slide Motion Sensor cover off, install batteries and check Dial Switch is set to ‘0’ (zero). Step 3: Within seconds press the Multi-Function button (sensor will beep once, motor 6 times).
-
Page 6: Blind Types
4.0 Blind Types 5.0 Set Upper & Lower Blind Limits Rev D... -
Page 7: Pair Remote With Motor
6.0 Pair Remote with Motor 7.0 Set Solar Sun & Wind Sensor 8.0 Set Number of Channels for Remote (Up to fifteen channels are available on a Multi-Channel Remote. This instruction hides the unused channels. The hidden channels can be shown again by changing the number of channels). Rev D... -
Page 8: Adding A Remote/Channel
9.0 Adding a Remote/Channel 10.0 Solar Sun & Wind Sensor Settings 10.1 Illumination It is recommended that this function is disabled. Set to ‘0’ (zero). Awning should not be operating unattended. 10.2 Wind Rev D... - Page 9 11.0 Adding a Connector Hub (Bridge) 11.1 Plug in Connector Hub (Bridge) to power using a USB Charger (NOT SUPPLIED). You can plug into your computer; however, the Hub will not work when the computer is OFF. 11.2 If you have a QR Reader already installed on your phone, go to step 11.3. If not, install a free QR Reader App on your Phone/iPad (if one is not already installed –...
- Page 10 11.3 continued… Install the Connector App onto your phone/iPad. 11.4 Now you can scan Step 2 on the Quick Start Guide which will open a link to You Tube with further video instructions or follow the below steps. 11.4a Create an account https://www.youtube.com/watch?v=0wSZBWld7KM 11.4b Once signed in go to the Connector app go to Location and add a name Rev D...
- Page 11 11.4c Go to Settings 11.4d Add New Bridge and follow the steps on the phone (WIFI must be 2.4GHz). https://www.youtube.com/watch?v=60m9yYJBZxM 11.4e Once you have connected the hub you can start to Add New Room. https://www.youtube.com/watch?v=w9FidZbFs4A Rev D...
- Page 12 11.4f Add New Device via Remote into your chosen room https://www.youtube.com/watch?v=mdxx8mYC60c 11.4g Click on the added Device and you can now Open and Close the blind via your phone. Share the settings on your phone with other people, by going to Location/Settings and “Add New Guest”.
Need help?
Do you have a question about the Bear MOT4001 and is the answer not in the manual?
Questions and answers