Advertisement
Table of Contents
- 1 Table of Contents
- 2 Quick Start Guide
- 3 Identifying Your Device
- 4 Your X1 / X2 Hearing Device
- 5 Installing the Battery
- 6 Turning the Device on and off
- 7 Placing the Hearing Device into Your Ear
- 8 Adjusting the Volume
- 9 Using the Fitting Domes
- 10 Removing Your Hearing Device
- 11 Cleaning Your Hearing Device
- 12 Changing the Wax Guard
- 13 Precautions for Your Hearing Device
- 14 Hearing Device Warranty & Safety
- 15 Common Issues & Troubleshooting Guide
- Download this manual
Advertisement
Table of Contents

Related Manuals for HearBloom X1

Summary of Contents for HearBloom X1
- Page 1 USER MANUAL Models: X1 / X2 Pro Please read these operating instructions before first time use to help you get the best out of your hearing device.
-
Page 2: Table Of Contents
Table of contents Quick start guide Identifying your device Your X1 / X2 hearing device Installing the battery Turning the device on and off Placing the hearing device into your ear Adjusting the volume Using the fitting domes Removing your hearing device... -
Page 3: Quick Start Guide
Quick start guide Gently open the battery compartment Use the magnetic tip of the brush Insert the battery & close the door. tool to pick up the battery. door. The hearing aid is now on. Identify the volume dial on the hearing Use the metal tip of the brush tool Select the correct ear dome size. -
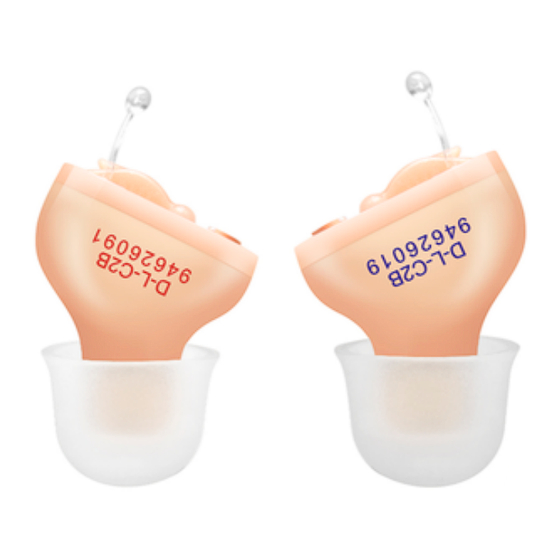
Page 4: Identifying Your Device
Identifying your device How do I identify which hearing device I have? Which is left vs right? X2 Pro Red & Blue Color Beige/Skin-Tone Color (Red is for right ear, blue is for left ear) (Red text = right ear, blue text - left ear) -
Page 5: Your X1 / X2 Hearing Device
Your X1 / X2 hearing device 1) Dome 2) Volume control 3) Removable handle 4) Battery door 5) Microphone inlet 6) Sound outlet... -
Page 6: Installing The Battery
Installing the battery A size 10 hearing device battery is used. Remove the stick tab from the battery after the battery door is fully opened. Close the battery door smoothly to turn on the device. Do not close the battery door with force as it may damage the hearing device. -
Page 7: Turning The Device On And Off
Turning the hearing device on and off The battery door also functions as the on/off switch. The hearing device is on when the battery door is fully closed. To turn the hearing device off, pull open and lift the battery door with your fingernail. Please remember to switch the hearing device off when it is not in use to reduce battery consumption. -
Page 8: Placing The Hearing Device Into Your Ear
Placing the hearing device into the ear Hold your hearing device with your thumb and forefinger on the outer edges of the case. Gently insert the canal tip of the device into your ear canal until you feel resistance. Use the tip of your forefinger to gently push the hearing device into your ear until it feels comfortable in your canal. -
Page 9: Adjusting The Volume
Adjusting the volume The volume control adjusts the amount of output sound. Identify the volume dial which has a circular shape and sits below the battery door. Using the metallic end of the adjustment tool provided, use the tool like a screwdriver to turn the volume control clockwise (to the right) for maximum sound amplification. -
Page 10: Using The Fitting Domes
Using the fitting domes A select of domes has been included with your hearing device. The hearing device can also be worn without any domes. The function of the domes is to improve fitting comfort and/or reduce whistling. To remove a dome, pinch the dome with your fingers and pull off the end of the hearing device. To insert, push the dome onto the end of the hearing device so that it is on securely as possible. -
Page 11: Removing Your Hearing Device
Removing your hearing device Most people find it easiest to remove the hearing device via the removal cord. Hold the removal cord between the thumb and forefinger and gently take the hearing device out of your ear. Never use the battery door to pull the hearing device out. -
Page 12: Cleaning Your Hearing Device
Cleaning your hearing device Use a small brush to gently brush away any accumulated earwax from the hearing device sound outlet. -
Page 13: Changing The Wax Guard
Changing the wax guard It is important to regularly check the wax guard on the end of the hearing device (white circle) for any build up of earwax. If any accumulated wax cannot be brushed away it is time to change the wax guard. The existing wax guard should be removed from the end of the hearing device using the orange tool supplied with your original order. -
Page 14: Precautions For Your Hearing Device
Precautions for your hearing device Moisture build up is a common cause of the hearing device failing and preventing it from occurring will help extend the life of the device. We recommend placing the hearing device into a "dry kit" or humidifier overnight which will help draw moisture out of the instruments overnight. - Page 15 Precautions for your hearing device The product's maximum output sound pressure level is under the product software control, which ensures the end user cannot be exposed to sound pressure levels higher than 132 dB, even in the event of device failure. Do not wear your hearing device during X-ray, MR scans, CT scans, short-wave diathermy, or similar radiation treatments.
-
Page 16: Hearing Device Warranty & Safety
Hearing device warranty & safety The warranty period is 12 months from date of purchase. Any of the following would not fall under the manufacturer's warranty: Damage caused by incorrect use or improper operation Damaged caused by floods, fires, earthquakes, and any other event described as "acts of God" Safety Operating conditions Temperature 0~40C Humidity <80% Voltage DC 1.4V... -
Page 17: Common Issues & Troubleshooting Guide
Common issues & troubleshooting guide No sound or not working There can be a few reasons why your hearing device may appear to be 'not working'. The most common reasons are: not turned on - ensure the battery is properly inserted and the slot is closed shut the volume is too low - to increase the volume, use the provided tool to turn the dial clockwise low or dead battery - please try inserting a new A10 battery faulty - please contact us for a replacement... - Page 18 Common issues & troubleshooting guide Help with whistling feedback noise The most common reason for hearing a whistling feedback noise is because the hearing device is not properly seated in your ear. Wearing your hearing device too loosely can cause whistling. Furthermore, if you have a build up of earwax, it can cause a blockage in your canal.
Need help?
Do you have a question about the X1 and is the answer not in the manual?
Questions and answers