
Summary of Contents for TIMEDOX Time-Clock Silver Plus
- Page 1 Employee Attendance User Guide Tracking System MPLOYEE ATTENDANCE TRACKING SYSTEM April 2018 Time-Clock Silver Plus 6825 Jimmy Carter Boulevard Norcross, GA 30071 | Phone: 470-554-7334 https://www.timedox.us/ Page ii...
- Page 2 All rights reserved to the Timedox Company © 6825 Jimmy Carter Boulevard Suite 1800 Norcross, GA 30071 Office Phone: 800-818-2398 Support Phone: 470-554-7334 support@timedox.us Support email: www.timedox.us...
-
Page 3: Table Of Contents
Table of Contents Time-Clock: Interface ..................1 Time-clock: Date/time definitions & employee registration ......2 Defining the Date and Time ................... 2 Employee Registration ....................2 Retry Punch Period ....................... 6 Preparing the Computer Working Folder ............8 Connection Options ....................... 9 Downloading the file from the time-clock .............. - Page 4 Dear customer, We would like to thank you for choosing the Timedox Attendance Control System, composed of a time-clock and Excel worksheets. Once the initial procedure of preparing the time-clock device and the working folder is completed, you will be able to retrieve, view and update data on a routine basis, during or at the end of each month, and generate pay reports for your accountant.
- Page 5 This time-clock includes a built-in backup battery. No additional software is required in order to download the files and view the content via the Excel file, supplied by Timedox. The Excel file is programmed to calculate the total of monthly hours for each employee and his/her assumed pay.
-
Page 6: Time-Clock: Interface
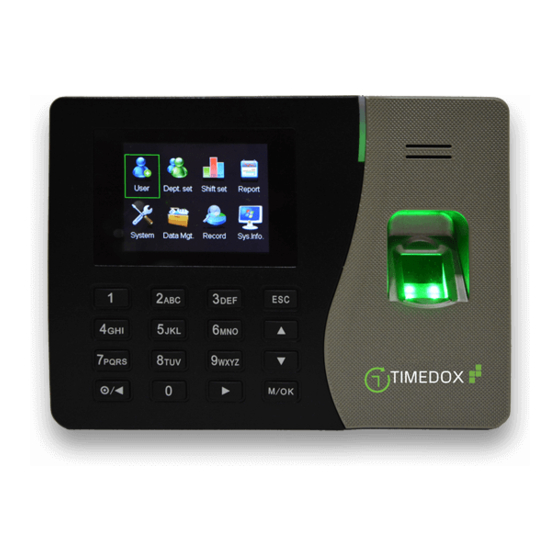
Employee Attendance User Guide Tracking System 1. Time-Clock: Interface Screen Finger-print surface Key- board Figure 1. Time-Clock In this figure: Navigates back to the previous menu. Navigates up/down between menu options. Press M/OK to activate a selection after navigation. Press-and-hold to display the main menu. Confirm a selected item after navigating using the arrow keys. -
Page 7: Time-Clock: Date/Time Definitions & Employee Registration
2. Time-clock: Date/time definitions & employee registration The first thing that you need to do is to define the system date and hour. Defining the Date and Time ➢ To define the date and time: 1. To display the main menu, press-and-hold M/OK. 2. - Page 8 An employee can be registered in one of the following methods: ID and Password See instructions 4 and 6 Finger-print and/or See instructions 5 and 6 password Time card and/or password See instruction 7 NOTE: Each employee records his/her entry/exit time using one of the above methods. ➢...
- Page 9 5. FP (Finger-Print): a. Select FP. b. Press M/OK. Figure 8. Finger-Print (1-0) screen Note: Verify that the protection sticker has been removed c. In the Enroll Finger-print (123456789-1) screen: Place and raise the finger on the surface three (3) times. Figure 9.
- Page 10 7. Time Card: a. Select Card. b. Press M/OK. c. Hover the card in front of the time-clock, to scan it. d. Press the down-arrow key. Figure 11. Scanning a card 8. Department: Avoid. 9. Purview: Intended ONLY for system administration(s). This option locks the access to the clock.
-
Page 11: Retry Punch Period
Retry Punch Period Every punch is displayed on the clock as "In"; nevertheless, the system identifies the second punch as "Out". It is possible to define a number of minutes between two subsequent punches, and as a result, only the first punch takes effect. - Page 12 ➢ To define the number of minutes between In and Out 1. To display the main menu, press- and-hold M/OK. Figure 14. Time-clock front 2. In the main menu, select System. Figure 15. Main menu – System 3. In the System menu, select System. Figure 16.
-
Page 13: Preparing The Computer Working Folder
Retrieved from the Time-clock, by a direct connection to the computer via the web or a disk-on-key. ➢ To access the company’s web site: 1. Go to the company’s site – www.timedox.us: a. Select CONTACT b. From the drop-down list, select SUPPORT. -
Page 14: Connection Options
Connection Options The Timedox Silver Plus offers two standard connection options. Choose your preferred connection option below and follow the relevant instructions. Connection Option System Requirements Ethernet Connection Compatible Windows PC. (Recommended) Available network and wall port for Ethernet. USB Connection Compatible Windows PC. -
Page 15: Downloading The File From The Time-Clock
Downloading the file from the time-clock ➢ To download the files via the PC-USB: 1. Press-and-hold M/OK in order to display the main menu. 2. Select Data Mgt. Figure 19. Data Mgt. 3. Select Download Data. Figure 20. Download Data File 4. - Page 16 9. Verify that the working file is ready, consisting two files: • EmployeeReportManager • OfflineDeviceManager...
- Page 17 ➢ To activate the Excel file: 1. In the working file, double-click the Excel file: EmployeeReportManager_XXX_HE.xls The Excel file is displayed. 2. If the Excel file is protected, perform the following: a. Press Enable Content Figure 23. Press Enable Content An Excel file and the initial system interface toolbar are displayed.
- Page 18 3. To display the employees’ details worksheet, press Load Employees Details. 4. Select attlog.dat_1 and press Open. Figure 25. Attendance Data File The Excel file is displayed, presenting the employee details retrieved from the time-clock. Figure 26. Excel general worksheet, including the data Note: Only employees that punched at least one time are saved in the file.
-
Page 19: Completing The Details In The Excel Worksheet
4. Completing the Details in the Excel Worksheet In this worksheet, one can add the company’s details and define its policy regarding working hours as well as employee details, such as the full name, the address and phone numbers. The yellow row on this page is for defining the parameter values of the company’s default contract;... - Page 20 Figure 29. General Worksheet: Standard working day hours In this example: In the default contract a standard work day is of 8:36 hours; a standard work day in the contract signed with an individual employee is of 9:00 hours, and therefore, the relevant cell indicates 9:00 hours. ➢...
- Page 21 The employee was at work for LESS than 6:00 hours, he is NOT • entitled to an interval payment. The employee was at work for MORE than 6:00 hours, he IS • entitled to an interval payment. ➢ To define the company’s policy regarding the “end-of-date” hour This section refers to a company in which a business day ends after midnight, and the date advances accordingly.
-
Page 22: Viewing The Employees' Reports
5. Viewing the Employees’ Reports This section provides instructions for routine managing of the Excel file, during and at the end of the month. 1. Copy the current data file from the time-clock to the working folder. 2. Display the Excel file. 3. -
Page 23: Employee Tabs
6. Employee Tabs ➢ To view the data of an individual employee 1. Select the relevant tab in the lower bar. Figure 35. An employee's sample worksheet... -
Page 24: Edit Tab - Editing Data
7. Edit Tab — Editing Data This worksheet displays all the missing data – whether arriving or departing time – as well as the reason why only one of the data items was entered. You can manually update this worksheet with the missing data, press Save and the relevant worksheet is automatically updated. -
Page 25: Total Tab - Saving And Closing The Worksheet
8. Total Tab — Saving and Closing the Worksheet The Total tab calculates the attendance data of the entire company in one summary table and allows exporting it to the accountant for producing the paycheck slips. Figure 38. The Total worksheet ➢... - Page 26 Export to The current status is saved to a separate Excel file and initiates XLS and the active Excel file for the next month. Payroll 1. The following dialog is displayed, press OK. Figure 40. Approve Export to the Accountant 2.
-
Page 27: Monthly Routine System Operation
9. Monthly Routine System Operation Once the time-clock and working folder preparation procedure is completed, the routine activity from now on consists of the following actions: 1. Employee Using one of the methods described on pages 3-4 attendance ID and Password •... -
Page 28: Frequently Asked Questions (Faq)
10. Frequently Asked Questions (FAQ) How to add an employee? Question: Answer: On the time-clock, press-and-hold M/OK. In the User screen, select Add. In the first two rows, (ID and Name) enter the ID (Without a leading Zero). The employees’ names may be added later in the Excel file. -
Page 29: Trouble Shooting
11. Trouble Shooting Malfunction Action The time-clock 1. Verify that the time-clock is properly connected to does not power a suitable socket. 2. Verify that the transformer is properly connected/secured to the time-clock. 3. Press-and-hold the left arrow for one (1) second. 4.
Need help?
Do you have a question about the Time-Clock Silver Plus and is the answer not in the manual?
Questions and answers