Table of Contents
Advertisement
Advertisement
Table of Contents

Related Manuals for Albatross AlbaCombi


Summary of Contents for Albatross AlbaCombi
- Page 1 USER MANUAL V1.0.5, Rev A November 2014...
-
Page 2: Table Of Contents
AlbaCombi - Analog to NMEA 2000 Converter page 2/33 Table of Contents PRODUCT OVERVIEW ..........................4 INSTALLATION ............................5 1.1 Selecting a Mounting Location ...................... 5 1.2 CAN connection ..........................5 2. MOUNTING THE ALBACOMBI UNIT ..................... 6 2.1 DIN Rail Mounting ......................... 6 2.2 Connecting to a NMEA 2000 Network .................. - Page 3 Any feedback that may help EMMI Network SL improve the documentation and information methods is welcome. The AlbaCombi has been certified to comply with the European directive for Electromagnetic Compatibility (EN60945) and is appropriately CE marked. Operation of the unit should be in conjunction with appropriate CE approved shielded connectors and cabling used in accordance with the CE directive EN60945.
-
Page 4: Product Overview
The AlbaCombi has an Ethernet port that will allow web based calibration. Just connect your laptop to the AlbaCombi via Ethernet and you will get to the calibration and testing page. No calibration tools or special interfaces are required. This device is future proof and can be upgraded in the field via its ethernet port. -
Page 5: Installation
1.1 Selecting a Mounting Location The following figure shows an example installation. This gives an idea of the connections that need to be made to install the AlbaCombi. All these connections need to be considered before selecting an installation location. -
Page 6: Mounting The Albacombi Unit
AlbaCombi - Analog to NMEA 2000 Converter page 6/33 2. MOUNTING THE ALBACOMBI UNIT 2.1 DIN Rail Mounting Requirements: • A top hat rail, type EN 50 022 or a G section rail, type EN 50 035. Mounting using a different rail type or an alternative mounting kit may breach the terms and conditions of the guarantee. -
Page 7: Nmea 2000 Networks
AlbaCombi - Analog to NMEA 2000 Converter page 7/33 2.2.1 NMEA 2000 Networks NMEA 2000 devices will only communicate with each other when connected to a powered and correctly terminated NMEA 2000 network. All networks need to be powered and terminated correctly to allow data to be transmitted reliably on the network. -
Page 8: Tacho Input Connections
AlbaCombi (input (input 5 or 6). Connect GND input of the alternator to the input 4 Hall Effect and Electronic Pulse Senders Connect the signal line of the sender to the positive input on the AlbaCombi Connect GND to GND input of the AlbaCombi... -
Page 9: Configuring The Albacombi Device
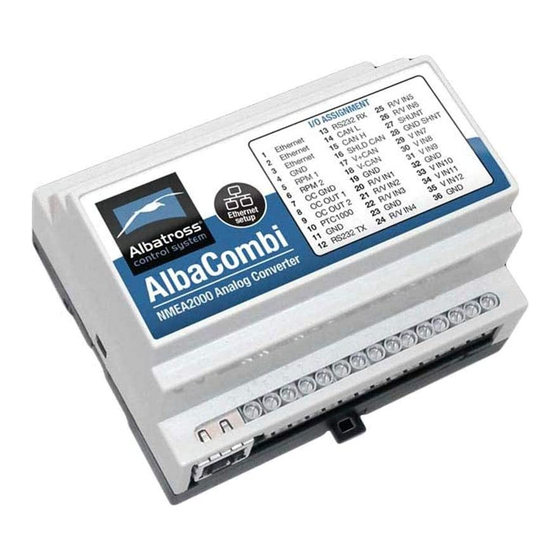
9/33 4. CONFIGURING THE ALBACOMBI DEVICE Make all connections. See the pin out of your device: Configure your AlbaCombi: Connect your laptop to Ethernet port. Open the browser navigator, preferred Chrome and go to the following address: http://192.168.0.50/ The first window that you will see is the “Full View” page:... -
Page 10: General Option
The default NMEA address is 9. Note that if you connect two or more AlbaCombi, you must change the NMEA address, for example: you have two AlbaCombi connected on your NMEA network. One will have the NMEA Address 9 and other will be configured with NMEA Address 10. -
Page 11: Channel Options
AlbaCombi - Analog to NMEA 2000 Converter page 11/33 4.2 Channel Options In order to configure each connected input, please select the channel, as shown on the following screen. Once selected please configure it. -
Page 12: Rpm Channel
AlbaCombi - Analog to NMEA 2000 Converter page 12/33 4.2.1 RPM Channel You must configure all fields: • Name: the name of the channel. • Signal from: In case of RPM signal, the signal is sent by one engine. • Physic Variable: In case of RPM, the only option is “Rotation Rate”. - Page 13 AlbaCombi - Analog to NMEA 2000 Converter page 13/33 You can click on RAW and see the current value or you can write the theoretical value of the sensor output which corresponds to the measurement. The “Calibrated” button is used to test if your calibration table is correct. Note that you must click on “Save”...
-
Page 14: Ptc1000 Option
AlbaCombi - Analog to NMEA 2000 Converter page 14/33 4.2.2 PTC1000 Option • Signal from: you can select if the sensor measures the temperature from the engine, battery or it’s a general temperature. It is important to select the correct sensor because otherwise when configuring the corresponding PGN you won’t have the choice to select this parameter, for... - Page 15 AlbaCombi - Analog to NMEA 2000 Converter page 15/33 You can click on RAW and see the current value or you can write the theoretical value of the sensor output corresponding to the measurement. The “Calibrated” button is used to test if your calibration table is correct. Note that you must click on “Save”...
-
Page 16: Volt/Resistive Input
AlbaCombi - Analog to NMEA 2000 Converter page 16/33 4.2.3 Volt/Resistive Input You have six inputs like this. In the Channel screen you will see if the input has been configured on voltage o resistive mode • Signal from: You can select the parameter that the input will measure; engine, battery, general fluid, general temperature, general pressure, switch bank or general fluid. - Page 17 AlbaCombi - Analog to NMEA 2000 Converter page 17/33 Sensor Type: You have some predefined sensors. You can choose a sensor type and make some changes. • Supply Correction (only on voltage input, not available on resistance mode): You can activate the supply correction using a voltage input (Correction Channel)
-
Page 18: Shunt Input
AlbaCombi - Analog to NMEA 2000 Converter page 18/33 4.2.4 Shunt Input The shunt is a sensor that measures the load or unload current in a battery, and it must have the right dimensions to stand the maximum current it it supposed to measure. -
Page 19: Voltage Input
AlbaCombi - Analog to NMEA 2000 Converter page 19/33 4.2.5 Voltage Input • Signal from: You can select the parameter that the input will measure: engine, battery, general fluid, general temperature, general pressure, switch bank or general fluid. Signal from... - Page 20 AlbaCombi - Analog to NMEA 2000 Converter page 20/33 Limits high and low: these limits will be used to set an alarm. • Filter Level: please indicate if the level measurement has been made with low, medium or high level.
-
Page 21: Output Option
AlbaCombi - Analog to NMEA 2000 Converter page 21/33 4.3 Output Option You have 2 relay outputs. If you wish to configure alarms: • Name: please write down the alarm’s name • Output Type: you have 3 options: Manual: You can switch on/off the relay... -
Page 22: Nmea 2000 Option
Engine Boost: if you have configured a pressure input from engine, please select it. • Tilt/trim: same as before. • Active PGN: If you select this option, the AlbaCombi will send this information through the NMEA 2000 network and the information will be shown on your multifunction display on board. -
Page 23: Pgn 127489: Engine Parameters Dynamic
Engine Temperature: If you have configured a temperature sensor from engine, please select it. • Proceed in the same way with the rest of parameters. • Active PGN: If you select this option, the AlbaCombi will send this information through N2K network and it will be shown on a multifunction display on board. -
Page 24: Pgn 127508: Battery Status
• Range 0 to 250 for valid position fixes. • Voltage: Select the input where you have connected the battery voltage on your AlbaCombi. • Current: Select your shunt input channel. •... -
Page 25: Pgn 127505: Fluid Level
AlbaCombi - Analog to NMEA 2000 Converter page 25/33 4.4.4 PGN 127505: Fluid Level Fluid Instance Fluid Type Fluid Level Tank Capacity Reserved FF • Instance: this is a very important field when you have two or more level sensors on your vessel, each sensor should be configured with a different instance. -
Page 26: Pgn 130312: Temperature
AlbaCombi - Analog to NMEA 2000 Converter page 26/33 4.4.5 PGN 130312: Temperature Instance nr Temperature Source Actual Temperature (ºK) Temperature Set Reserved FF • Instance: this is a very important field if you have two or more temperature sensors on your vessel, each sensor must configure with different instances. -
Page 27: Pgn 130314: Pressure
AlbaCombi - Analog to NMEA 2000 Converter page 27/33 4.4.6 PGN 130314: Pressure Instance nr Pressure Source Pressure (Pa) Reserved FF • Instance: this is a very important field if you have two or more pressure sensors on your vessel, each sensor must configure with different instances. -
Page 28: Displays Option
In this option you will configure the parameters to monitoring in the Full View Option. Select the first display to configure it: • Select Measurement: You will choose any input that you had connected to AlbaCombi • Title: Display name, you will see underneath the gauge. - Page 29 AlbaCombi - Analog to NMEA 2000 Converter page 29/33 Display: • Activate Full‐View: If you select this option, you will see the parameter in the full screen option from AlbaCombi. • Alarms zone: It is important to set the alarm values as it will define the scale limits on your display.
-
Page 30: Full-Screen Option
AlbaCombi - Analog to NMEA 2000 Converter page 30/33 4.8 FULL‐SCREEN OPTION The default page of AlbaCombi will be displayed as shown below. All displays that you have configured before will be displayed. This option can work in parallel to a NMEA display. - Page 31 AlbaCombi - Analog to NMEA 2000 Converter page 31/33 Before making all connections, please follow the next steps: 1. Change the state of the switch on Hardware Test Mode: Switch 1 on, switch 2 off and then press reset button 1.
- Page 32 1. Download the last firmware version from: www.albacombi.com and save it on your PC 2. Enter in Installer Mode on your AlbaCombi device. 3. Go to: http://192.168.0.50/. 4. Select the “Firmware Update” option: 5. Select the .xin file saved on step 1.
-
Page 33: Specifications
AlbaCombi - Analog to NMEA 2000 Converter page 33/33 5. SPECIFICATIONS...
Need help?
Do you have a question about the AlbaCombi and is the answer not in the manual?
Questions and answers