
Subscribe to Our Youtube Channel
Summary of Contents for Promise Technology Pegasus R4i
- Page 1 MPX RAID Storage Module Product Manual Version 1.0 ©2019 Promise Technology, Inc. All Rights Reserved.
- Page 2 Promise Technology Pegasus R4i Copyright © 2019 PROMISE T echnology, Inc. All Rights Reserved. PROMISE, the PROMISE logo, VTrak, Pegasus, SmartStor, SuperTrak, FastTrak, VessRAID, Vess, PerfectPATH, PerfectRAID, SATA150, ULTRA133, VTrak S3000, BackTrak, Hyper- Cache, HyperCache-R, HyperCache-W, DeltaScan and GreenRAID are registered or pending trademarks of PROMISE T echnology, Inc.
- Page 3 About this guide About this guide This Product Manual describes how to setup, use, and maintain the Pegasus R4i MPX RAID Storage Module. It also describes how to use the Pegasus Utility software that you install and run on your computer.
- Page 4 Promise Technology Pegasus R4i VCCI...
- Page 5 Pegasus R4i Product Manual About this guide BSMI RoHS Declaration of the Presence Condition of the Restricted Substances Marking China RoHS Hazardous substance tables...
- Page 6 Promise Technology Pegasus R4i WEEE Information For EU (European Union) member users: According to the WEEE (Waste electrical and electronic equipment) Directive, do not dispose of this product as household waste or commercial waste. Waste electrical and electronic equipment should be appropriately collected and recycled as required by practices established for your country.
-
Page 7: Table Of Contents
Pegasus R4i Product Manual Contents ������������������������������������������������������������������������������������������������������������������������������������������������������� bout this guide ������������������������������������������������������������������������������������������������������������������������������ 1 ntroduction to egAsus ���������������������������������������������������������������������������������������������������������������������������������������������� 1 rchitecture ������������������������������������������������������������������������������������������������������������������������������������������������������������� 1 Acking �������������������������������������������������������������������������������������������������������������������������������������� 2 rotocoL uPPort ����������������������������������������������������������������������������������������������������������������������������������������������� 2 enefits ����������������������������������������������������������������������������������������������������������������������������������������������������������� 3 PecificAtions ����������������������������������������������������������������������������������������������������������������������������������������������������������������� 4 ArdwAre ������������������������������������������������������������������������������������������������������������������������������������������ 6 nstAllAtion And etuP ���������������������������������������������������������������������������������������������������������������������������������� 7 efore you begin instAllAtion ����������������������������������������������������������������������������������������������������������������... - Page 8 Promise Technology Pegasus R4i rAid c ���������������������������������������������������������������������������������������������������������������������� 33 AnAging the ontroLLer ����������������������������������������������������������������������������������������������������������������������������� 34 iewing ontroller nforMAtion �������������������������������������������������������������������������������������������������������������������������������� 36 iewing ontroller tAtistics ���������������������������������������������������������������������������������������������������������������������������������������������� 37 ontroller ettings ����������������������������������������������������������������������������������������������������������������������������������������������������� 39 uzzer ettings ����������������������������������������������������������������������������������������������������������������������������������������� 40 AnAging ncLosures ������������������������������������������������������������������������������������������������������������������������ 41 iewing the nclosure nforMAtion ��������������������������������������������������������������������������������������������������������������� 42...
- Page 9 Pegasus R4i Product Manual Contents sMArt l �������������������������������������������������������������������������������������������������������� 68 Aking hysicAl rive ettings ������������������������������������������������������������������������������������������������������������� 69 Aking ndividuAl hysicAl rive ettings PfA c ��������������������������������������������������������������������������������������������������������������������� 70 leAring A tAle or A ondition ���������������������������������������������������������������������������������������� 71 unning ediA AtroL on your hysicAL rives ����������������������������������������������������������������������������������������������������������������������������������������� 73...
- Page 10 Promise Technology Pegasus R4i Pdm ���������������������������������������������������������������������������������������������������������������������������������������� 112 toPPing ������������������������������������������������������������������������������������������������������������������������������������� 113 AnAging PAre rives ����������������������������������������������������������������������������������������������������������������������������� 114 iewing A ist of PAre rives �������������������������������������������������������������������������������������������������������������������������� 115 iewing PAre rive nforMAtion ������������������������������������������������������������������������������������������������������������������������� 116 reAting A PAre rive AnuAlly �������������������������������������������������������������������������������������������������������������������������������� 118 Aking PAre rive ettings �������������������������������������������������������������������������������������������������������������������������������������������...
- Page 11 Pegasus R4i Product Manual Contents ��������������������������������������������������������������������������������������������������������������������������������������� 144 erformAnce onitor ���������������������������������������������������������������������������������������������������������������������� 145 ontActing echnicAl uPPort ����������������������������������������������������������������������������������������������������������������������������������������������� 145 imitAtions rmA m ����������������������������������������������������������������������������������������������������������������������������������������� 145 ethods ������������������������������������������������������������������������������������������������������������������������������������������������� 149 iMited ArrAnty ��������������������������������������������������������������������������������������������������������������� 150 iscLAimer of other wArrAnties ������������������������������������������������������������������������������������������������������������������������������ 151 esPonsiBiLities ��������������������������������������������������������������������������������������������������������� 151 eturning the roduct...
-
Page 12: I Ntroduction To P Egasus R4 I
• “Specifications” • “Hardware” PROMISE T echnology’s Pegasus R4i is a RAID storage solution in an MPX Module form factor for the Mac Pro. Use the latest version of the Pegasus Utility to monitor the Pegasus R4i status and perform maintenance and management functions. -
Page 13: P Rotocol S Upport
Promise Technology Pegasus R4i The Pegasus R4i architecture is based on a state-of-the-art PMC Sierra 8067 I/O processor coupled with 1G of DDR3-1866 SDRAM memory and a world class enterprise-proven RAID engine. rotocol uPPort Pegasus R4i supports PCIe Gen3 high-speed serial computer expansion bus standard. -
Page 14: Pecifications
Pegasus R4i Product Manual Introduction pecificationS Storage Disks The Pegasus R4i is shipped with 3.5 inch 7200 rpm SATA Hard Disk Drive (HDD) Modules mounted in the drive bays. Capacity Total capacity depends on the size of the HDD shipped with the unit. -
Page 15: Ardware
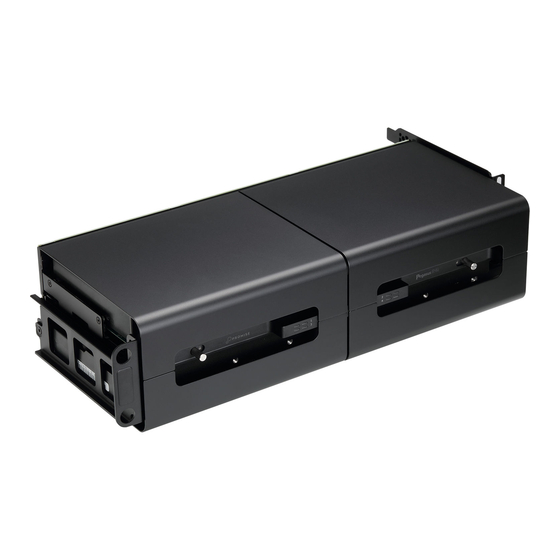
Promise Technology Pegasus R4i ardware This section provides a brief introduction to the external hardware of the Pegasus R4i MPX RAID Storage Module. Front view Activity LEDs Drive Status LEDs Drive Module locks LED Description The Drive Status LED lights blue when functioning normally. A red Drive Status LED Status indicates a problem with the physical drive or an array. - Page 16 Pegasus R4i Product Manual Introduction Rear view Gold Finger PCIe Top view Gold Finger PCIe Feature Description The Gold Finger PCIe contacts complete the physical link, it is the path through Gold Finger PCIe which the PCIe link is established.
-
Page 17: I Nstallation And S Etup
• “Installing Pegasus R4i into Mac Pro” • “Installing the Software on Mac Pro” CAUTION The electronic components within the Pegasus R4i unit are sensitive to damage from Electro-Static Discharge (ESD). Observe appropriate precautions at all times when handling the Pegasus R4i unit or its subassemblies. -
Page 18: Before You Begin Installation
• Make sure an empty MPX bay is available in your Mac Pro to accommodate the Pegasus R4i. You can use either of the MPX bays, or both, if you are installing another Pegasus R4i. Summary of the setup procedure The setup procedure for the Pegasus R4i MPX RAID Storage Module is simple and easy. -
Page 19: Installing Pegasus R4I Into Mac Pro
Make sure your Mac Pro is powered off before opening the system enclosure. Please refer to your Mac Pro Essentials Guide for instructions to open the system enclosure in order to expose available MPX bays used for the Pegasus R4i installation and to remove the clamp plates before beginning the installation. -
Page 20: Verview
Installation and Setup Hardware Installation Overview Follow the illustrated instructions beginning on the next page to install the Pegasus R4i is either of the available locations. The pictures below provide a visual summary of the procedure. Guide the Pegasus R4i into an available MPX bay. - Page 21 Pegasus R4i insert into slots in the Mac Pro chassis. This will properly align the unit for insertion. • The PCI faceplates on the right side of the Pegasus R4i must be inserted into the PCI ladder. PCI Faceplates fit...
- Page 22 When the system is booted up, you can install the Pegasus Utility to use some advanced features specially created for the Pegasus R4i. See “Installing the Software on Mac Pro” on the next page. The Pegasus Utility is located on the Pegasus R4i volume.
-
Page 23: Installing The Software On Mac Pro
Pegasus Utility software even if you do not plan to make any changes to device configuration. The utility is critical for monitoring the system, troubleshoot and getting firmware updates. The utility is necessary if you plan to change the default RAID configuration (Pegasus R4i is shipped with a RAID 5) or in case you ever need to swap out any of the hard disks shipped with the device. The software utility installation package is located on the Pegasus R4i. Follow the instructions below to install the utility. To install the Pegasus Software Utility: Double-click on the Promise Pegasus R4i icon on your desktop to view the device contents. See example to right. - Page 24 Pegasus R4i Product Manual Installation and Setup The Software License Agreement appears, please read the statement and click Continue to proceed. Click Agree if you agree to the terms of the license. To read the license, click Read License. Choose Disagree if you do not agree the terms, in which case the installation procedure is terminated.
- Page 25 It takes a few seconds for the utility software to be installed. When the installation has completed, a message informs you that the installation was successful. Click Close to end the installation procedure. The Pegasus Utility is now available to be used for management of the Pegasus R4i. Use this to monitor the Pegasus R4i status and health, or change the default array configuration, or to update the device firmware. This is also useful for monitoring the status of the system and for troubleshooting. For more information on using the Pegasus Utility, including instructions on how to use the Wizard menus to install a different RAID array configuration, please read “Creating a Disk Array and Logical Drive with...
-
Page 26: U Nlocking The
Unlocking the UI By default, the UI is locked to prevent unauthorized changes to your RAID system. When the UI is locked, you cannot create logical drives or change settings on the Pegasus R4i unit. Note Unlocking the UI requires administrator privilege. Make sure you have the Mac OS X administrator Name and Password. -
Page 27: To Create A Disk Array And Logical Drive
Promise Technology Pegasus R4i To Create a Disk Array and Logical Drive The Pegasus R4i is shipped with HDDs pre-installed and a RAID5 array configured, so it is not necessary to do this yourself. However, if you want to change the disk drives or configure a different RAID, you will need to create an array and logical drive to use the storage. If you are installing new disk drives, use the Wizard to create a disk array and logical drive. The procedures are described in the next chapter. -
Page 28: M Anaging The P Egasus R4 I
Pegasus R4i Product Manual Managing the Pegasus R4i anagIng tHe egasus This chapter contains the following topics: • “Accessing the Pegasus software utility” • “Managing Subsystems” • “Managing the RAID Controller” • “Managing Enclosures” • “Managing Background Activities” • “Managing Physical Drives”... -
Page 29: Accessing The Pegasus Software Utility
Promise Technology Pegasus R4i Accessing the Pegasus software utility Access Promise Utility in Mac Pro Accessing the Promise Utility includes: • Opening and Closing • Unlocking the UI Opening T o open the Promise Utility, double-click the Promise Utility icon in the Macintosh Dock. -
Page 30: Perusing The Promise Utility Interface
Pegasus R4i Product Manual Managing the Pegasus R4i Perusing the Promise Utility interface The Promise Utility interface consists of menus and icons, each leading you to a specific function. The Promise Utility interface with the Dashboard displayed Toolbar icons • Promise Utility – About, Checking for Updates, Preferences, Services, Hide, Quit • View – Show/Hide T oolbar, Customize T oolbar, Devices (Pegasus units) • Dashboard –... -
Page 31: Toolbar Icons
Promise Technology Pegasus R4i Toolbar Icons The default toolbar icons are listed here: • Dashboard icon – Displays the Dashboard and overview • Wizard icon - Displays the Wizard options for quickly setting up RAID arrays • Physical Drive icon – Displays the physical drive list, settings and functions • Disk Array icon - Display menu for monitoring, managing and creating disk arrays... -
Page 32: Device Menus
Pegasus R4i Product Manual Managing the Pegasus R4i Device menus Use the Device drop-down menu in the menu bar at the top of your desktop to view an active display of the Pegaus R4i device, as well as access to menus used to configure settings for device hardware and physical drives. To view the Promise Utility menu bar, just select the Promise Utility window, and the menu bar lists the Device, Admin and other menus categories. -
Page 33: Component List
Promise Technology Pegasus R4i Component List Go to the Device drop-down menu and choose the Component List option to display the device ID, operational status, enclosure type, and status description of all enclosures. The Enclosure, Controller and Buzzer menus are described in relevant sections of this chapter. See “Viewing Controller Information”... -
Page 34: Physical Drive Menu
Pegasus R4i Product Manual Managing the Pegasus R4i Physical Drive menu Go to Admin drop-down menu and choose the Physical Drive option to display the Physical Drive menu. This is the same menu you see by clicking the Physical Drive menu button at the top of the Promise Utility window, or by clicking the Physical Drive menu link under System Status in the Dashboard. -
Page 35: Front View
Promise Technology Pegasus R4i Front View The Front View active menu lets you view the enclosures and all components on the front of the Pegasus R4i. Move the cursor over the drive module to display the information of the installed physical drive, including the device ID, physical capacity, operational status, etc. - Page 36 Pegasus R4i Product Manual Managing the Pegasus R4i Highlight Arrays Click the Highlight Arrays button to identify the physical drives assigned to a disk array, these appear colored purple. Click on of the following items in the drop-down menu: • All DA – Show all disk arrays • DA0 (DA1, DA2, etc.) – a specific disk array...
-
Page 37: Anaging S Ubsystems
Promise Technology Pegasus R4i Managing Subsystems Enclosure management includes: • “Viewing Subsystem Information” • “Subsystem Settings” • “Clearing Statistics” • “Restoring Factory Default Settings” • “Saving a Service Report” • “Updating Firmware”... -
Page 38: Iewing S Ubsystem I Nformation
Pegasus R4i Product Manual Managing the Pegasus R4i Viewing Subsystem Information The term enclosure refers to the Pegasus R4i MPX RAID Storage Module. T o view enclosure information, click the Subsystem Information icon. Subsystem Information includes: • Alias * – Same as controller alias • Model... -
Page 39: Subsystem Settings
Promise Technology Pegasus R4i Subsystem Settings T o modify enclosure settings: Click the Subsystem Information icon. Click the Settings button. Make changes as required: • Enter an alias or change the existing alias in the field provided. Click the Save button. Settings - Subsystem Information... -
Page 40: Clearing Statistics
Pegasus R4i Product Manual Managing the Pegasus R4i Clearing Statistics This function clears statistical data on the RAID controller, physical drives, and logical drives. T o clear statistics: Click the Subsystem Information icon. Click the Clear Statistics button. Type the word “confirm” in the field provided. Click the Confirm button. -
Page 41: Restoring Factory Default Settings
Promise Technology Pegasus R4i Restoring Factory Default Settings This feature restores settings to their default values. To restore all settings to their default values: From the Admin drop-down menu in the menu bar at the top of your desktop, choose Restore Factory Default. -
Page 42: Aving A S Ervice R Eport
Pegasus R4i Product Manual Managing the Pegasus R4i Saving a Service Report A service report can be useful to technical support for troubleshooting or diagnosing issues on the device. To save a service report to your computer, click on the Subsystem Information menu link, and click on the Save Service Report button. -
Page 43: Pdating F Irmware
Click the Submit button. In the Confirmation box, type the word “confirm” in the field provided and click the Confirm button. The process will take several seconds to complete. Once the process has completed, you will be prompted to restart the computer. Once you’ve restarted your computer, you may continue to use the Pegasus R4i. - Page 44 Pegasus R4i Product Manual Managing the Pegasus R4i Managing the RAID Controller RAID controller management includes: • “Viewing Controller Information” • “Viewing Controller Statistics” • “Controller Settings” • “Buzzer Settings”...
- Page 45 Promise Technology Pegasus R4i Viewing Controller Information T o view controller information, from the Device menu, choose Component List, the Information tab is displayed. Controller information includes: • Controller ID • Alias * – Same as enclosure alias • Vendor •...
- Page 46 Pegasus R4i Product Manual Managing the Pegasus R4i To view advanced information, click the Advanced Information tab. Advanced controller information includes: • Memory Type • Memory Size • Flash Type • Flash Size • NVRAM Type • NVRAM Size •...
- Page 47 Promise Technology Pegasus R4i Viewing Controller Statistics T o view controller statistics: Click the Dashboard icon, then click the Controller link. Click the Statistics tab. Controller statistics include: • Data Transferred • Read Data Transferred • Write Data Transferred •...
- Page 48 Pegasus R4i Product Manual Managing the Pegasus R4i Controller Settings T o modify controller settings: From the Device menu, choose Component List. Mouse-over the controller, then click the Settings button. Make setting changes as required: • Enter, change or delete the alias in the Alias field.
- Page 49 Promise Technology Pegasus R4i Controller Settings...
- Page 50 Pegasus R4i Product Manual Managing the Pegasus R4i Buzzer Settings T o modify buzzer settings: From the Device menu, choose Component List. Mouse-over the buzzer, then click the Settings button. Check the Enable Buzzer box to enable the buzzer. Or uncheck the box to disable.
- Page 51 Promise Technology Pegasus R4i Managing Enclosures Enclosure management includes the following functions: • “Viewing the Enclosure Information” • “Viewing Temperature Sensor Information”...
- Page 52 Pegasus R4i Product Manual Managing the Pegasus R4i Viewing the Enclosure Information T o access enclosure information: Click the Dashboard icon, then click the Controller link. Mouse-over the Enclosure, then click the View button. Enclosure information includes: • Enclosure ID •...
- Page 53 Promise Technology Pegasus R4i Viewing Temperature Sensor Information T o view the status of the temperature sensor: Click the Dashboard icon, then click the Temperature link. Scroll down until you see Temperature Sensors. Temperature Sensors information includes: • ID • Status (Normal, Warning or Critical icon) • Location (Controller or Enclosure)
- Page 54 Pegasus R4i Product Manual Managing the Pegasus R4i Managing Background Activities Background activity management includes: • “Viewing Current Background Activities” • “Viewing Scheduled Background Activities” • “Adding a Scheduled Background Activity” • “Changing a Background Activity Schedule” • “Enabling or Disabling a Scheduled Background Activity”...
- Page 55 Promise Technology Pegasus R4i Viewing Current Background Activities T o view a list of background activities, click on the Background Activities icon. The list of background appears: • • Media Patrol • Transition • Redundancy Check • Synchronization • Rebuild •...
- Page 56 Pegasus R4i Product Manual Managing the Pegasus R4i Viewing Scheduled Background Activities T o view a list of scheduled background activities: Click on the Background Activities icon. Click the Scheduler button. The list of scheduled background appears. Adding a Scheduled Background Activity T o add a new scheduled background activity: Click on the Background Activities icon.
- Page 57 Promise Technology Pegasus R4i Modify schedule settings as desired. Choose the option for the activity you want to modify: • Media Patrol • Redundancy Check • Spare Check Choose a Start Time from the dropdown menus. The menus have a 24-hour clock.
- Page 58 Pegasus R4i Product Manual Managing the Pegasus R4i Changing a Background Activity Schedule T o change an existing scheduled background activity: Click on the Background Activities icon. Click the Scheduler button. The list of scheduled background appears. Mouse-over the background activity, then click the Settings button.
- Page 59 Promise Technology Pegasus R4i Modify settings as needed. Choose the option for the activity you want to modify: • Media Patrol • Redundancy Check • Spare Check Choose a Start Time from the dropdown menus. The menus have a 24-hour clock.
- Page 60 Pegasus R4i Product Manual Managing the Pegasus R4i Enabling or Disabling a Scheduled Background Activity Background activity schedules are enabled by default when you create the schedule. If you want to stop a background activity now but plan to use it again in the future, disable the scheduled activity rather than deleting it.
- Page 61 Promise Technology Pegasus R4i Deleting a Scheduled Background Activity T o delete a scheduled background activity: Click on the Background Activities icon. Click the Scheduler button. The list of scheduled background appears. Mouse-over the background activity, then click the Delete button.
- Page 62 Pegasus R4i Product Manual Managing the Pegasus R4i Media Patrol Media Patrol is a routine maintenance procedure that checks the magnetic media on each disk drive. Media Patrol checks are enabled by default on all disk arrays and spare drives. Media Patrol is concerned with the media itself, not the data recorded on the media.
- Page 63 Promise Technology Pegasus R4i Redundancy Check Redundancy Check is a routine maintenance procedure for fault-tolerant disk arrays (those with redundancy) that ensures all the data matches exactly. Redundancy Check can also correct inconsistencies. See “Redundancy Check on a Logical Drive” on page 64.
- Page 64 Pegasus R4i Product Manual Managing the Pegasus R4i Initialization T echnically speaking, Initialization is a foreground activity, as you cannot access a logical drive while it is Initializing. Initialization is normally done to logical drives after they are created from a disk array. Initialization sets all data bits in the logical drive to zero.
- Page 65 Promise Technology Pegasus R4i Rebuild When you rebuild a disk array, you are actually rebuilding the data on one physical drive. • When a physical drive in a disk array fails and a spare drive of adequate capacity is available, the disk array begins to rebuild automatically using the spare drive.
- Page 66 Pegasus R4i Product Manual Managing the Pegasus R4i Making Rebuild Settings Click on the Background Activities icon. Click the Settings button. Click the Rebuild Rate dropdown menu and choose a rate: • Low – Fewer system resources to the Rebuild, more to data read/write operations.
- Page 67 Promise Technology Pegasus R4i Migration The term “Migration” means either or both of the following: • Change the RAID level of a logical drive. • Expand the storage capacity of a logical drive. See “Migrating a Logical Drive” on page 108.
- Page 68 Pegasus R4i Product Manual Managing the Pegasus R4i Predictive Data Migration (PDM) is the migration of data from the suspect disk drive to a spare drive, similar to rebuilding a disk array. But unlike rebuilding, PDM automatically copies your data to a spare drive before the drive fails and your logical drive goes Critical.
- Page 69 Promise Technology Pegasus R4i Transition Transition is the process of replacing a revertible spare drive that is currently part of a disk array with an unconfigured physical drive or a non-revertible spare drive. See “Running a Transition” on page 121. Making Transition Settings T o make Transition settings: Click on the Background Activities icon.
- Page 70 Pegasus R4i Product Manual Managing the Pegasus R4i Synchronization Synchronization is automatically applied to logical drives when they are created. Synchronization recalculates the redundancy data to ensure that the working data on the physical drives is properly in sync. Mouse-over on the logical drive, click the View button, and look under Logical Drive Information beside the line that says Synchronized.
- Page 71 Promise Technology Pegasus R4i Managing Physical Drives Physical drive management includes: • “Viewing a List of Physical Drives” • “Viewing Physical Drive Information” • “Viewing Physical Drive Statistics” • “Viewing Physical Drive SMART Log Information” • “Locating a Physical Drive”...
- Page 72 Managing the Pegasus R4i Viewing a List of Physical Drives T o view a list of physical drives in the Pegasus R4i MPX RAID Storage Module, click the Physical Drive icon. Physical drive information includes: • ID – ID number of the physical drive • Status (Normal, Stale or PFA or Dead icon)
- Page 73 Promise Technology Pegasus R4i Viewing Physical Drive Information T o view physical drive information: Click the Physical Drive icon. Mouse-over the physical drive you want then click the View button. Physical drive information includes: • Physical Drive ID – ID number of the physical •...
- Page 74 Pegasus R4i Product Manual Managing the Pegasus R4i Click the Advanced Information tab. Advanced information for physical drives includes: • Write Cache – Enabled or disabled * • Command Queuing – Enabled or disabled * • Read Look Ahead Cache – Enabled or disabled * •...
- Page 75 Promise Technology Pegasus R4i Viewing Physical Drive Statistics T o view physical drive statistics: Click the Physical Drive icon. Mouse-over the physical drive you want then click the View button. Click the Statistics tab. Physical drive statistics include: • Data Transferred •...
- Page 76 Pegasus R4i Product Manual Managing the Pegasus R4i Viewing Physical Drive SMART Log Information T o view physical drive SMART Log information: Click the Physical Drive icon. Mouse-over the physical drive you want then click the View button. Click the SMART Log tab.
- Page 77 Promise Technology Pegasus R4i Making Global Physical Drive Settings T o make global physical drive settings: Click the Physical Drive icon.. Click the Global Physical Drive Settings button. Check the boxes to enable, uncheck to disable. • Enable Write Cache • Enable Read Look Ahead Cache...
-
Page 78: Locating A Physical Drive
Pegasus R4i Product Manual Managing the Pegasus R4i Locating a Physical Drive This feature causes the drive module LEDs to blink for one minute to assist you in locating the physical drive, and is supported by RAID enclosures and JBOD expansion units. -
Page 79: M Aking P Hysical D Rive Smart L
Promise Technology Pegasus R4i Making Physical Drive SMART Log Settings To make physical drive SMART log settings: Click the Physical Drive icon. Mouse-over the physical drive you want then click the Settings button. Click the SMART Log Settings tab. Check the box to enable the SMART log. -
Page 80: M Aking I Ndividual P Hysical D
Pegasus R4i Product Manual Managing the Pegasus R4i Making Individual Physical Drive Settings T o make individual physical drive settings: Do one of the following actions: • Click the Physical Drive icon. • From the Device menu, choose Physical Drive. -
Page 81: C Learing A S Tale Or A Pfa C
Promise Technology Pegasus R4i Clearing a Stale or a PFA Condition Stale – The physical drive contains obsolete disk array information. PFA – The physical drive has errors resulting in a prediction of failure. Be sure you have first corrected the condition by a physical drive replacement, rebuild operation, etc. Then clear the condition. T o clear a Stale or a PFA condition: Click the Physical Drive icon. -
Page 82: R Unning M Edia P Atrol On Your
Pegasus R4i Product Manual Managing the Pegasus R4i Running Media Patrol on your Physical Drives Media Patrol is a routine maintenance procedure that checks the magnetic media on each disk drive. Media Patrol checks are enabled by default on all disk arrays and spare drives. Media Patrol is concerned with the media itself, not the data recorded on the media. - Page 83 Promise Technology Pegasus R4i Stopping a a Media Patrol T o stop is to cancel the Media Patrol: Click on the Background Activities icon. The list of background activities appears. Mouse-over Media Patrol and click the Stop button. In the Confirmation box, type the word “confirm” in the field provided and click the Confirm button.
-
Page 84: Anaging D Isk A Rrays
Pegasus R4i Product Manual Managing the Pegasus R4i Managing Disk Arrays Disk array management includes: • “Viewing a List of Disk Arrays” • “Viewing Disk Array Information” • “Creating a Disk Array Manually” • “Making Disk Array Settings” • “Locating a Disk Array”... -
Page 85: Iewing A L Ist Of D Isk A Rrays
Promise Technology Pegasus R4i Viewing a List of Disk Arrays T o view a list of disk arrays, do one of the following actions: • From the Dashboard window, click the Disk Array link. • From the Storage menu, choose Disk Array. The list of disk arrays appears. Each disk array lists: • ID –... -
Page 86: Iewing D Isk A Rray I Nformation
Pegasus R4i Product Manual Managing the Pegasus R4i Viewing Disk Array Information T o view disk array information: Do one of the following actions: • From the Dashboard window, click the Disk Array link. • From the Storage menu, choose Disk Array. - Page 87 Promise Technology Pegasus R4i Creating a Disk Array Manually This feature creates a disk array only. You can also use the Wizard to create a disk array with logical drives and spare drives at the same time. T o create a disk array: From the Dashboard menu, click the Disk Array link.
- Page 88 Pegasus R4i Product Manual Managing the Pegasus R4i In the Select Physical Drives diagram, click the drives to add them to your array. The drive modules turn blue when you click them. The physical drives’ ID numbers appear in the field below the diagram.
-
Page 89: C Reating A D Isk A Rray And L
Promise Technology Pegasus R4i Creating a Disk Array and Logical Drive with the Wizard A disk array is the method of organizing the hard disk drives or solid state drives in the Pegasus. A logical drive is created on a disk array. The logical drive is where your computer saves files on the Pegasus. The Pegasus Utility includes a Wizard to help you set up a disk array, logical drives, and spare drive. -
Page 90: C Hoosing A Utomatic C
Automatic Configuration dialog box Do one of the following actions: • If you agree with the proposed configuration, click the Submit button. The Wizard creates your disk array and logical drive. If you have a Pegasus R4i, the Wizard also creates a spare drive. • If you do NOT agree with the proposed configuration, click the Cancel button to return to... -
Page 91: C Hoosing A Dvanced C
Promise Technology Pegasus R4i Choosing Advanced Configuration This option enables you to directly specify all parameters for a new disk array, logical drives, and spare drives. T o use the Advanced Configuration Wizard: From the Storage menu choose Wizard. Click the Advanced button. The Create Disk Array screen displays. - Page 92 Pegasus R4i Product Manual Managing the Pegasus R4i Task 2 – Logical Drive Creation T o create your logical drive: Enter your information and choose your options. • Enter a logical drive alias in the field provided • Choose a RAID level from the dropdown menu. Note the Max: capacity value. Then enter a capacity value the field provided and choose a unit of measure from the dropdown menu.
- Page 93 Promise Technology Pegasus R4i T o create your spare drive: For each of the following items, accept the default or change the settings as required: • Check the Revertible box if you want a revertible spare drive. A revertible spare drive returns to its spare drive assignment after you replace the failed physical drive in the disk array and run the Transition function.
- Page 94 Pegasus R4i Product Manual Managing the Pegasus R4i Review your choices of disk array, logical drives, and spare drive. • T o make a change, click the Back button to reach the appropriate screen. • To accept, click the Submit button.
-
Page 95: Making Disk Array Settings
Promise Technology Pegasus R4i Making Disk Array Settings T o make disk array settings: Do one of the following actions: • From the Dashboard window, click the Disk Array link. • From the Storage menu, choose Disk Array. Mouse-over the disk array you want then click the Settings button. -
Page 96: Deleting A Disk Array
Pegasus R4i Product Manual Managing the Pegasus R4i Deleting a Disk Array T o delete a disk array: Do one of the following actions: • From the Dashboard window, click the Disk Array link. • From the Storage menu, choose Disk Array. -
Page 97: Locating A Disk Array
Promise Technology Pegasus R4i Locating a Disk Array This feature causes the drive module LEDs to flash for one minute to assist you in locating the physical drives that make up this disk array. T o locate a disk array: Do one of the following actions: • From the Dashboard window, click the Disk Array link. • From the Storage menu, choose Disk Array. -
Page 98: P Reparing A D Isk A Rray For R Ebuilding A D Isk A Rray
Pegasus R4i Product Manual Managing the Pegasus R4i Preparing a Disk Array for Transport This feature prepares the physical drives that make up the disk array to be removed from the enclosure and installed in a different location. T o prepare a disk array for transport: Do one of the following actions: • From the Dashboard window, click the Disk Array link. - Page 99 Promise Technology Pegasus R4i Rebuilding a Disk Array When you rebuild a disk array, you are actually rebuilding the data on one of its physical drives. If there is no spare drive of adequate capacity, you must replace the failed drive with an unconfigured physical drive, then perform a Manual Rebuild. On the module with the failed drive, the Drive Status LED is red and the Drive Activity LED is dark. That is the physical drive you must replace.
-
Page 100: P Erforming A M Anual R
Pegasus R4i Product Manual Managing the Pegasus R4i Performing a Manual Rebuild T o perform a manual rebuild: Click on the Background Activities icon. Mouse-over Rebuild and click the Start button. From the Source Physical Drive dropdown menu, choose a Source disk array and physical drive. -
Page 101: P Ausing And R Esuming A R
Promise Technology Pegasus R4i Pausing and Resuming a Rebuild T o pause or resume a Rebuild: Click on the Background Activities icon. Mouse-over Rebuild and click the Pause or Resume button. Pausing a disk array rebuild... -
Page 102: Stopping A Rebuild
Pegasus R4i Product Manual Managing the Pegasus R4i Stopping a Rebuild T o stop or cancel a Rebuild: Click on the Background Activities icon. Mouse-over Rebuild and click the Stop button. Click the Confirm button. Also see “Making Rebuild Settings” on page 55. - Page 103 Promise Technology Pegasus R4i Managing Logical Drives Logical drive management includes: • “Viewing a List of Logical Drives” • “Viewing Logical Drive Information” • “Viewing Logical Drive Statistics” • “Making Logical Drive Settings” • “Viewing Logical Drive Check Tables” • “Creating a Logical Drive Manually”...
- Page 104 Pegasus R4i Product Manual Managing the Pegasus R4i Viewing a List of Logical Drives T o view a list of logical drives, do one of the following actions: • Click the Logical Drive icon. • From the Storage menu, choose Logical Drive.
- Page 105 Promise Technology Pegasus R4i Logical Drive Information Logical Drive information displays, including: • Logical Drive ID – LD0, LD1, etc. • Alias – If assigned • Write Policy – WriteThru or WriteBack * • Array ID – ID number of the disk array where this •...
- Page 106 Pegasus R4i Product Manual Managing the Pegasus R4i Viewing Logical Drive Statistics To view logical drive statistics: Do one of the following actions: • Click the Logical Drive icon. • From the Storage menu, choose Logical Drive. The list of logical drives appears.
-
Page 107: Making Logical Drive Settings
Promise Technology Pegasus R4i Making Logical Drive Settings T o make logical drive settings: Do one of the following actions: • Click the Logical Drive icon. • From the Storage menu, choose Logical Drive. The list of logical drives appears. -
Page 108: L Ogical D Rive C
Pegasus R4i Product Manual Managing the Pegasus R4i Viewing Logical Drive Check Tables This feature enables you to view error tables. Use this information to evaluate the integrity of the logical drive and to determine whether corrective action is needed. -
Page 109: C Reating A L Ogical D Rive M
Promise Technology Pegasus R4i Creating a Logical Drive Manually This feature creates a logical drive only. You can also use the Wizard to create a disk array with logical drives and spare drives at the same time. See “Creating a Disk Array and Logical Drive with the Wizard”... - Page 110 Pegasus R4i Product Manual Managing the Pegasus R4i Accept the defaults or make changes: • Optional. Enter an alias in the Alias field. Maximum of 32 characters; letters, numbers, space between characters, and underscore. • Choose a RAID level. The choice of RAID levels depends the number of physical drives in the disk array.
-
Page 111: F Ormatting Y Our L Ogical D
Promise Technology Pegasus R4i Formatting Your Logical Drives If you left the Format box checked when you created your logical drives, they are formatted automatically. If you UNchecked the Format box, you must format your logical drives manually. See “Formatting Your Logical Drives” on page 100. -
Page 112: Deleting A Logical Drive
Pegasus R4i Product Manual Managing the Pegasus R4i Deleting a Logical Drive This action requires Administrator or Super User privileges. T o delete a logical drive: Do one of the following actions: • Click the Logical Drive icon. • From the Storage menu, choose Logical Drive. The list of logical drives appears. -
Page 113: Initializing A Logical Drive
Promise Technology Pegasus R4i Initializing a Logical Drive Initialization is normally done to logical drives after they are created from a disk array. T o initialize a logical drive: Click on the Background Activities icon. The list of background activities appears. -
Page 114: P Ausing And R Esuming An S Topping An I Nitialization
Pegasus R4i Product Manual Managing the Pegasus R4i Pausing and Resuming an Initialization T o pause or resume Initialization: Click on the Background Activities icon. The list of background activities appears. Mouse-over Initialization and click the Pause or Resume button. - Page 115 Promise Technology Pegasus R4i Stopping an Initialization T o stop means to cancel an Initialization: Click on the Background Activities icon. The list of background activities appears. Mouse-over Initialization and click the Stop button. In the Confirmation box, type the word “confirm” in the field provided and click the Confirm button. Stop Initialization...
-
Page 116: R Edundancy C Heck On A L
Pegasus R4i Product Manual Managing the Pegasus R4i Redundancy Check on a Logical Drive Redundancy Check is a routine maintenance procedure for fault-tolerant disk arrays (those with redundancy) that ensures all the data matches exactly. Redundancy Check can also correct inconsistencies. -
Page 117: P Ausing And R Esuming A R
Promise Technology Pegasus R4i Pausing and Resuming a Redundancy Check T o pause or resume a Redundancy Check: Click on the Background Activities icon. The list of background activities appears. Mouse-over Redundancy Check and click the Pause or Resume button. -
Page 118: S Topping A R Edundancy C
Pegasus R4i Product Manual Managing the Pegasus R4i Stopping a Redundancy Check T o stop is to cancel the Redundancy Check: Click on the Background Activities icon. The list of background activities appears. Mouse-over Redundancy Check and click the Stop button. -
Page 119: Migrating A Logical Drive
Promise Technology Pegasus R4i Migrating a Logical Drive The term “Migration” means either or both of the following: • Change the RAID level of a logical drive. • Expand the storage capacity of a logical drive. Before you begin a migration, examine your current disk array to determine whether: • The physical drives in your array can support the target RAID level. - Page 120 Pegasus R4i Product Manual Managing the Pegasus R4i To migrate a logical drive: Click on the Background Activities icon. The list of background activities appears. Mouse-over Migrate and click the Start button. In the Select Disk Array dropdown menu, choose the source disk array.
-
Page 121: R Unning Pdm On A L Ogical
Promise Technology Pegasus R4i Running PDM on a Logical Drive Predictive Data Migration (PDM) is the migration of data from the suspect disk drive to a spare drive, similar to rebuilding a disk array. But unlike rebuilding, PDM automatically copies your data to a spare drive before the drive fails and your logical drive goes Critical. -
Page 122: P Ausing And R Esuming
Pegasus R4i Product Manual Managing the Pegasus R4i Pausing and Resuming PDM T o pause or resume PDM: Click on the Background Activities icon. The list of background activities appears. Mouse-over PDM and click the Pause or Resume button. Pause/Resume PDM... - Page 123 Promise Technology Pegasus R4i Stopping PDM T o stop is to cancel PDM: Click on the Background Activities icon. The list of background activities appears. Mouse-over PDM and click the Stop button. Click the Confirm button. Pause/Resume PDM...
- Page 124 Pegasus R4i Product Manual Managing the Pegasus R4i Managing Spare Drives Spare drive management includes: • “Viewing a List of Spare Drives” • “Viewing Spare Drive Information” • “Creating a Spare Drive Manually” • “Making Spare Drive Settings” • “Running Spare Check”...
-
Page 125: L Ist Of S
Promise Technology Pegasus R4i Viewing a List of Spare Drives T o view a list of spare drives, do one of the following actions: • From the Dashboard window, click the Spare Drive link. • From the Storage menu, choose Spare Drive. - Page 126 Pegasus R4i Product Manual Managing the Pegasus R4i Viewing Spare Drive Information T o view spare drive information: Do one of the following actions: • From the Dashboard window, click the Spare Drive link. • From the Storage menu, choose Spare Drive. The list of spare drives appears.
-
Page 127: Creating A Spare Drive Manually
Promise Technology Pegasus R4i Creating a Spare Drive Manually This feature creates a spare drive only. You can also use the Wizard to create a disk array with logical drives and spare drives at the same time. T o create a spare drive: From the Dashboard window, click the Spare Drive link. - Page 128 Pegasus R4i Product Manual Managing the Pegasus R4i Create Spare Drive - Summary In the Create Spare Drive diagram, click a drive to choose it for your spare. The drive module turns blue when you click it. The physical drive’s ID number appears in the field below the diagram. Click the Submit button to continue. If you are done creating spare drives, click the Finish button. T o create another spare drive, click...
-
Page 129: Making Spare Drive Settings
Promise Technology Pegasus R4i Making Spare Drive Settings T o make spare drive settings: From the Dashboard window, click the Spare Drive link. The list of spare drives appears. Mouse-over the spare drive you want then click the Settings button. -
Page 130: Running Spare Check
Pegasus R4i Product Manual Managing the Pegasus R4i Running Spare Check Spare Check verifies the status of your spare drives. T o run spare check: From the Dashboard window, click the Spare Drive link. The list of spare drives appears. Mouse-over the spare drive you want then click the Spare Check button. -
Page 131: Deleting A Spare Drive
Promise Technology Pegasus R4i Deleting a Spare Drive This action requires Administrator or a Super User privileges. T o delete a spare drive: From the Dashboard window, click the Spare Drive link. The list of spare drives appears. Mouse-over the spare drive you want then click the Delete button. -
Page 132: Running A Transition
Pegasus R4i Product Manual Managing the Pegasus R4i Running a Transition T o run a transition on a revertible spare drive: Click on the Background Activities icon. The list of background activities appears. Mouse-over Transition and click the Start button. -
Page 133: Pausing And Resuming A Transition
Promise Technology Pegasus R4i Pausing and Resuming a Transition T o pause or resume Transition: Click on the Background Activities icon. The list of background activities appears. Mouse-over Transition and click the Pause or Resume button. Pausing/Resuming a Transition... -
Page 134: Stopping, Pausing Or Resuming A Transition
Pegasus R4i Product Manual Managing the Pegasus R4i Stopping, Pausing or Resuming a Transition T o stop is to cancel a Transition: Click on the Background Activities icon. The list of background activities appears. Mouse-over Transition and click the Stop button. -
Page 135: Setting Up Email Notifications
Promise Technology Pegasus R4i Setting Up Email Notifications You can use email notifications to receive alerts about events such as a drive error or drive failure on the Pegasus R4i, so that you can take corrective action. To setup Email notification settings: Click on Promise Utility in the top menu bar and select Preferences, click on the Email menu tab. Click the padlock icon to the menu so you can make settings changes. - Page 136 Pegasus R4i Product Manual Managing the Pegasus R4i In Mac, click padlock icon to make changes, then enter administrator user name and password Click on Turn On Email Service. Click to Enable ESMTP based on your own Email service environment.
- Page 137 Promise Technology Pegasus R4i Enter the email address used for the sender’s address in Email Sender (From) Address. Enter the email address to receive the email notification in Reciever’s Email Address. The default value in SMTP Server Port is 25, change this only if your company uses a different port for SMTP. Enter the subject text used for the notification emails in Email Subject.
- Page 138 Pegasus R4i Product Manual Troubleshooting roubLesHootIng This chapter deals problems you might encounter with your Pegasus unit and how to resolve them. • “Responding to an Audible Alarm” • “Checking LEDs” • “Pegasus Utility” • “Viewing the Event Logs” • “Physical Drive Problems”...
-
Page 139: Responding To An Audible Alarm
Pegasus R4i Responding to an Audible Alarm The Pegasus R4i has an audible alarm that beeps in a pattern to provide some information about a problem that requires immediate attention. The table below lists the beep pattern, what it might indicate and what response is needed, if any. -
Page 140: Checking Leds
Pegasus R4i Product Manual Troubleshooting Checking LEDs When you boot Pegasus the drive module Activity and Status LEDs turn blue. Front view Activity LEDs Drive Status LEDs LED Description The Drive Status LED lights blue when functioning normally. A red Drive Status Status LED indicates a problem with the physical drive or an array. -
Page 141: Pegasus Utility
Promise Technology Pegasus R4i Pegasus Utility If you can open the Pegasus Utility, but you cannot create or delete disk arrays and logical drives, nor can you make settings changes, check the UI lock. See “Unlocking the UI in Mac” on page 65. -
Page 142: Event Severity Descriptions
Pegasus R4i Product Manual Troubleshooting Viewing NVRAM Events This screen displays a list of and information about 300 most important events over multiple subsystem startups. T o display NVRAM events: Click the Events icon. The log of Runtime Events appears. - Page 143 Promise Technology Pegasus R4i View NVRAM Events...
- Page 144 Pegasus R4i Product Manual Troubleshooting Saving All Logs To save event logs, Click the Events icon. The log of Runtime Events appears. Click the Save All Logs (debug purpose) button in the top of the menu. You are asked to confirm that you want to save all logs. In the Confirmation box, type the word “confirm” in the field provided and click the Confirm button. Save All Logs...
-
Page 145: Physical Drive Problems
Promise Technology Pegasus R4i Physical Drive Problems Physical drive troubleshooting includes: • “Diagnosis using the Pegasus Utility” • “Locating a Physical Drive” • “Replacing a Drive Module” Physical drives are the foundation of data storage. A physical drive problem can affect your entire RAID system. -
Page 146: Replacing A Drive Module
Check the failed drive, then obtain a replacement drive module. Follow the instructions below if you want to remove a drive module from the Pegasus R4i MPX RAID Storage Module, or to reinsert a drive module. You need to remove the drive module if you want to replace it. - Page 147 Promise Technology Pegasus R4i • Use two hands to gently slide the module straight out from the enclosure. Make sure you support the bottom of the module so it does not drop when it is free of the enclosure hardware.
- Page 148 • Gently push the drive module in as far as it goes until the connectors on the back are firmly seated. Note that if the drive module is not fully inserted, you will not be able to slide the lock to the locked position. • Slide the lock toward the outside of the Pegasus R4i enclosure to secure it. The drive module is now ready for use.
-
Page 149: Disk Array And Logical Drive Problems
Promise Technology Pegasus R4i Disk Array and Logical Drive Problems Disk array and logical drive troubleshooting includes: • “Disk Array Degraded / Logical Drive Critical” • “Disk Array Offline / Logical Drive Offline” • “Repairing an Offline Disk Array or Logical Drive” • “Rebuilding a Disk Array” • “Incomplete Array” • “Unreadable Disk Warning”... -
Page 150: Disk Array Offline / Logical Drive Offline
Pegasus R4i Product Manual Troubleshooting Disk Array Offline / Logical Drive Offline Disk arrays are made up of physical drives. Logical drives are created on the disk array. When a disk array and its logical drives go Offline, the data stored in the logical drives is no longer accessible. -
Page 151: Rebuilding A Disk Array
Promise Technology Pegasus R4i T o recreate your logical drive: Identify the failed physical drive. See “Locating a Physical Drive” on page 135. Replace the failed drive. See “Replacing a Drive Module” on page 135. If the disk array had more than one physical drive, delete the disk array and re-create it. -
Page 152: Incomplete Array
Pegasus R4i Product Manual Troubleshooting Incomplete Array A more serious, but far less common problem is an Incomplete Array. An incomplete array results from a physical drive that fails or becomes missing during: • RAID level migration • Disk array transport... -
Page 153: Unreadable Disk Warning
Promise Technology Pegasus R4i If you choose NOT to accept the incomplete array: Click Cancel in the incomplete array dialog box. Do one of the following: • • D elete the array. This action deletes all logical drives on the array. • • R eplace the missing physical drive. Unreadable Disk Warning Your Pegasus logical drive displays on the computer’s desktop as a removable-drive icon (right). -
Page 154: Subsystem Problems
Pegasus R4i Product Manual Troubleshooting Subsystem Problems Subsystem problem troubleshooting includes: • “Diagnosing a Subsystem Problem” Diagnosing a Subsystem Problem Check System Status on the Dashboard tab. If a yellow ! or red X appears in the System Status box: Click the name link of the component with the red X icon. - Page 155 Promise Technology Pegasus R4i Performance Monitor The Performance Monitor display can be useful for diagnosing performance issues that will not necessarily trigger any alerts to appear in the System Status display or event logs. You can use it for testing performance of different drive types.
- Page 156 The information below is required for troubleshooting. Please register this information or have it readily available at the time of your support call • Serial number - Located on label toward rear of Pegasus chassis • Config Logs. Please refer http://kb.promise.com/cat/Pegasus R4i-series/ for instruction on acquiring Config Logs. imitAtionS RMAs issued before 12:00 noon PST M-F can be shipped out on same day.
- Page 157 Promise Technology Pegasus R4i United States 3241 Keller St. Santa Clara CA. 95054 Technical Support (E-Support): https://support.promise.com Web Site: http://www.promise.com Australia Technical Support (E-Support): https://support.promise.com Web Site: http://www.promise.com EMEA Netherlands Science Park Eindhoven 5228 5692 EG Son, The Netherlands Technical Support (E-Support): https://support.promise.com Web Site: http://www.promise.com...
- Page 158 Pegasus R4i Product Manual Troubleshooting Norway ITF Technical Support (E-Support): https://support.promise.com Web Site: http://www.promise.com Belguim Technical Support (E-Support): https://support.promise.com Web Site: http://www.promise.com Luxembourg Technical Support (E-Support): https://support.promise.com Web Site: http://www.promise.com United Kingdom Technical Support (E-Support): https://support.promise.com Web Site: http://www.promise.com Taiwan Technical Support (E-Support): https://support.promise.com...
- Page 159 Promise Technology Pegasus R4i Korea Technical Support (E-Support): https://support.promise.com Web Site: http://www.promise.com Hong Kong Technical Support (E-Support): https://support.promise.com Web Site: http://www.promise.com Singapore Technical Support (E-Support): https://support.promise.com Web Site: http://www.promise.com Japan 3F, Mura Matsu Bldg, 3-8-5, Hongo Bunkyo-ku Tokyo 113-0033, Japan Technical Support (E-Support): https://support.promise.com...
- Page 160 Troubleshooting imited arranty PROMISE Technology, Inc. (“PROMISE”) warrants that this product, from the time of the delivery of the product to the original end user: a) all components for a period of three (3) years; b) will conform to Promise’s specifications;...
- Page 161 Promise Technology Pegasus R4i iSclAimer of other wArrAntieS This warranty covers only parts and labor, and excludes coverage on software items as expressly set above. Except as expressly set forth above, Promise disclaims any warranties, expressed or implied, by statute or otherwise, regarding the product, including, without limitation, any warranties for fitness for any purpose, quality, merchantability, non-infringement, or otherwise.
- Page 162 Pegasus R4i Product Manual Troubleshooting eSPonSiBilitieS You are responsible for determining whether the product is appropriate for your use and will interface with your equipment without malfunction or damage. You are also responsible for backing up your data before installing any product and for regularly backing up your data after installing the product. Promise is not liable for any damage to equipment or data loss resulting from the use of any product.
- Page 163 Promise Technology Pegasus R4i Return ONLY the specific product covered by the warranty. Do not ship cables, manuals, CDs, etc. USA and Promise Technology, Inc. Canada: Customer Service Dept. Attn.: RMA # ______ 47654 Kato Road Fremont, CA 94538 Asia-Pacific:...
Need help?
Do you have a question about the Pegasus R4i and is the answer not in the manual?
Questions and answers