Advertisement
Advertisement

Summary of Contents for Tosot SMART Series
- Page 1 USER MANUAL SMART SERIES Willis Inc.
-
Page 2: Table Of Contents
Table des matières Declaration of Conformity ......3 Specifications ..........4 Precautions ........... 5 Technical solution ......... 6 Operation instruction ........8 User registration ......... 12 Network configuration ......... 14 Page 2 sur 18... -
Page 3: Declaration Of Conformity
Declaration of Conformity Hereby, we declare that this AC is in compliance with the essential requirements and other relevant provisions of Directive 1999/5/EC. The declaration of conformity may be consulted with sales agent. Page 3 sur 18... -
Page 4: Specifications
Specifications Model: OSK102 Standard: IEEE 802.11b/g/n Antenna Type: External omnidirectional Antenna Frequency: WIFI 2.4G Maximum Transmitted Power: 15dBm Max Dimension: 55*24*8(mm) Operation Temperature: 0 ° C~45 ° C/32 ° F~113 ° F. Operation Humidity: 10%~85% Power Input: DC 5V/300mA Page 4 sur 18... -
Page 5: Precautions
Precautions • Applicable system: IOS, Android. (Suggest: IOS 7.0 or later Android 4.0 or later) Please check the service website for more applicable devices. • Disclaimer: Due to the special situation existed during App use, we explicitly claim as bellow: Not all of the Android and IOS systems are compatible with the APP. -
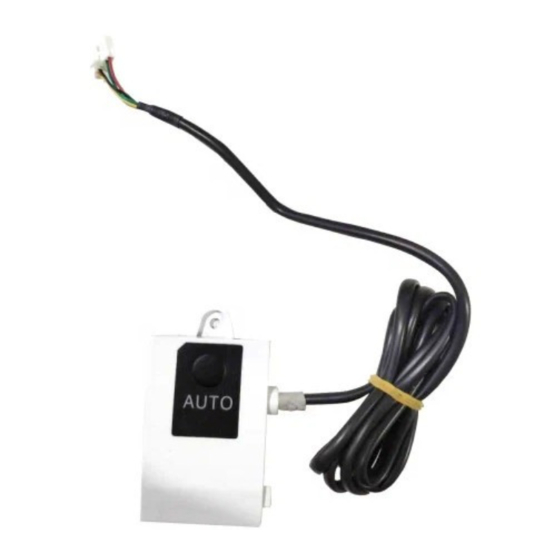
Page 6: Technical Solution
Technical solution 1.WIFI Router Home Control Mode. A WIFI router is needed at this mode. Smart phone and connect to the AC through the WIFI router conditioner. 1. Smart Phone 2. Smart Air conditioner 3. WIFI Router Page 6 sur 18... - Page 7 2. How to install the smart kit 1. Remove the protective cap of the smart kit 2. Open the front panel and insert the smart kit into the reserved port 3. Attach the QR code packed with SMART KIT to the side panel of the machine, ensure it is convenience to be scanned by a mobile phone.
-
Page 8: Operation Instruction
Operation instruction 1. Download the “Nethome plus” App NetHome Plus Iphone Users: Scan QR Code or go to App Store and click on the link below (or search for NetHome Plus app on the App Store) and download it. Page 8 sur 18... - Page 9 • QR CODE • APP STORE https://itunes.apple.com/us/app/nethome- plus/id1008001920?mt=8 Android users: Scan QR Code or go to App Store and click on the link below (or search for NetHome Plus app on Google Play Store) and download it. Page 9 sur 18...
- Page 10 • QR CODE • PLAY STORE https://play.google.com/store/apps/details?id=com.midea .aircondition&hl=fr Page 10 sur 18...
- Page 11 2. Set your air conditioner to AP mode The procedure includes the following steps: 1. Disconnect the power supply of AC 2. Connect the power supply 3. Continuously press the « LED » button of your remote control 4. Once your air conditioner displays « AP », that’s mean the configuration is OK Kindly reminder •...
-
Page 12: User Registration
User registration Please ensure your mobile device is connected to Wi-Fi router. Also, the Wi-Fi router has already connected to Internet before doing user registration and network configuration. 1. Click on « Create Account » 2. Enter your email address and password, and then click Registration. - Page 13 Caution : • It is necessary to forget any other around network and make sure the Android or IOS device just connect to the WIFI network you want to configure. • Make sure the Android or IOS device WIFI function works well and can be connected back to your original WIFI network automatically.
-
Page 14: Network Configuration
Network configuration ‣ Android device • Press « add device » • Scan the « QR code » you add on your AC Page 14 sur 18... - Page 15 • Select your own Wi-Fi network, for example My Home (the picture is only for reference) • Enter your own « Wi-Fi router password » and click « OK » • Configuration Success, you can see the device on the list. Page 15 sur 18...
- Page 16 ‣ IOS device • Press on « add device » • Scan the « QR code » you add on your AC • Read the instruction above and press the “home” button of your phone to return to the device interface Page 16 sur 18...
- Page 17 • Click « setting » to enter the setting page select WLAN/WIFI • Choose « net_ac_XXXX » Page 17 sur 18...
- Page 18 • Type default password: « 12345678 » and click « Join » • Return to « APP » and click « Next » • Select your own Wi-Fi network, for example My Home (the picture is only for reference) • Enter your own Wi-Fi router password and click «...
Need help?
Do you have a question about the SMART Series and is the answer not in the manual?
Questions and answers