Advertisement
Dear User,
Thank you very much for choosing LAISAI LS526/LSG526 rotary laser, please read this instruction manual before
operating it.
1. Features and functions
2. User safety
6. Application demonstration
1. Features and functions
LS526 (red laser)/LSG526 (green laser) full automatic rotating laser can project self-leveling horizontal laser plane and
plumb up line, and vertical laser plane and horizontal line. It supplies accurate horizontal reference for working
construction lay out and calibration indoor and outdoor. It is convenient for operation and widely used.
Features:
※ Electronic auto-leveling, when beyond the range, the instrument stops rotating and sound indication.
※360° rotary laser, able to work horizontally and vertically
※ Able to set different rotation speed and area scanning angle
※ Able to unbalance alarm in TILT mode. The instrument stops rotating when knocked, in order to make sure work
accurately.
※ Slope mode function could set single axis or double axis slope
※ Accuracy self-calibration function
※ Timing power-off function
※ Remote operation function
※ Able to connect with tripod through 5/8'' thread.
※ Rainproof and dustproof
2. User safety
※ Laser output sign lies near the output aperture.
※ Do not stare into laser beam directly.
※ Do not disassemble the instrument or attempt to perform any internal servicing. Repairs and servicing could be
performed only by authorized service centers.
※ The instrument complies with the safety classification standards of laser radiation.
Content
Advertisement
Table of Contents

Related Manuals for LAISAI LS526


Summary of Contents for LAISAI LS526
-
Page 1: Table Of Contents
Dear User, Thank you very much for choosing LAISAI LS526/LSG526 rotary laser, please read this instruction manual before operating it. Content 1. Features and functions 2. User safety 3. Nomenclature 4. Operation instruction 5. Self-check and calibration 6. Application demonstration 7. -
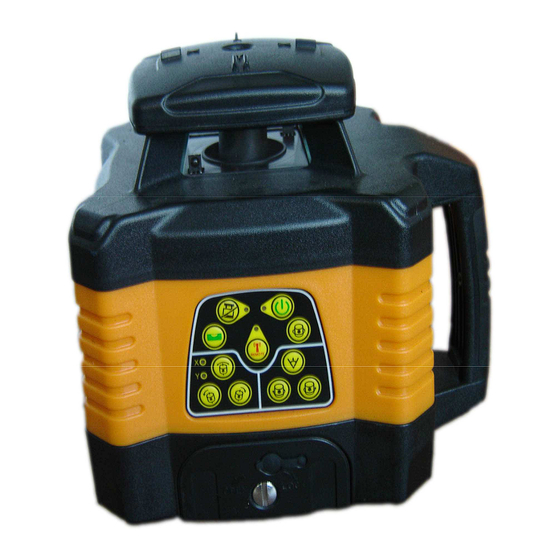
Page 2: Nomenclature
3. Instrument nomenclature Laser output window Rotary head Remote receiving tube Hand wheel Operation keypad Battery cover screw Battery cover Side 5/8″ screw thread Central 5/8″screw thread 4. Operation instruction 4.1 Battery mount a) Mount 3*C alkaline batteries into battery box according to polarity direction, then fix the battery box on the instrument. b) Fix the rechargeable battery on the instrument 4.2 Charging to rechargeable battery... - Page 3 Insert the charger into charging jack, then the rechargeable battery in charging. The indication light is red when it is in charging, it turns green when the battery is in full. Charging status LED Charging directly to rechargeable battery box directly: Charging to the rechargeable battery on the instrument: Note: a) When the power LED is flashing, the battery is in low voltage.
- Page 4 。 Place the instrument transversely: a) Able to place the instrument on the horizontal platform b) Set on the tripod with side 5/8’’ screw thread 4.4 Instrument operation keypad Remote status LED Power LED TILT mode LED TILT mode key On/off key Self-leveling key Rotation speed set key...
- Page 5 Power LED: Lighted LED means power-on Extinguished LED means power-off Flashing LED means low battery voltage TILT mode LED: Flashing slowly (1Hz): The instrument enter into TILT preparation status Lighted constantly: The status of TILT function become effective Flashing quickly: The instrument is in TILT alarming status Extinguished: The instrument exit from TILT status Slope axis LED: Both X and Y LEDs, the LEDs are on means this axis is in the slope set status.
- Page 6 4.10 Slope function key a) Place the instrument horizontally Press slope function key, the instrument enter into double axis slope, the default is X axis slope, X LED is on, Y axis is not leveling, press slope left/right moving key could make slope adjustment, short press slope function key could switch X/Y direction, long press to exit slope function.
-
Page 7: Self-Check And Calibration
the instrument will power off automatically. The function of the rotation speed switch key, self-leveling key, area scanning function key and slope function key on the remote control is same with the instrument. 5. Self-check and Calibration The instrument must be self-checked after service for a certain time or before operation in a major project. If the accuracy is found beyond tolerance, user makes some adjustment according to methods as follows. - Page 8 (H=H1-H2+h/2),and mark O’the highest dot among A, B, C and D. to measure H value, it is the reference dot of placing the instrument transversely. (5)Measure h’ from E to O’, if h'≤6mm, the instrument accuracy is qualified. If 6mm<h'≤30mm, the instrument accuracy is out of tolerance, if h'>30mm, the instrument accuracy is out of tolerance, please contact the distributor.
-
Page 9: Technical Specification
6. Instrument application 7. Technical specification Item Parameter Laser wavelength LS526: 635nm LSG526: 532nm Laser class ClassⅡ/Ⅲ Output range LS526: 600m LSG526: 400m Rotating speed 600 rpm Area scanning angle Big area scanning/small area scanning/dot Accuracy ±0.75mm/10m Leveling range ±5°... -
Page 10: Maintenance
Power 3*C alkaline battery or NI-MH battery box or Li battery box Low battery indication Power LED flash Size 212mm×168mm×208mm Weight 2.1Kg 8. Maintenance ※ The instrument should be carefully operated and properly preserved, and any violent shock or falling will possibly result in the damage of instrument.
Need help?
Do you have a question about the LS526 and is the answer not in the manual?
Questions and answers