Advertisement
Quick Links
Operating Instructions • Warning Information • Parts Break down
WARNING
• Always read instruction manual carefully
before use.
• Always wear safety goggles
(User and bystanders).
• Always wear hearing protection
(User and bystanders).
• Avoid prolonged exposure to vibration.
• Always disconnect air supply before proceeding
with any assembly or disassembly procedures.
• Do not exceed 100 psi max. air pressure.
• Inspect hydraulic section prior to use.
Do not use if cracked.
• Always follow proper maintenance procedures.
• Keep exhaust port pointed away from face.
Some dust created by power sanding, sawing, grinding,
drilling, and other construction activities contains chemicals
known to cause cancer, birth defects or other reproductive
harm. Some examples of these chemicals are:
• lead from lead-based paints,
• crystalline silica from bricks and cement
and other masonry products, and
• arsenic and chromium from
chemically-treated lumber.
Your risk from these exposures varies, depending on how
often you do this type of work. To reduce your exposure to
these chemicals: work in a well ventilated area, and work with
approved safety equipment, such as those dust masks that are
specially designed to filter out microscopic particles.
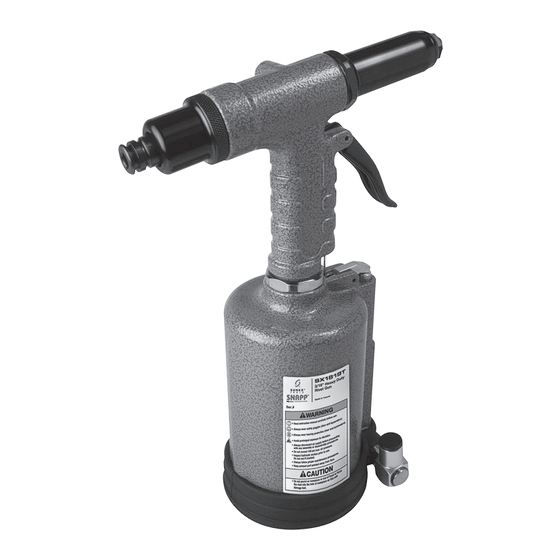
SPECIFICATIONS
Rivet Capacity ..............................1/4"
Traction Power................ 3,960 ft. lbs.
Air Pressure ....................... 70-100 psi
Stroke Length ...............................3/4"
SX1819T: Parts Breakdown & Operating Manual
WARNING
Height .................................... 12-9/16"
Weight ...................................... 5.5 lbs
Minimum Hose Size ..............3/8" I.D.
Air Inlet ................................. 1/4" NPT
SX1819T
1/4" HEAVY
DUTY RIVET
GUN
04/19/10
Advertisement

Related Manuals for Sunex Tools SNAPP SX1819T


Summary of Contents for Sunex Tools SNAPP SX1819T
- Page 1 Operating Instructions • Warning Information • Parts Break down WARNING • Always read instruction manual carefully before use. • Always wear safety goggles (User and bystanders). • Always wear hearing protection (User and bystanders). • Avoid prolonged exposure to vibration. • Always disconnect air supply before proceeding with any assembly or disassembly procedures. • Do not exceed 100 psi max. air pressure. • Inspect hydraulic section prior to use. Do not use if cracked. • Always follow proper maintenance procedures. • Keep exhaust port pointed away from face. WARNING Some dust created by power sanding, sawing, grinding, drilling, and other construction activities contains chemicals known to cause cancer, birth defects or other reproductive harm. Some examples of these chemicals are: • lead from lead-based paints, •...
- Page 2 WARNING! WARNING FAILURE TO OBSERVE THESE WARNINGS COULD RESULT IN INJURY. This Instruction Manual Contains • Slipping, tripping and/or falling while Important Safety Information. operating air tools can be a major cause of serious injury or death. Be aware of Read THIS INSTRUCTION...
- Page 3 SX1819T 1/4" HEAVY DUTY RIVET GUN 14A 10A 2 3 2 REF. PART REF. PART REF. PART DESCRIPTION QTY. DESCRIPTION QTY. DESCRIPTION QTY. RS819101 Hydraulic Section 16 RS721401 Air Cylinder Body 28B RS618605 Brass Collar 1A RS819108 Plunger Rod Guide 17 RS918109 Lock Nut 28C RSOR0914 O-Ring 1D RSOR1823 O-Ring...
- Page 4 Operating Instructions • Warning Information • Parts Break down 3. Jaw Opening adjustment: To obtain the maximum stroke of the tool, proper distance setting between the jaw housing and the head is very important. First loosen the lock nut. A rivet is then inserted into the nosepiece which should be selected to match the rivet size to be set. While screwing or unscrewing the head to achieve the minimum opening of the jaws, check if the rivet mandrel can be removed and inserted freely. Fasten the lock nut after the adjustment.
Need help?
Do you have a question about the SNAPP SX1819T and is the answer not in the manual?
Questions and answers