
Summary of Contents for Space ULTRA plus
- Page 1 HANDHELD COMBO METER WITH INTEGRATED FIBRE OPTIC POWER METER HELPLINE 0861 40 41 42 • WWW.SPACETV.CO.ZA ULTRA+ Combo Meter - User Manual...
-
Page 2: Table Of Contents
CONTENTS: 1. MAIN FEATURES 7. DVB-C 2. BUTTONS AND INDICATORS 7.1 CABLE MEASURE 3. HOW TO MEASURE 7.2 AUTO SCAN 4. HOME MENU 7.3 RF CHANNEL LIST 5. DVB-S/S2 7.4 TILT 5.1 SATELLITE FINDER 7.5 SPECTRUM CHART 5.1.1 ZOOM 7.6 TRUNK VOLTAGE 5.1.3 TP CONTROL 8. -
Page 3: Main Features
Thank you for purchasing this product. For optimum performance and safety, please read these instructions carefully before connecting, operating or adjusting this product. Please keep this manual for future reference. 1. MAIN FEATURES • Support DVBS/DVBS2/DVBT/DVBT2/DVBC/ • Power, CNR, CBER, VBER(DVBS), DVBC2/MCNS/ OPTICAL LBER(DVBS2) Modulation mode display. - Page 4 HELPLINE 0861 40 41 42 • www.spacetv.co.za...
-
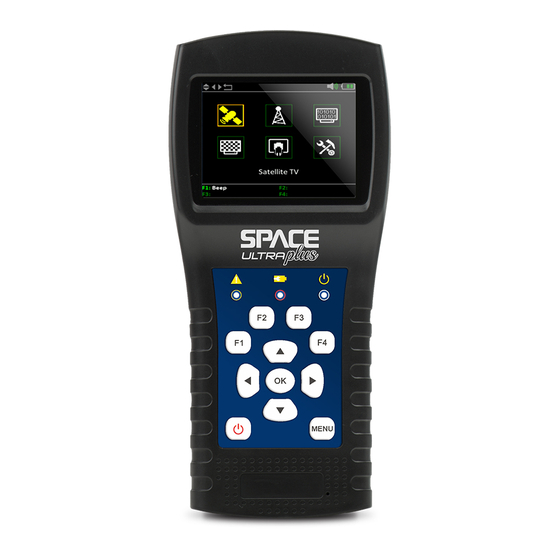
Page 5: Buttons And Indicators
2. BUTTONS AND INDICATORS LNB Input: Navigation Keys: Signal input port for DVB-S. Connects : Move focus or change value. : Move focus or change value directly to LNB using coaxial cable. Antenna Input: Signal input port for DVB-T and DVB-C and 1. -
Page 6: How To Measure
3. HOW TO MEASURE A SIGNAL Power on the meter, select the system to measure or select system setting to set parameters for the meter in the HOME menu. In all menus, press [/] button to navigate, press [/] button to change the value of highlighted item, press [OK] button to confirm your selection, edit value or enter a list to select a desired item, press [MENU] button to enter or exit menu selection. -
Page 7: Home Menu
4. HOME MENU The meter will enter this menu first when powered on. Press [/] to switch between icons or [OK] to enter submenus. DVB-S/S2: Submenu for DVB-S/S2 system. DVB-T/T2/ISDBT: Submenu for DVB-T/T2/ISDBT system. DVB-C/C2/MCNS: Submenu for DVB-C/C2/MCNS system. Analogue TV: Submenu for analogue TV system. -
Page 8: Zoom
5.1 SATELLITE FINDER cont. • CBER: The BER before FEC value of • 22K: The 22k output status signal. • 13V: The 13V antenna power • VBER: The BER before viterbi value supply status of signal. • 18V: The 18V antenna power • Str: The strength of signal. -
Page 9: Auto Diseqc
5.1.4 AUTO DISEQC Press F4 to enter into DiSEqC 1.0 detection menu as below. 5.2 LNB SETTING All the LNB parameters are set in this menu. Such as LNB type, LNB power, 22k, Diseqc type and motor type. • Astra 19E: The current satellite. Press [/] to switch between satellites and press [OK] to enter satellite list to select satellite. - Page 10 5.2.1 Diseqc 1.2 Setting: Press [OK] to enter Diseqc 1.2 setting menu on Position Type if the type sets to Diseqc 1.2 • Move single step: Move the motor by step. Press [/] to move to west or east • Move incrimentaly: To move the motor incrimentaly.
-
Page 11: Edit Satellite
5.3 EDIT SATELLITE The parameters of satellite, such as Orbital Position and Transponders can be edited in this menu. All the satellites will be listed in this menu. Press [/] buttons to move cursor in list. Press [F2] to edit the name or the orbital position of current satellite in the menu. -
Page 12: Angle Calculation
5.4. SPECTRUM CHART cont. • 22K: Show the RF 22k status. The 22K is on if the icon is green. • 13V: Show the RF power output 13V status. The 13v output is on if the icon is green. • 18V: Show the RF power output 18V status. The 18v output is on if the icon is green. • 40~50~60: The range of power level. - Page 13 5.5 ANGLE CALCULATION cont. • 010.1°E: The location of local area • 50.2°N: The hemisphere of local area • 31.8°: The elevation calculated by meter • 168.2°: The azimuth calculated by meter • 07.5°: The polarization of the LNB • Select Align and press [OK] to enter the alignment menu.
-
Page 14: Diseqc Monitor
5.5 ANGLE CALCULATION cont. Select Compass and press [OK] to go to compass submenu. And the menu as bellowing figure. 5.6 DISEQC MONITOR Connect your meter to STB (DVB-S/S2 receiver), to the LNB input port. The meter analyse all input commands for DiSEqC, it will also show the power supply and 22K status. • Pow: The power supply of the input cable line. -
Page 15: Dvbt/T2/Isdbt
6. DVBT/T2/ISDBT User can measure the live DVB-T/T2 signal, analyze the spectrum, the scope between transponders, auto scan all the saved frequencies and list all the locked ones. There are six submenus: Measure, Auto Scan, RF Channel List , Scope, Spectrum chart and ANT power. 6. -
Page 16: Auto Scan
6.2 AUTO SCAN The meter will scan all the saved frequencies and show the lock status one by one and will then return to the main menu once scanning is finished. Press [MENU] to abort a scan in progress and return to the main menu. 6.3 RF CHANNEL LIST This menu shows all the locked frequencies during Auto Scan. -
Page 17: Dvb-C
7. DVB-C User can measure DVB-C signal in this submenu. There are total six submenus: Cable Measure, Auto scan, RF channel list, Tilt , Spectrum chart and Trunk voltage. 7.1 CABLE MEASURE User can read SNR, BER, PER, level, strength and quality of the live signal. -
Page 18: Rf Channel List
7.3 RF CHANNEL LIST This menu shows all the locked frequencies during Auto Scan. 7.4 TILT This menu shows tilt of three channels` power level. • C16,C17, C18: The channel number. Press [/] to switch between them. Press [/] to change the channel number and press [OK] to display the channel list to select a frequency. -
Page 19: Trunk Voltage
7.6 TRUNK VOLTAGE This menu measures the trunk voltage. Press [OK] to switch alternating current and direct current. 8. ANALOGUE TV User can measure analogue TV signal in this submenu. There are total three submenus: Measure, Tilt and Spectrum chart. 8.1 MEASURE User can read SNR, Video and audio ratio, level, strength and quality of the analogue TV signal in this menu. -
Page 20: Tilt
8.2 TILT Please refer to 7.4 8.3 SPECTRUM Please refer to 7.5 9. OPTICAL POWER This menu measures the optical fiber input. Press [/] to switch wavelength between 850, 980, 1300, 1310, 1490, 1550 and 1610. Press [OK] to record current testing value. -
Page 21: Accessories
11. ACCESSORIES Power adapter, 2 RF connectors, User Manual 12. TROUBLE SHOOTING 1. Unable to switch on: Charge the meter for 3 hours until the charge light turns blue. 2. Warning LED flashing: Antenna overload, power off the meter and check the signal cable for a short circuit. -
Page 22: Technical Specification
13. TECHNICAL SPECIFICATION DVB-T CBER (before Viterbi): 1E-7 – 1E-3 Bit Error Rate (BER) VBER (before Reed Solomon): 1E-7 – 1E-3 Frequency range 42-1005MHz Power level 30-100 dBμV, +/-2dB 5 - 35dB, +/-0.5dB Bandwidth 6MHz, 7 MHz, 8 MHz FFT type 2k, 8k Constellation QPSK, 16QAM, 64QAM... - Page 23 MCNS J83B BER (before Reed Solomon): 1E-7 – 1E-3 Bit Error Rate (BER) PER (Packet Error Rate): 1E-6 – 1E-2 Frequency range 42-1005MHz Power level 35-100 dBμV, +/-2dB 20 - 40dB, +/-0.5dB Symbol Rate 5.6 Msym/s Constellation 16QAM, 32QAM, 64QAM, 128QAM, 256QAM Spectrum inversion auto DVB-C2...
- Page 24 DVB-S2 CBER (before LDPC): 1E-7 – 1E-3 Bit Error Rate (BER) LBER (before BCH): 1E-9 – 1E-5 Frequency range 950-2150MHz Power level 35-100 dBμV, +/-3dB 0 - 20dB, +/-0.5dB Symbol rate 333 Ksym/s to 45 Msym/s Constellation QPSK, 8PSK, 16APSK, 32APSK Viterbi rate 2/5, 1/2, 3/5, 2/3, 3/4, 5/6, 8/9, 9/10 Spectrum inversion...
Need help?
Do you have a question about the ULTRA plus and is the answer not in the manual?
Questions and answers