
Summary of Contents for Garlando G.1000
- Page 2 2. Clean your table periodically. You can use any household detergent which does not contain wax or abrasives, to wipe it using a damp cloth. Garlando roller bearings do not normally require any lubrication. However, should you wish to furtherly improve their smoothness, only employ a good quality silicone spray.
- Page 3 2. Reinigen Sie Ihren Fußballtisch regelmäßig. Sie können ihn mit einem feuchten Tuch und einem Haushaltsputzmittel reinigen, welches kein Wachs enthält und nicht agressiv ist. Garlando Kugellager müssen normalerweise nicht geölt werden. Möchten Sie zusätzlich ihre Gleitfähigkeit verbessern, dann benutzen Sie nur ein gutes Selikonspray. Bitte seien Sie vorsichtig.
- Page 4 Vi consigliamo di usare soltanto uno spray al silicone di buona qualità. E’ preferibile non usare grassi vegetali o minerali, che potrebbero attirare lo sporco e intasare i cuscinetti a sfera. La ditta Garlando declina ogni responsabilità in caso di danni derivanti dalla mancata osservanza delle istruzioni.
- Page 5 Like many things of beauty IMPORTANT: Once your Garlando G-1000 football assembled your table is quite table requires a little care and wide and may not fit through attention. Before you start your doors. For this reason spend 10 minutes...
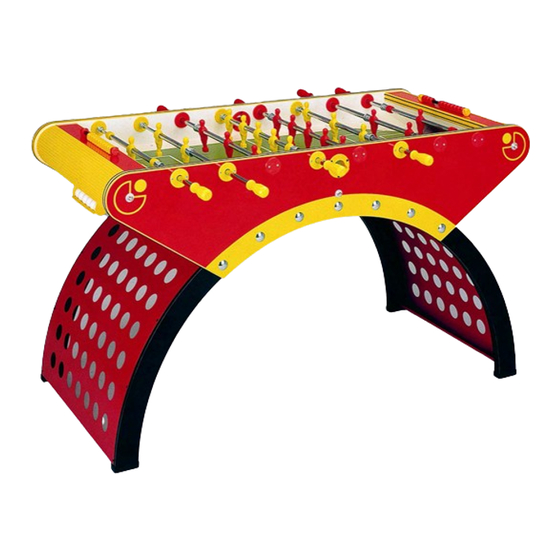
- Page 6 Page 2: This shows you what your completed G-1000 table will look like.
- Page 7 Page 3: This shows the sticking of the yellow edging and logos to the sides of the table. TIP: Position and line up all the stickers before removing the backing to make sure you have them in the correct order.
- Page 8 PAGE 4: This shows lining up the playing field to the yellow curved end pieces. NOTE: The playing field is upside down in the diagram - the pitch is facing the floor.
- Page 9 PAGE 5: This covers screwing the playing field to the yellow curved end pieces. NOTE: The tools shown in the bottom right hand corner are all different types of screwdriver. DO NOT use a drill for assembly under any circumstances.
- Page 10 PAGES 6 & 7: These cover passing the metal threaded cross rods through one side piece of the table. NOTE: Use a washer and capped nut on the outside (logo side).
- Page 11 PAGES 6 & 7: These cover passing the metal threaded cross rods through one side piece of the table. NOTE: Use a washer and capped nut on the outside (logo side).
- Page 12 Two people PAGES 8 & are required 9: These to lift and line cover lining up the up and fixing playing field, the sides to as you must the playing lower it down field. over the metal rods. NOTE: Do Remember to this with the use the...
- Page 13 Two people PAGES 8 & are required 9: These to lift and line cover lining up the up and fixing playing field, the sides to as you must the playing lower it down field. over the metal rods. NOTE: Do Remember to this with the use the...
- Page 14 PAGE 10: This covers fitting the middle metal cross rod and levelling the pitch with the small wedges. NOTE: The table is now upside down with the playing field facing the floor. You do not have to fit the 6 small wedges if you are worried about hitting nails. If you do fit them be very careful and do not hit the nails too hard or all the way in.
- Page 15 PAGE 11: This covers fitting the four black curved legs to the body of the table and the screwing of the yellow curved end pieces to the wooden battens on the inside of the red side pieces. NOTE: The small screws on each of the four curved legs are to help you line the legs up in the correct positions.
- Page 16 PAGE 12: This covers fixing the red metal leg braces to the curved legs with screws. NOTE: You must fix the screws in the order shown in the diagram (1 first to 3 last).
- Page 17 PAGE 13: This covers fixing the black wooden end panels and ball holders behind each goal. TIP: Make sure you fit the ball holders the right way up other all the balls will fall on the floor each time a goal is scored ! NOTE: You should now turn the table the right way up.
- Page 18 PAGE 14: This covers fixing the plastic sloping side and corner pieces to the edges of the playing field. TIP: Place all the pieces in position before you start fixing with screws. This will avoid any overlapping or bad joins.
- Page 19 PAGE 15: This covers fitting the score counters and ball entry ' shutes' to the table. TIP: You may want to think about which colours you want where for the most pleasing finish.
- Page 20 PAGE 16: This covers fitting the bars to the table and the handles to the bars. NOTE: Make sure you put bars in the right places. We recommend that you put all the bars in place before you start fixing them to ensure you have it right. Do not forget to fit the black nylon bushes where the handle end passes through the table.
Need help?
Do you have a question about the G.1000 and is the answer not in the manual?
Questions and answers