Table of Contents
Advertisement
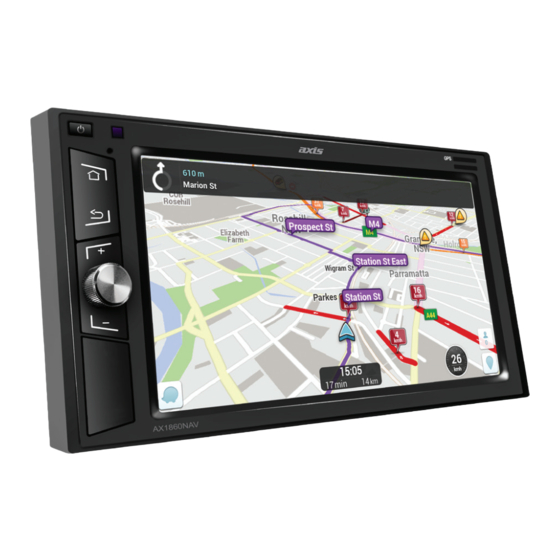
AX1860NAV
12/24V 6.2" ANDROID MULTIMEDIA RECEIVER
SPECIFICATIONS
GENERAL
- 6.2" Capacitive Touch LCD
- Android 8.1.0 OS
- Cortex A7 Quad Core T3 1.2Ghz
- 1GB DDR3 RAM
- 32GB Flash
- Steering Wheel Control (Programmable)
- 11-28V DC Voltage Range
- -20° to +60°C Operating Temp
- 170W x 97Hmm Nose
- 178W x 103H x 98Dmm Overall
AUDIO
- 4 x 45W Max Power (24V)
- 7 x EQ Presets
- 1 x Custom 12 Band EQ with Q Value Adjust
- Subwoofer Control: 80/120/160Hz Level Adust
- Loud/Mute
- 2 x RCA Pre-out
- 1 x Sub RCA Pre-out
TUNER
- Elite RDS AM/FM
- FM 87.5-108MHz; AM522-1710KHz
- 30 Presets (18 FM/12 AM)
INSTRUCTION MANUAL
MULTIMEDIA
- Built-in WiFi
- Included Apps: Spotify, Chrome, Waze, Google Maps, YouTube
- Mirror Link: Android Display & 2-Way Control via USB
Apple & Android Display only via WiFi
- 32GB Internal Storage
- Supports External Hard Disk up to 1TB
- 3 x USB (2 x Rear, 1 Front)
- 1 x Micro SD Map Slot (Front)
- 1 x AUX Input (Front)
- 1 x A/V Input (Rear)
- 2 x Camera Input (Selectable)
- 1 x Video Output
- Audio Formats: MP3, WMA, AAC, WAV, OGG, FLAC, AC3
- Video Formats: 1080p, DivX, RMVB, MP4
- Image Formats: JPEG, BMP, GIF, PNG
NAVIGATION
- Includes: WAZE Navigation App, GOOGLE maps App
- Optional: iGo Primo Mapping, HEMA Explorer App
BLUETOOTH
- A2DP Audio Streaming
- Phonebook & Search
- External Mic
2
1
INCLUDED
- GPS Antenna
- ISO Wiring Harness
- Installation L Brackets
- 2 Year Warranty
YEAR WARRANTY
Advertisement
Table of Contents

Summary of Contents for Audioxtra axis AX1860NAV
- Page 1 INSTRUCTION MANUAL AX1860NAV 12/24V 6.2” ANDROID MULTIMEDIA RECEIVER SPECIFICATIONS GENERAL MULTIMEDIA - 6.2” Capacitive Touch LCD - Built-in WiFi - Android 8.1.0 OS - Included Apps: Spotify, Chrome, Waze, Google Maps, YouTube - Cortex A7 Quad Core T3 1.2Ghz - Mirror Link: Android Display & 2-Way Control via USB - 1GB DDR3 RAM Apple &...
-
Page 2: Table Of Contents
CONTENTS User Manual Instructions ..................3 Cleaning the Unit ....................4 Panel Introduction ....................4 Main Screen Interface ....................5 Home Page Functions 1: ..................6 Radio Function .....................6 Bluetooth Phone ...................7 Bluetooth Music ....................8 Waze Navigation App ...................8 Waze Navigation Setup ................8 Navi .......................9 Music Function ....................9 Phone Mirroring Function ................9 Phone Mirroring Setup .................9... -
Page 3: User Manual Instructions
User Manual Instructions • Illustrations are used in this manual to explain operations and precautions. • The illustrations used in this manual are only for reference. • If the manual differs to the unit, it could be a result of factory improvements and updates. -
Page 4: Cleaning The Unit
Cleaning the Unit • If there is any dirt or marks on the front panel, clean the panel using a dry, soft cloth. • If the panel is very dirty, clean the panel with mild detergent and then wipe the detergent with a clean soft cloth. -
Page 5: Main Screen Interface
Main Screen Interface After the unit is turned on, the system will enter Radio mode by default. Press the HOME icon to enter the Home Page. 1. Press the Home icon to go back to the home page. 2. Slide down here to reveal the Settings Icon, System Info & SD Card status. Press the down arrow (V) to access Wi-Fi settings, Hot Spot On/Off, Screen Shot, Clean Memory. -
Page 6: Home Page Functions 1
Functions - Home Page 1 Radio Function Operation Tap the Radio icon on the Home Page to enter the radio interface. Radio Band Select Tap the AM or FM icon to switch the radio bands: FM1/FM2/FM3/AM1/AM2. Tune and Seek • Press the icon I◄ and ►I to tune freqency step by step. •... -
Page 7: Bluetooth Phone
Bluetooth Phone 【Common function interface】 Tap the Phone icon on the Home Page to enter the phone interface. Registering y y o o u u r r B B l l u u e e t t o o o o t t h h d d e e v v i i c c e e 1. -
Page 8: Bluetooth Music
Bluetooth Music Tap the BT Music icon on the Home Page to enter the BT audio interface. Unit will automaticlly start playing music from the paired device. Tune and Seek • Press the icon I◄ and ►I to skip forward or back track. •... -
Page 9: Navi
Navi Tap the Navi icon on the Home Page to activate Google Maps. *NOTE: The unit will need to be hot spotted to a Wi-Fi device or Smart Phone. Music Function Tap the Music icon on the Home Page to enter the music stored. •... -
Page 10: Spotify
Spotify Tap the Spotify icon on the Home Page to listen to your favourite music. *NOTE: The unit will need to be hot spotted to a WiFi device or Smart Phone. Chrome Tap the Chrome icon to search the internet. *NOTE: The unit will need to be hot spotted to a Wi-Fi device or Smart Phone. -
Page 11: Equalizer
Equalizer Tap the EQ icon to set audio preferences. EQ ICON SETTINGS: • EQ Presets: Flat, Pop, Easy, Rock, Classic, Jazz. • EQ User: Touch desired level of each selected frequency. Unit will display the frequency adjusted and the level adjusted to. •... -
Page 12: Swc
Functions - Home Page 3 Image Tap the Image icon to view images stored in the unit’s memory. Logo Select Tap the Logo Select icon to select a logo stored in the unit’s memory (not included) to appear on the start up screen. Tap the SWC icon to program steering wheel functions into the unit. -
Page 13: Swc Questions
SWC Questions If this unit is only compatible with anaologue SWC systems, how do I tell if the vehicle has an analogue or digital system? Test 1 - Without the radio SWC wires connected. With an Ohm meter, probe the SWC positive and SWC negative connection on the vehicle. -
Page 14: Colour Led
All of the SWC buttons were successfully programmed, but 1 or more of the buttons do not work. If 2 or more of the resistors in the steering wheel have resistance values that are too close to one another, the radio may register the different buttons as the same button, overwriting 1 or more of the programmed functions. -
Page 15: Troubleshooting
Troubleshooting Please refer to the troubleshooting issues below: Issue Reason Remedy Replace the fuse with the The fuse is burnt out same value Fails to turn on There is abnormality Disconnect power from within the MPU unit to reset The vehicles battery or Reset and save preferred fuse was replaced settings... -
Page 16: Warranty
AX1860NAV...
Need help?
Do you have a question about the axis AX1860NAV and is the answer not in the manual?
Questions and answers