Table of Contents
Advertisement
Advertisement
Table of Contents

Related Manuals for Dahua DS11

Summary of Contents for Dahua DS11
- Page 1 DS11 Wireless Chime User’s Manual V1.0.0...
-
Page 2: Cybersecurity Recommendations
Cybersecurity Recommendations Mandatory actions to be taken towards cybersecurity 1. Change Passwords and Use Strong Passwords: The number one reason systems get “hacked” is due to having weak or default passwords. It is recommended to change default passwords immediately and choose a strong password whenever possible. - Page 3 someone collecting those passwords and trying them out on your video surveillance system. Using a different username and password for your security system will make it more difficult for someone to guess their way into your system. 9. Limit Features of Guest Accounts: If your system is set up for multiple users, ensure that each user only has rights to features and functions they need to use to perform their job.
-
Page 4: Regulatory Information
Regulatory Information FCC Information CAUTION Changes or modifications not expressly approved by the party responsible for compliance could void the user's authority to operate the equipment. FCC conditions: This device complies with part 15 of the FCC Rules. Operation is subject to the following two conditions: This device may not cause harmful interference. -
Page 5: Foreword
Foreword General This document elaborates introduction, installation, device adding and FAQ of wireless chime. Model DS11 Operation Definition Italic Content Note It represents modifiable parameter name. Specific contents are Device Name different depending on settings. Default device name is its serial Channel Name number and default channel name is Channel 1. - Page 6 rights and interests of other people by implementing measures include but not limited to: providing clear and visible identification to inform data subject the existence of surveillance area and providing related contact. About the Manual The Manual is for reference only. If there is inconsistency between the Manual and the ...
-
Page 7: Important Safeguards And Warnings
Important Safeguards and Warnings The following description is the correct application method of the device. Please read the manual carefully before use, in order to prevent danger and property loss. Strictly conform to the manual during application and keep it properly after reading. Operating Requirement Please don’t place and install the device in an area exposed to direct sunlight or near heat ... -
Page 8: Table Of Contents
Table of Contents Cybersecurity Recommendations ........................I Regulatory Information ............................. III Foreword ................................IV Important Safeguards and Warnings ......................VI 1 Packing List ..............................1 2 Device Introduction ............................2 2.1 Front Panel ..............................2 2.1.1 State Description of Indicator Light .................... 2 2.1.2 Description of Button ........................ -
Page 9: Packing List
Packing List Check whether device appearance shows obvious damages. Check whether all accessories are supplied. Packing list is as follows: Wireless chime User’s manual Installation accessories package Packing List... -
Page 10: Device Introduction
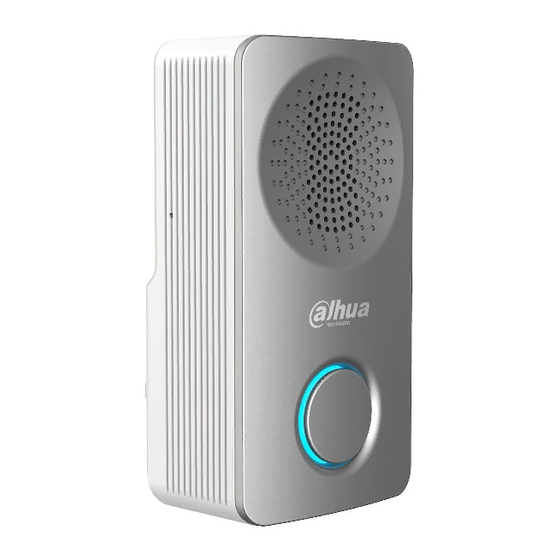
Device Introduction Front Panel Front panel includes loudspeaker, indicator light and call button, as shown in Figure 2-1. Figure 2-1 2.1.1 State Description of Indicator Light State description of indicator light is shown in Table 2-1. State Icon Description Wireless router is not connected; Blue Flashing Cloud service is not connected;... -
Page 11: Rear Panel
Rear Panel Rear panel includes power plug and switch, as shown in Figure 2-2. Power plug of the device varies depending on your local security requirements and relevant standards. Please refer to actual model. Figure 2-2 Side Panel Reset hole on the side panel is used to restore factory defaults, as shown in Figure 2-3. Figure 2-3 Device Introduction... -
Page 12: Get Started
Get Started Download Lechange Client Please ensure that your smartphone has connected with Wi-Fi. Scan QR code below, or search “Lechange” in APP market, download and log onto APP client. For specific operation, please refer to relevant Lechange user’s manual. Figure 3-1 This document takes iOS system as an example and explains operations. - Page 13 Figure 3-2 Connect power socket, and press reset button (pinhole) at the side of the device. If the chime beeps and blue indicator light flashes, it means that the device hotspot has been enabled. Long press the button in the front of the device for 5s, and the hotspot can be enabled too.
- Page 14 Figure 3-3 Connect your smartphone with hotspot. Hotspot Wi-Fi name is Doorbell-device serial number. Figure 3-4 At APP interface, press [Next]. Get Started...
- Page 15 The system displays device password setting interface, as shown in Figure 3-5. If this device is not used for the first time, the interface is to enter device password, rather than setting the password, as shown in Figure 3-6. Figure 3-5 Get Started...
- Page 16 Figure 3-6 Set device password and email, and press [Next]. The system displays available Wi-Fi list, as shown in Figure 3-7. Figure 3-7 Choose the Wi-Fi network to be connected. The system displays Wi-Fi connection interface, as shown in Figure 3-8. Get Started...
- Page 17 Figure 3-8 Input Wi-Fi network password and press [Connect]. The system displays indicator light judgment interface, as shown in Figure 3-9. Figure 3-9 Please check if device indicator light is blue ON. Get Started...
- Page 18 If the blue indicator light doesn’t turn on, press [Add again], repeat above steps to add it again. If blue light turns on, it means that the connection is successful. Press [Yes] to add the device to APP. Start to add the device to APP, as shown in Figure 3-10.
-
Page 19: Link Chime
Figure 3-11 Set “Time Zone” and “DST”. Press [Next] to enter real-time monitoring interface. Set the local time zone and press [Next] to complete adding. Link Chime Link the chime with doorbell. Select “Me > My Device > Device Name > Link Chime” or click in device menu. - Page 20 Figure 3-12 Select “New Link”. The system displays wireless chime list, as shown in Figure 3-13. Figure 3-13 To link wireless chime, select it from the list. Get Started...
-
Page 21: Ring Setup
To link third-party chime, press [Link Third Party Chime], and the system displays chime type selection interface, as shown in Figure 3-14. Select a type, press [OK], and the system will automatically read the connected chime info. Figure 3-14 Press [Save] to complete adding. - Page 22 Figure 3-15 Select “Ring Setup”. The system displays ring list, as shown in Figure 3-16. A, B and C represent ring A, ring B and ring C. Figure 3-16 Get Started...
-
Page 23: Doorbell Call
Select a ring, and press [Save] to complete adding. Doorbell Call When someone presses call button on the doorbell to call, the chime rings and informs about the call. Get Started... -
Page 24: App Operation
APP Operation Modify Device Info Modify device name and channel name; view its SN. Select “Me > My Device > Device Info”. The system displays “Device Info” interface, as shown in Figure 4-1. Figure 4-1 Modify device name or view its QR code. Select “Device Name”... -
Page 25: Volume
Volume Set volume of the chime. Modify device cover, device name and channel name; view device S.N. and set device password. Select “Me > My Device > Device Name > Device Info”. The system displays “Volume” interface, as shown in Figure 4-2. Figure 4-2 Select the volume and press [Save]. -
Page 26: Cloud Update
Figure 4-3 Cloud Update After entering the update interface, update the device to the latest version. Select “Me > My Device > Device Name > Cloud Update”. The system displays “Update” interface, as shown in Figure 4-4. APP Operation... -
Page 27: Wi-Fi Config
Figure 4-4 Press [Update]. Update the device according to interface prompt. The device reboots automatically after successful update. Wi-Fi Config Modify Wi-Fi config of the device, in order to connect with other Wi-Fi networks. Select “Me > My Device > Device Name > Wi-Fi Config”. The system displays “Wi-Fi Config”... - Page 28 Figure 4-5 Select new Wi-Fi and enter the password. Figure 4-6 Press to connect new Wi-Fi network. APP Operation...
-
Page 29: Delete Device
Delete Device Select “Me > My Device > Device Name > Delete Device”, press [Delete], so as to unbind the device. APP Operation... -
Page 30: Faq
Question 1 Q: How to restore factory settings? A: Please press Reset Button on the side panel of the device for 10s. Blue light will be on for 3s and then turn off; the device will reboot automatically and restore factory default settings. Question 2 Q: The device cannot work normally? A: Please restore factory settings, and configure the device again. -
Page 31: Technical Parameter
Technical Parameter Parameter Description Output Built-in loudspeaker, clear ring Audio Ring Switch built-in ring through Lechange Network Wi-Fi 1-channel, 802.11b/g/n, 2.4GHz frequency band Man-machine Pairing button At the side panel of the device interaction State indicator light Blue indicator light Power input 90Vac~240Vac Working environment...
Need help?
Do you have a question about the DS11 and is the answer not in the manual?
Questions and answers