Table of Contents
Advertisement
Quick Links
L-851
Thank you for purchasing the HOZAN L-851 FULL HD CAMERA. With proper care
and handling, this fine instrument will provide years of trouble-free operation. Please read
this entire instruction manual carefully before attempting to place this instrument in
service. Please keep this instruction manual available for reference.
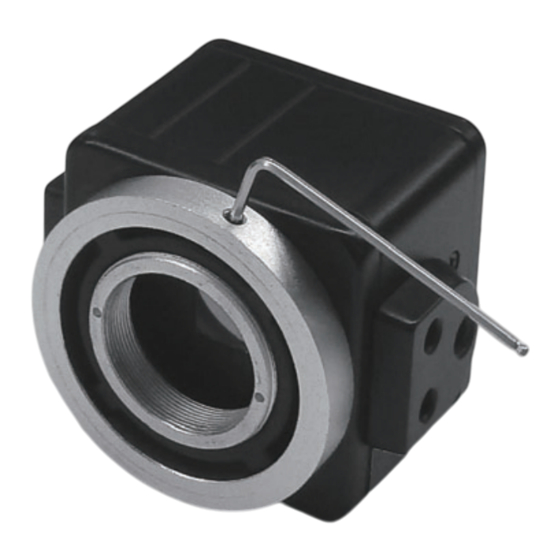
Identification of parts and contents
Peel the protection
film from the
sensor before
use.
C mount
Specifications
Image sensor
Interface connector
Display resolution (max) 1920×1080 (2000000 picture elements)
Save resolution (Max)
File formats
recoding media
Frame rate
Lens mount
Rating
Power consumption
Dimensions
Weight
FULL HD CAMERA
Camera screw
Camera screw
Osd controller
1/2.8" CMOS
HDMI
Still picture 1920×1080 (2000000 picture elements)
Video 1920×1080 (2000000 picture elements)/
1280×720 (900000 picture elements)
Still picture JPG / Video AVI
microSD/SDHC/SDXC card (Max128GB)
Max 60FPS
C mount
5Vdc
2.5W
50(W) X 50(H)X 48(D) mmw/o projections
163g
INSTRUCTION MANUAL
mini HDMI connector
micro USB connector
Slot for SD card
Monitor lamp
Dimensions
Power switch
External control jack
6
50
6
1
Camera screw
C mount
φ50
50
7.2
18.3
40.8
Advertisement
Table of Contents

Related Manuals for HOZAN L-851

Summary of Contents for HOZAN L-851
- Page 1 L-851 FULL HD CAMERA Thank you for purchasing the HOZAN L-851 FULL HD CAMERA. With proper care and handling, this fine instrument will provide years of trouble-free operation. Please read this entire instruction manual carefully before attempting to place this instrument in service.
-
Page 2: Warning And Caution Symbols
Warning and caution symbols These symbols are used throughout the instruction manual to alert the user to potential safety hazards as follows: … Notice when incorrect handling could cause the user's death or serious Warning injury. Caution … Notice when incorrect handling could cause injury to the user or material damage. -
Page 3: Operation
Make sure of the contents Make sure that these items are in the package before use. ・Camera ・Osd controller ・AC Adapter ・HDMI cable ・Power cable ・microSDHCcard ・Hex Wrench ・instruction manual Operation Remove the cap of the camera, then screw the lens into the mount of the camera clockwise. The connecting format of the camera and the lens is C mount. - Page 4 Operation Connect the microUSB of the power cable AC adapter to the microUSB terminal of the camera. Connect the USB of the power cable to the PC, monitor USB PC or monitor, or attach the included AC adapter and connect it to the outlet and turn on the power.
-
Page 5: Mode Description
Operation Description for buttons Body buttons and OSD controller operation buttons are common. Operations other than power ON / OFF can be performed with the OSD controller. MENU : displaying menu or not MODE ( : Switching between still images, videos, and playback, (decision) : Expansion(move adobe) : Shrinking(move below) -
Page 6: Exposure [Auto]
Operation Still image shooting mode It means that it is still image mode It means that it is still image mode Approximate remaining number of recordable images is displayed. * Depending on the remaining amount of data, it may differ from the actual number of shots. -
Page 7: Color [Color]
Operation ・White balance (Wb) [AUTO] Adjust the white balance. Auto : Always adjust the white balance automatically. Single-auto : Adjusts the color of the photographed object at the time the decision button is pressed as the reference of white. Please decide semi - auto with the whole face captured by blank paper etc. Manual : Fine adjustment of white balance manually with semi-auto value as center value. -
Page 8: Default Setting
Operation ・Language: Japanese] Set language (Japanese · English · Simplified Chinese → 繁體 中文). ・Frequency [60 Hz] Set the power supply frequency. It is effective when flickering of fluorescent light etc. occurs. Please adjust to the power supply frequency of your area (50 Hz / 60 Hz). ・Image rotation [Standard] Invert / rotate the display image. - Page 9 Operation It means that it is Video shooting Video shooting mode mode Approximate remaining number of recordable images is displayed. * Depending on the remaining amount of data, it may differ from the actual number of shots. Icon of setting menu is displayed. Display resolution.
- Page 10 Operation ・White balance (WB) [AUTO] Adjust the white balance. Auto : Always adjust the white balance automatically. Single-auto : Adjusts the color of the photographed object at the time the decision button is pressed as the reference of white. Please decide semi - auto with the whole face captured by blank paper etc. Manual : Fine adjustment of white balance manually with semi-auto value as center value...
- Page 11 Operation ・Language: Japanese] Set language (Japanese · English · Simplified Chinese → 繁體 中文). ・Frequency [60 Hz] Set the power supply frequency. It is effective when flickering of fluorescent light etc. occurs. Please adjust to the power supply frequency of your area (50 Hz / 60 Hz). ・Image rotation [Standard] Invert / rotate the display image.
-
Page 12: Playback Mode
Operation Playback mode It means that it is Playback mode Displays the name of the image being displayed Icon of setting menu Is displayed. The shooting date and time is displayed. Play the video with the [REC] button. file is It is displayed only when it is a video. When playing back videos, the button operations are as follows.
Need help?
Do you have a question about the L-851 and is the answer not in the manual?
Questions and answers