Table of Contents
Advertisement
Advertisement
Table of Contents

Summary of Contents for Milesight MS-K01
- Page 1 User Manual Network Keyboard User Manual V2.01...
- Page 2 Milesight Technology Co., Ltd(Hereinafter referred to as Milesight). Milesight reserves the right to change this manual and the specifications without prior notice. The latest specifications and user documentation for all Milesight products are available on our official website www.milesight.com...
- Page 3 Industry Canada ICES-003 Compliance: This Class B digital apparatus complies with Canadian ICES-003. Cet appareil numerique de la classe B est conforme a la norme NMB-003 du Canada. Safety Instruction These instructions are intended to ensure that user can use the product correctly to avoid danger or property loss.
- Page 4 EU Conformity Statement 2012/19/EU (WEEE directive): Products marked with this symbol cannot be disposed of as unsorted municipal waste in the European Union. For proper recycling, return this product to your local supplier upon the purchase of equivalent new equipment, or dispose of it at designated collection points.
-
Page 5: Table Of Contents
Table of Contents Chapter I Product Introduction ......................1 1.1 Introduction..........................1 1.2 Product Key Functions......................1 1.3 Appearance..........................2 1.4 Operation Panel........................3 1.5 Keyboard Joystick........................4 1.6 Keyboard Shuttle........................5 Chapter II Operation Guide........................6 2.1 User Account........................... 6 2.2 Boot and Shut down of Network Keyboard................6 2.2.1 Boot.......................... -
Page 6: Chapter I Product Introduction
Chapter I Product Introduction 1.1 Introduction Milesight Network Keyboard MS-K01 is positioned to control Milesight NVR and PTZ Cameras. It adopts network connection for easy connection and control, which eliminates unwanted complexity and simplifies the overall installation process. Built-in Web Server can support the use of browser to easily manage and maintain the keyboard. -
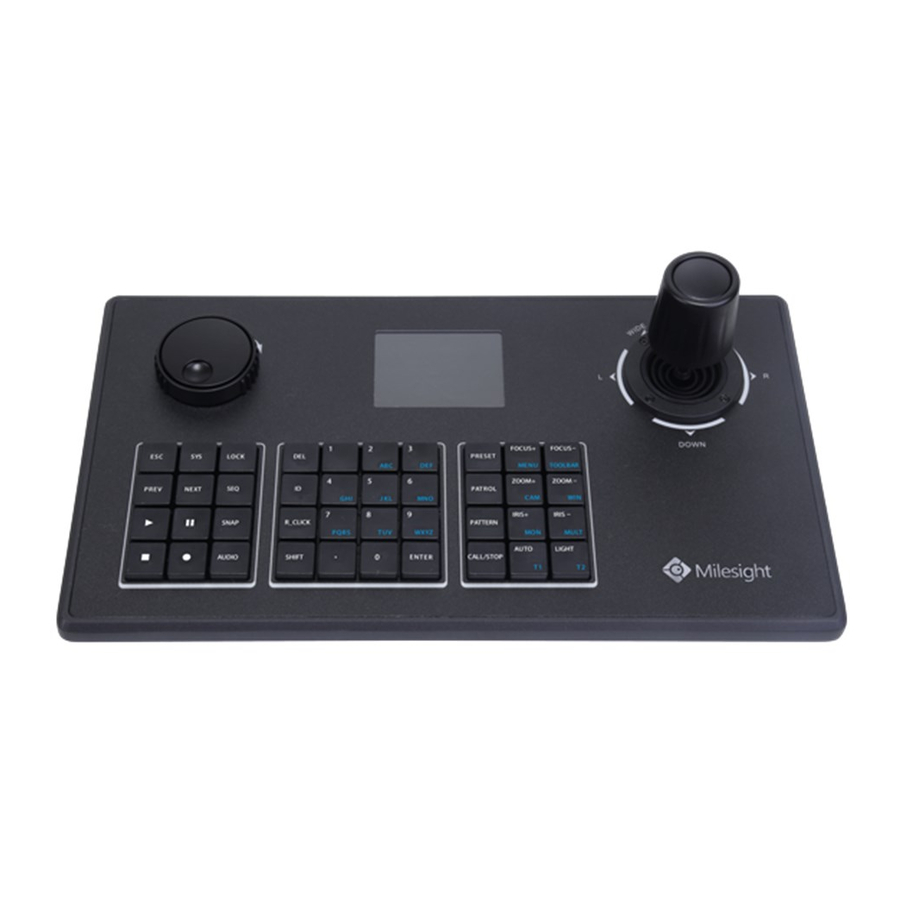
Page 7: Appearance
1.3 Appearance Figure 1.3-1 Milesight Network Keyboard Operation Panel Figure 1.3-2 Milesight Network Keyboard Interfaces... -
Page 8: Operation Panel
1.4 Operation Panel Description of Functional Buttons Button Description Return to previous menu. Long press 10s to reset all settings to factory default. Long press 2s to enter keyboard settings interface. Note: Only admin user has the permission. LOCK Lock/Unlock the keyboard. PREV Previous channel. -
Page 9: Keyboard Joystick
0-9/A-Z Number input or letter input. Dot. ENTER Confirm operation. PRESET In PTZ mode, select or set the preset. PATROL In PTZ mode, select the patrol. CALL+PATROL+Num: select the defined patrol PATTERN In PTZ mode, select the pattern. CALL+PATTERN+Num: select the defined pattern Call the defined Preset, Patrol and Pattern in PTZ mode. -
Page 10: Keyboard Shuttle
In PTZ mode, control the PTZ to move right. Right In NVR playback interface, video rewind 30s. Left up/Left down/ In PTZ mode, control the PTZ to move Left up/Left down/Right Right up/Right down up/Right down. Clockwise rotation In PTZ mode, Zoom in Counterclockwise In PTZ mode, Zoom out rotation... -
Page 11: Chapter Ii Operation Guide
Chapter II Operation Guide 2.1 User Account There are two types of the keyboard user account: admin and operator. The admin user is authorized with the following operation permissions: Add a maximum of 9 operator accounts. Configure the keyboard parameters. ... -
Page 12: Shut Down
2.2.2 Shut Down Unplug the power supply, then the keyboard will power off and shut down. 2.3 Local Keyboard Configuration by Admin 2.3.1 Login Input the password of admin user to log in the keyboard. 2.3.2 Keyboard Management Step1. Long press 2s on the [SYS] button to enter the setting interface like the Figure 2.3.2-1; Step2. - Page 13 keyboard. Device Figure 2.3.2-3 Device Interface There are three options (INQUIRE/ADD/DELETE) in DEVICE interface: INQUIRE: Inquire the devices which have been added. ADD: Select [ADD] option, press [ENTER] to enter the ADD DEVICE interface, the keyboard will assign an ID to the device, you can vacillate joystick to the left and right to select the device type which contains NVR and PTZ camera, then press the [Enter] button to input the IP address of the device, press [ENTER] button to confirm and save the setting.
-
Page 14: Keyboard Operation
Note: 1. Please make sure the Network Keyboard is connected to the Internet. 2. The default IP address of the Network Keyboard is 192.168.5.180. 3. When inputting IP address in keyboard, moving joystick to the left could execute Delete action. 4. - Page 15 Figure 2.4.1-3 NVR Mode Step3 (Only for NVR). If the NVR needs local authentication, press [SHIFT] button to switch between ‘abc’ and ‘123’ mode, then input the password to do local authentication. Figure 2.4.1-4 NVR Login Interface For example, the password is ‘ms1234’: Step1.
-
Page 16: Ptz Control
Figure 2.4.1-6 Step4. Press [ENTER] button to log in NVR on monitor. Note: 1. Press [ID] button to input different ID numbers, then you can connect the device you wanted. 2. When doing password authentication to connect the NVR, please press the [Del] button to delete the character you want to abandon. - Page 17 PRESET Setting : PRESET+Num+ENTER Delete : DEL+PRESET+Num+ENTER Call : CALL+PRESET+Num+ENTER PATROL Call : CALL+PATROL+Num+ENTER Pause : STOP PATTERN Call : CALL+PATTERN+NUM+ENTER Pause : STOP Through the [ZOOM+], [ZOOM-], [FOCUS+], [FOCUS-], [IRIS+], [IRIS-] buttons, you can adjust the lens of the PTZ camera.
-
Page 18: Chapter Iii Keyboard Configuration By Web Server
Chapter III Keyboard Configuration by WEB Server 3.1 Login Figure 3.1-1 WEB Login Page Step1. Input the IP address of keyboard in browser. Step2. Input the password of admin user to log in. 3.2 Device Management Figure 3.2-1 Device Management ... - Page 19 Figure 3.2-2 Search Device 2. Click to select one device, then click [Add] button to add the selected device. Figure 3.2-3 Add One Device Click [Add All] button to add all the devices which have been searched out. Figure 3.2-4 Add All Devices 3.
-
Page 20: Keyboard Management
Method2. Add devices manually 1. Select the device type. 2. Input the IP address of the device, then click [Add Manually] to add a device manually. 3. Click [Save] button to confirm the operation. Figure 3.2-5 Add Manually Configure Added Devices Click [Delete] button to delete an added device. - Page 21 Users Figure 3.3-2 User In Users page, you can add, edit and delete operator users; Also, you can edit the password of Admin user. Hardware Figure 3.3-3 Hardware In Hardware page, you can turn on/off the keypad tones. Also, you can select the retention time of screen back light.
- Page 22 Click to reboot the keyboard. Click to reset the keyboard to factory defaults. System Upgrade: Step1. Browse and select the upgrading file. Step2. Click the “upgrade” button after it prompts upload file successfully. After the system reboots successfully, the update is done. Note: Do not disconnect the power of the device during the update.
-
Page 23: Chapter Iv Services
Chapter IV Services Milesight Technology Co., Ltd provides customers with timely and comprehensive technical support services. End-users can contact your local dealer to obtain technical support. Distributors and resellers can contact directly with Milesight for technical support. Technical Support Mailbox: support@milesight.com Web: http://www.milesight.com...
Need help?
Do you have a question about the MS-K01 and is the answer not in the manual?
Questions and answers