Advertisement
Quick Links
Advertisement

Related Manuals for Modernhome ARIA AAO-890


Summary of Contents for Modernhome ARIA AAO-890
- Page 1 Digital Air Fryer Oven User Guide 10QT / 1700 Watts AAO - 890...
- Page 2 Follow Us for video tutorials, recipes, and more! ARIAAIRFRYERS ARIAAIRFRYERS facebook instagram...
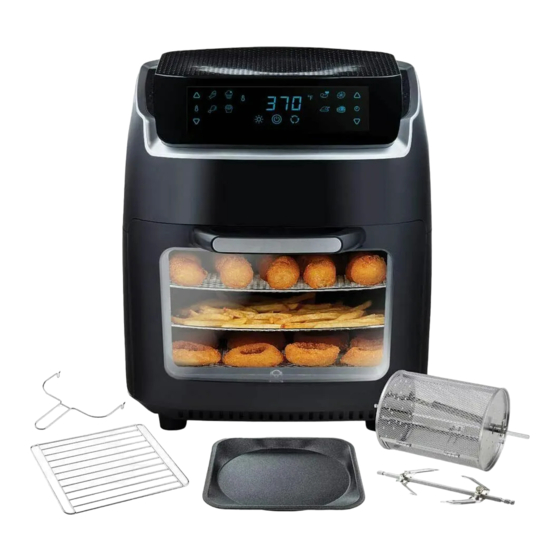
- Page 3 HEALTHY STARTS HERE Congratulations on your new Ceramic Digital Air Fryer and thanks for choosing Modernhome...
- Page 4 Your Air Fryer Oven is a practical, multi-function appliance that uses incredibly hot air and rapid air circulation to evenly cook your food from all angles, without using extra oil or grease. This leads to deliciously crispy food in a snap with less fat, calories, grease, and harmful chemicals.
- Page 5 Digital Air Fryer Oven Quick Start Guide...
- Page 7 Presets Functions Fish Oven Light Baking Power/Start Button Shrimp Rotation Function Dehydration Temperature Control Poultry Time Control Fries Rotating Rotisserie Roast (this function automatically turns on the Rotation Function) Steak...
- Page 8 Powering Air Fryer Place the Air Fryer on an even surface and plug into a grounded wall socket...
- Page 9 Set Up Air Fryer with Presets After pressing the On/Off button select a preset Once a preset is selected hit the On/Off button to start Air Fryer...
- Page 10 Setting Cook Time & Temperature Manually Pressing the On/Off button to turn on Air Fryer Tap the Arrows to adjust the Cooking Temperature...
- Page 11 Tap the Arrows to adjust the Cooking Time Once a preset is selected hit the On/Off button to start Air Fryer...
- Page 12 Grill Rack & Mesh Trays Open the Air Fryer Place food on mesh tray Slide Drip Tray into the Oven’s door then slide it into the oven's lowest grooves. Air Fryer Oven...
- Page 13 Note: This Air Fryer must only be used with the Drip Tray securely inside the appliance. Do not attempt to use the Air Fryer without the Drip Tray securely inside the unit first. If using the Grill Racks, the Drip Tray must be used to catch excess oil and grease and protect the heating element at the bottom.
- Page 14 Loading Whole Chicken Note: Bind the chicken together with twine if necessary. Push Rotisserie Skewer Slide Forks onto the Tighten screws into through the meat or food skewer from both ends skewer to secure meat you want to cook. into the meat securely. and forks from moving.
- Page 15 Slide Skewer into the Select the desired Press the On/Off button oven's grooves left side time/temp and press to start the Air Fryer first. the rotating function...
- Page 16 Rotating Kebob Rack Place Skewer Rack at Guide the sharp end of the Skewer through the hole on the Skewer Rack and push both ends of the Rotisserie the clip into the Skewer Rack’s grooves. Rod and tighten thumb screws.
- Page 17 Note: Skewer Rack is Labelled Left or Right for directional guidance. Slide Skewer Rack into the Select the desired Press the On/Off button oven's grooves left side time/temp and press to start the Air Fryer first. the rotating function...
- Page 18 Rolling Cage Open the Air Fryer Slide Drip Tray into the Slide rolling cage into the Oven’s door oven's lowest grooves. oven's grooves left side first.
- Page 19 Select the desired Press the On/Off button time/temp and press to start the Air Fryer the rotating function...
-
Page 20: Before First Use
Before First Use Remove all packaging materials, Wipe the inside and outside of the plastic, tape, and labels. Air Fryer with a dry cloth. Note: Air Fryer may make some smoke or Clean the Frying Basket, Racks, slight odor the first time you use it. Trays and all accessories with warm This is normal. - Page 21 excess oil and grease and protect The Air Fryer contains both elec- the heating element at the bottom. tronic and heating elements. To avoid electrical shock, do not immerse the power cord, plug, or housing in water or put them under the tap during cleaning.
- Page 22 face, and all other body parts away Do not clean with metal scouring to avoid injury. Also, be careful of pads or abrasive sponges and mate- hot steam and air you open the rials. Door or remove the accessories, Rolling Cage, Racks or Rotisserie To prevent a fire, be sure to keep Skewer.
- Page 23 cations of this manual. In the case of a fire, never attempt to extinguish the flames with water. Immediately unplug the appliance. If safe, close the lid and smother flames with a damp cloth.
- Page 24 Cooking Using the Rotisserie Push the Rotisserie Skewer through ing Rotisserie function can be the meat or food you want to cook. started or stopped at any time by Bind the chicken together if neces- tapping the Start/Stop button. sary. Note: The total weight of frying chicken must be less 3 lbs...
- Page 25 Cooking Using Rolling Cage Open the Rolling Cage's door on its Right slot of the Air Fryer. You'll Right side by compressing the latch notice that the Left slot is the one and pulling it out. that rotates the Cage so it's easiest to place that first, as then the Right Load the Rolling Cage with your side will easily slide into the Right...
- Page 26 Cooking Using Rolling Cage Press the Start/Stop button to begin the Rolling Cage and us the Handle cooking and the machine will start to lift the Right side of the Rollling to heat up while your Rolling Cage Care upward and pull the Right side Tip: begins to rotate.
- Page 27 Cooking Using the Grill Rack The included Grill Rack can conve- Trays can be used for pizzas, des- niently cook a variety of foods. serts, as a drip tray, and a multitude When using, always be sure to use of other ingredients. the Drip Tray at lowest possible slot Tip: to catch excess oil.
- Page 28 Cooking Using the Grill Rack Tip: When cooking using 2 slots, the higher rack will cook more quickly than the lower tray. Keep this in mind while cooking and also be sure not to over- crowd the higher rack, as this will block some air flow.
- Page 29 Food Time Temp (ºF) Notes Shake/Flip Halfway Frozen Fries 14-22 min. Shake Handmade 16-26 min. Shake Soak for 30 mins, dry, then add a half teaspoon of oil before cooking for crispiness Beef / Steak 10-20 min. Flip Over Pork Chops 15-24 min.
- Page 30 Dehydration You can use your Aria Air Fryer to dehydrate and preserve your favorite fruits, vegeta- bles, and meats conveniently at home, using your own ingredients that you trust. Make delicious fruit and vegetable snacks, create meat jerky, dry herbs, and more that you can store for later! Tips for Best Results Be sure to consistently cut the fruits...
- Page 31 Food Preparation Instructions Time Temp (ºF) Remove the core and seeds, cut into slices about 1/8-inch thick, soak in Apples 6-8 hours 135ºF water with a bit of lemon juice for 5 minutes, pat dry Rinse clean, pat dry, and remove Dried Herbs 3-4 hours 135ºF...
- Page 32 We’re Here to Help! Please remember, the safety of you and your loved ones is our top priority. That's why we have the industry's only Lifetime Warranty on all accessories and 1 year warranty on the unit itself. If you're ever having serious issues with your Air Fryer, please stop using it immediately and email or call us.
-
Page 33: Troubleshooting
Shut the or Trays are overfilled with Air Fryer off immediately and ingredients. safely. Contact Modernhome Door isn’t completely closed Customer Care for warranty Temperature is set too low instructions. The Air Fryer is not on... - Page 34 Troubleshooting Problem Problem Problem Fried ingredients aren’t Ingredients aren’t Home-made French fries crispy enough are not crispy enough cooked evenly Solution Solution Solution Use oven snacks or brush Soak the cut potatoes in In the middle of cooking a thin layer of oil on the water for at least 30 minutes process, carefully lift the surface of the ingredients...
- Page 35 Troubleshooting Problem Problem The Air Fryer has White smoke is coming shut down out of the Air Fryer Solution Solution The Air Fryer has an auto-off The Frying Basket, Racks, Trays, safety feature which protects Stirring Arm, accessories or it from overheating. inside of the Air Fryer still contain grease or oil from a Unplug the unit safely and allow...
-
Page 36: Important Safety Tips
Important Safety Tips As your Air Fryer is a powerful electrical and try again, or contact a certified appliance with heating elements and electrician. fans, be sure to follow all safety precau- tions and read all instructions fully and Do not modify the appliance in any way. carefully before using Before using, check the power cord of appliance and the accessories. - Page 37 Warning Keep out of reach of children - they Children over 10 years, anyone with a should be supervised to ensure that physical or mental disability, and anyone they do not play with the Air Fryer. with a lack of experience and knowledge on how to use the Air Fryer should read Do not use Air Fryer unattended while the User Guide completely and be...
- Page 38 Warning during use, prevent fire hazards and do Do not place it on plastic, any boards, or not put plastic or metal dishes, bowls, any other surface that can get too hot or tools, or protective film into the appli- damaged.
- Page 39 Warning when it is not in use or before cleaning If the preset time is too long the food it. Always allow the appliance to cool will be burnt and dark smoke will be down completely first before cleaning. released from the air outlet. Unplug the Air Fryer immediately and allow it to Do not use any 3rd party accessories.
- Page 40 Warning features that won’t allow it to turn on unless the Frying Basket is securely inside the appliance and the Lid is fully closed and locked. Open the Lid, remove the Frying Basket completely and reinsert securely into the unit. Then close the Lid until you hear a click, which indicates it’s locked securely.
-
Page 41: Care, Cleaning & Maintenance
Care, Cleaning & Maintenance For optimal efficiency and long-term non-abrasive sponge. To avoid care, clean the Air Fryer after each use. damage to the parts, do not use a hard-wire cleaning tool. Since the Air Fryer and internal The Frying Basket, Grill Rack and parts get very hot during use, Stirring Arm are dishwasher-safe for unplug the power cable and let the... -
Page 42: Warranty Terms
Warranty Terms Air Fryer dry and away from water This warranty applies to products to prevent electric shock and purchased and used only in the U.S and damage to the appliance. Canada and does not cover wear and tear from improper use or not following For long-term storage, unplug the instructions as specified in the print Air Fryer, allow it to cool down,... - Page 43 Skyline Brands, Inc. 4801 Emerson Ave. Palatine, IL 60067 To make a warranty claim, do not return this appliance to the store. Please call 1.847.357.9077 in the U.S. or Canada between 9:00am - 5:00pm (CST) Hassle-Free Warranty Monday through Friday. or email customercare@skylinebrands.com Follow Us for video tutorials, recipes, and more! ARIAAIRFRYERS...
Need help?
Do you have a question about the ARIA AAO-890 and is the answer not in the manual?
Questions and answers
Is there a way to disable the beeping sound?