Table of Contents
Advertisement
Advertisement
Table of Contents

Summary of Contents for Fotopast BL480L-P
- Page 1 4G/3G/2G GPS Cellular Trail Cameras Supporting MMS/Email/FTP User’s Manual...
-
Page 2: Table Of Contents
Contents Introduction--------------------------------------------------1 Main Features------------------------------------------------1 Illustration-----------------------------------------------------2 Applications---------------------------------------------------3 Accessories----------------------------------------------------3 Peel Off---------------------------------------------------------3 Cleaning--------------------------------------------------------3 Power Supply-------------------------------------------------4 Inserting SD/Micro SIM cards-----------------------------5 Quick Start(NO sending pictures out)-------------------7 Screen display when in TEST mode----------------------8 Shoot Picture Information------------------------ ----------8 Specification----------------------------------------------------9 Connecting PC and Camera--------------------------------11 Checking Menu via Buttons--------------------------------12 MMS/Data(SMTP/FTP) Setup------------------------------28 How to config camera via PC-------------------------------30 How to send picture in TEST mode------------------------37... -
Page 3: Introduction
Introduction Congratulations on the purchase. Users have selected a high-quality product. The operating instructions are a constituent of this product. They contain important information about safety, use and disposal. Before using the product, familiarize all operating and safety instructions. Use this product only as described and only for the specified areas of application. -
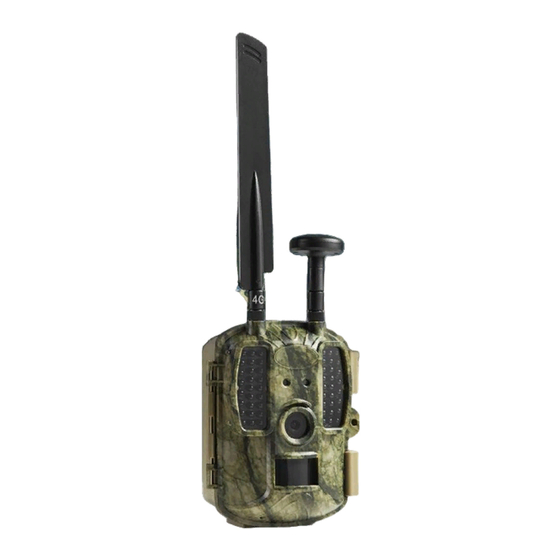
Page 4: Illustration
Illustration Front & Bottom view: 1. Bottom 2. Microphone 3. PIR detection 4. Lens 5. 4G antenna 6. GPS antenna 7. logo space 8. light detection 9. Invisible IR 52pcs Leds 10. DC 12V Jack 11. Power switch( TEST/ON/OFF) 12. 7 Operation Buttons 13. -
Page 5: Applications
Applications 1. Trail camera for hunting 2. Animal or event observation,Fauna Surveys 3. Warehouse/Storage/Farm Area Surveillance 4. Home/Property Security 5. Farm Gates or Driveways Accessories 1. Strap 2. USB cable 3. User manual 4. GPS antenna 5. 4G antenna 6.CD Peel Off There are transparent protective films on leds, lens, PIR and screen. -
Page 6: Power Supply
■ Always keep the seal clean so that no moisture gets into the device and damages it. Contamination of the seal can impair the dust and water spray protection. Power Supply ♦ To insert batteries in the device, first open camera and check battery compartment on +-. -
Page 7: Inserting Sd/Micro Sim Cards
Warning 1. Slide the power switch to OFF position to turn off the camera, Please note that even in the OFF mode, the camera still consumes a small amount of battery power. Therefore, please remove the batteries if the camera is not in use for a long time 2. - Page 8 please format the SD card via camera sub-menu ‘format’, so that to improve the battery life and shutter speed. ► The device supports SD/SDHC memory cards with a capacity of up to 32 GB. ►When the SD memory card is full, it will automatically stop take picture and record video.
-
Page 9: Quick Start(No Sending Pictures Out)
Quick Start(NO sending pictures out) A. Switch camera to ON mode Note: Camera comes default setting, so for testing purpose, users only need to insert a SD card and batteries to let camera work by turning camera to ON Mode. The red light will work for 3 times and screen is off, then work on PIR and when working during nighttime, there is no any visible light. -
Page 10: Screen Display When In Test Mode
Screen display when in TEST mode Shoot Picture Information Picture information strip: logo, serial number, temperature, longitude and latitude, moon phrase and date/time... -
Page 11: Specification
Specification GPS function Supporting, camera will read when camera is on test mode MMS Function 1-3 mobile ID(only sending VGA and QVGA image) SMTP function 1-3 Email ID(NO SSL/SSL/TSL support, original image and video can be sent,if camera is on camera+video mode, all can be sent out)... - Page 12 Picture size VGA:640*480 1.3MP:1280*960 5MP:2592x1944 12MP:4032x3024 Picture Format Video resolution 1080P (1920x1080): 30FPS 720P (1280x720):30FPS 640x480:30FPS Video Format H.264 Video Length 5-30sec. programmable Shooting Numbers Trigger Time 0.6s Trigger Interval 3s-60min Camera + Video Time lapse supporting Timer Setting 2 Timers Device Serial No.
-
Page 13: Connecting Pc And Camera
12V input) IR LEDs Photo: 1A Video: 1A Interface Micro SIM Card slot/HDMI/USB/SD Card/DC Port Mounting Strap; Tripod Storage temperature -30 °C to 60°C Operation Humidity 5%-90% Waterproof spec IP66 Dimensions 13(length)*9.5(width)*16(higth)cm Gross Weight 800g Certification CE FCC RoHs Connecting PC and Camera No matter camera has power or not, user can transfer files between computer and camera. -
Page 14: Checking Menu Via Buttons
Checking Menu via Buttons Note: user can not setup cellular function via camera buttons. After connecting a power supply, switch camera to the “TEST” position, then screen will be on, please enter MENU to confirm the settings described on the following pages using the buttons (photo as follows). - Page 15 Press MODE key to swift photo mode, video mode and reviewing the photo or video; swift the number, letter, symbol when re-setting up mobile ID and Email. The MENU on the keypad allows users to program the camera to work the way users want. 1.
- Page 16 3. Image size Select a photo size: 1.3 MP, 5 MP (preset)or 12 MP.The larger the file size, the more detailed the image. However, the maximum number of high-resolution images that can be stored before the memory card is much fewer. 4.
- Page 17 5. Date & time Camera will read time/date after choosing time zone. They will be displayed on the photos and video that the camera takes. 6. Shooting No. Select the number of photos that are to be taken in one succession when the camera is activated in photo or camera+video mode.
- Page 18 7. Video Length Use the up/down buttons to select the length of the video recording (between 5–30 seconds) that is to be made when video recording is activated. The longer the recording time selected, the shorter the operating time. 8. Interval Use the up/down buttons to select the minimum time period(between 3second and 60mins).During the selected interval, the camera will not record any images or videos.
- Page 19 recordings of the same event. Users can select from 3 seconds to 60 minutes. 9. PIR Sensitivity For interior areas and environments with little interference, such as branches blowing in the wind, select “High”. Select “Medium” for exterior areas and environments with a normal amount of interference, and select “Low”...
- Page 20 Here users can choose whether save photos/video with a time stamp or not.Users can choose whether the stamp consists of time and date or just date. 11. Timer 1 and Timer 2 Select“On” if the camera should only be active during a certain time period.
- Page 21 Confirm user selection with OK button. Afterwards, press the MENU button to leave this sub-menu. 12. Password Setting Select “On” if users want to use a password to protect the camera from unwanted access. In the following screen menu, users can set a 4-digit combination: Press the up /down buttons to select the first digit between 0–9.
- Page 22 Select “On” if users want to use a serial number to rank the camera. In the following screen menu, users can set a 4-digit combination: Press the up /down buttons to select the first digit between 0–9. Then switch to the next field using the right button. Press the up /down buttons to select the second digit between 0–9.
- Page 23 Press the up/ down buttons to set the hour of the desired time interval.Then switch to the next field,“Min”, using the right button. Press the up/down buttons to set the minutes of the desired time interval. Then switch to the next field,“Sec”, using the right button.
- Page 24 16. SD Cycle Default setting is OFF, when user turns on this function, the pictures or videos which are taken at beginning will be deleted. For example, picture 1st, picture 2cd, picture 3rd, video 4 ……full card picture 5 , picture 6 , picture 7 , video 8 picture 1...
- Page 25 When using MMS function, and users do not know which MMS option is suitable, please let user mobile to get MMS from mobile, then check the MMS picture size via computer. 18. Phone Number 19. Data Option Enter the sub-menu(Data Option) there will be SMTP/FTP Server/OFF 1) SMTP (Email): Choose the SMTP.
- Page 26 20. Recipient Email There have three email ID available. That’s mean the cameras will send picture/video to the 3 email box at the same time. 21. FTP Server User need to register a FTP account at local and can enjoy better service.
- Page 27 22. SMS Control Interval Inter the On sub-menu, input the interval time. The camera will wake up each interval time and receive SMS Command. The instruction can be made via APP. After camera is waked up by SMS, it will be awaken for 6mins. The shortest SMS Control Interval is 10min.
- Page 28 24. GPS Switch Turn on/off the GPS function. 25. Default Settings If user select“Yes”the menu item and press the OK button, all previously made camera settings including any password will be deleted and the factory settings will be restored. 26. Format Formatting the memory card will permanently delete all data on it including the locked images.
- Page 29 following prompt with the OK button. The formatting process starts. While the card is being formatted, the message “Please wait”appears. 27. Version Checking camera version. That will help manufacturer to find out the reason when there is problem with camera.
-
Page 30: Mms/Data(Smtp/Ftp) Setup
MMS/Data(SMTP/FTP) Setup Part 1. Picture mode Video Mode Picture+Video Mode User can choose VGA or QVGA. MMS Option Compressed pictures Compressed pictures will be sent No work (VGA,QVGA) will be text out Original video Data Option User can choose SMTP or FTP. Original picture and will be sent out (SMTP, FTP) - Page 31 3. In camera+video mode, Both images and video can be sent out via data service. If user choose MMS function as well, Image will be text out. 4. when multi-shoot function is ON, the last taken image will be sent out. Part 2 4G, 3G and 2G network can be supported, when camera starts to search signal, the best and stable signal will be selected.
-
Page 32: How To Config Camera Via
How to config camera via PC Load CD into Windows computer first and check. MenuConfigPlus.exe , which is mainly for setting camera to send picture out. Please copy it to computer. Double-Click it to open. Home Page will occur as below, please go to ‘MMS/4G’... - Page 33 Note: If there is no relate default country and operator for selection. Please Mode:Manual, contact Micro SIM card operator to get MMS APN, Account, Password, MMSC, IP and Port info. Then fill in mobile ID. Click OK to save setting.
- Page 34 Email SETUP Cameras email out original images via data transmission, the pictures are sent out from SMTP server to recipient email. Mode: Auto, there is default operator info for selection 1. MMS option: OFF Data Option: SMTP 2. Choose local country and micro SIM card operator. 3.
- Page 35 Note: 1. If there is no relate default country and operator for selection. Please Mode:Manual, contact Micro SIM card operator to get internet APN, Account and Password info. Then choose default SMTP server and fill in mobile ID. Click OK to save setting.
- Page 36 FTP SETUP FTP account is to recieve and store files. Camera FTP function works like a FTP user, log in FTP account and upload files via data service. It is faster way to send out files than SMTP. User can check file via FTP APP as well. Mode: Auto, there is default country and operator information for selection.
- Page 37 Note: user can fill in Phone 1 to get FTP sms notice. It will work as below:...
- Page 38 There is free FTP service, user can apply for a free account(1G), please check this link https://www.drivehq.com/secure/freeSignup.aspx Server:ftp.drivehq.com IP: 66.220.9.51 Port:21 User can also check DriveHQ APP to check pictures/video.
-
Page 39: How To Send Picture In Test Mode
How to send picture in TEST mode After menu.cfg saved to format SD card, then turn camera from OFF to Test Mode, camera will detect SD card and SIM card, signal and image space will occur on display, what is more, the relate setup will be shown via menu. -
Page 40: Faq List
FAQ List A. Camera can not detect small animal. Solution: Please use High PIR sensitivity. A. It seems that camera has much slower trigger speed. Solution: when using default setting to test trigger speed or make comparison with other cameras, please use High PIR sensitivity. - Page 41 F. In too cold weather, please use LOW PIR sensitivity, if temperature is close to 37℃,please use HIGH PIR sensitivity. G. When testing sending picture out on Test mode, please make sure the signal is 3 bars or 4 bars. H.
-
Page 42: After-Sales Support
After-sales Support If you meet any difficulty during usage, please email support@balever.com. And please offer which country you are in? Which operator you use? You need MMS or Email function? How many signal bars on camera display? Skype: carasmith59 Wechat: carasmith59...
Need help?
Do you have a question about the BL480L-P and is the answer not in the manual?
Questions and answers