
Summary of Contents for INNOVATIVE POOL PRODUCTS Smart Touch LE
- Page 1 Smart Touch LE, 620 and 840 Integrated Automation system Owners Manual By INNOVATIVE POOL PRODUCTS LLC For more information look us up on the web at www.InnovativePools.com...
-
Page 2: Safety Instructions
Safety Instructions 1. Read and Follow All Instructions 2. DANGER - to reduce the risk of injury, do not permit children to use this product unless they are closely supervised at all times. 3. Prolonged immersion in hot water may induce hyperthermia. Hyperthermia occurs when the internal temperature of the body reaches a level several degrees above the normal body temperature of 98.6 degrees F. -
Page 3: Table Of Contents
Table Of Contents Safety Instructions Table of Contents System Overview Standard PLC Control Smart Touch Control Panel Smart Touch Power Center Temperature display Adjusting the temperature Mode Switch Filter Pump Heater Enable Switches Aux 1 / Cleaner Aux 2 / Solar Aux 3 through 6 7- 8 Lockouts and Delays (Flashing LED’s) - Page 4 Standard X-10 Control in this manual. The House Code of the Smart T ouch controller is set by your installer. This is done at the DIP switches in the Power Center. The Standard X-10 Controls will operate the following functions. Smart Touch LE Smart Touch 620 and 840 X-10 Unit Code...
- Page 5 Smart Touch Power Center Control Panel The Smart Touch control panel allows local control (at pool equipment) of all functions of the SmartTouch system. Each function has an LED next to the switch to give the operator feedback on the status of the system. The temperature is dis- played after the filter pump has been running for 1 minute.
-
Page 6: Smart Touch Power Center
The Smart Touch Power Center TEMPERATURE DISPLAY The Temperature Display on the Power Center uses a temperature sensor installed in the pool plumbing at the Pool Equipment area. The display will only read the temperature of the water that flows past the sensor. The temperature will be displayed if the Filter Pump has been pumping for one minute. -
Page 7: Filter Pump
#2 Dip switch turned to the Solar position the logic circuits and lockouts will be turned on. You must have Innovative Pool Products 4 wire Digital Solar Temperature Sensor to operate the solar collectors automatically. Do Not Use a 2 wire thermistor type sensor or damage to the system will result. To Enable the Solar Heater turn on the Aux 2 /Solar function, it’s LED will flash until conditions are met for Solar Heating to begin. -
Page 8: Lifeguard System (Option)
In these conditions, the pool and spa should be shut down completely (i,e. drained of water and closed for the winter) until warmer weather exists. Innovative Pool Products does not warranty any equipment that is damaged by freezing conditions. (FIND SEE PROGRAMMING DEVICES ON THE TOUCHSCREEN FOR ENHANCED FREEZE... - Page 9 Typical Lifeguard System Installation using 1 pair of beams an infrared beam can be set up from fence to fence to let you know when a child is on his way to the pool. You can install up to 4 pairs of beam emmitters to completely surround the swimming pool area.
- Page 10 The Smart Touch Touch Screen LED Light. Activates when send- ing or receiving data over the powerline. Reset Button Use Paperclip to reset touchscreen. Speaker For Touch Feedback and Lifeguard Alert Contrast Adjustment NavBar Sunrise and Sunset. Quickly takes you to Pool, Home and Quick Keys Allows you to turn lights on at...
-
Page 11: Touchscreen (Option)
TouchScreen Getting Started The Touch Screen for the Smart T ouch system is very durable, but it can become scratched if you use a sharp or abra- sive object on the screen. In the upper right corner of the screen you will notice an LED. This LED has two purposes. 1.) It will help you see the screen in the dark. -
Page 12: Touchscreen Overview
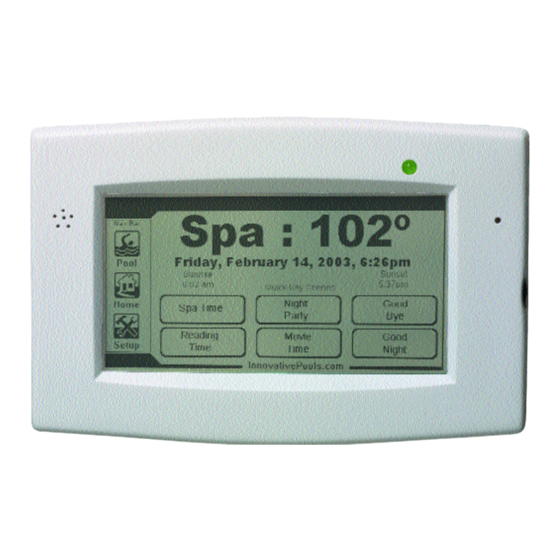
Touch Screen Overview The main screen of your Smart Touch TouchScreen gives you important information about your pool at one glance. This is the default screen that your TouchScreen will return to if you have not touched the screen within the last two minutes. From this screen you can see the temperature of the pool or spa, (if the filter pump is running) the day, date, time, Sunrise and Sunset times as well as navigating through the Nav Bar or launching Quick Key macros. -
Page 13: Connecting Your Touch Screen To The Pool Equipment
Please see page 13 for details. Keys to a successful Home Automation System. Use only high quality Power Line devices from Innovative Pool Products. We carry quality components from various ous manufacturers on our Web Site at InnovativePools.com. Have your system planned in advance by a properly licensed electrician who is familiar with Power Line Carrier Home Automation Systems and has the proper test equipment to verify signal strength and noise issues Install a Coupler Repeater in your main electrical panel as well as remote breaker panels. - Page 14 Setting the connection to the Pool Equipment and the Pool PLC Code The Smart Touch system is capable of checking for other Pool Control and Home Automation If your Touch Screen has a cable connecting it to the Power Center Press Hardwire Connection.
- Page 15 Setting the Time, Date and Location For the Smart Touch system to operate properly you must enter the following date, time and location information. This will allow the TouchScreen to program devices by time of day seven days a week, as well as program items to turn on or off at Sunrise and Sunset.
- Page 16 World Time Zone Map Why We Need This Information Your Smart Touch TouchScreen is capable of controlling every electrical device in your home. With traditional control systems you must change the clock twice a year if you are in an area that uses Daylight Savings time. If you want a tra - ditional system to control outdoor lighting, you must either change the programmed time for these lights to turn on sever - al times a year, or live with the fact that your outdoor lighting will turn on several hours early (while it is still light) or late, (several hours after it gets dark) during the course of a year.
- Page 17 Programming Pool Equipment Press Setup > Program Pool and Spa Devices Select the device from this menu that you would like to program. Notice that the labels are generic. You will custom label these devices as you program them. You may want to make a list of what equipment is connect to Aux 1 - 6 to refer to.
- Page 18 X-10 compatible PLC products. If a particular system or manufacturer does not have a bridge and is not compatible with this protocol, but can output RS 232, you can purchase an RS 232 to PLC PowerLinc from Innovative Pool Products.
- Page 19 Programming Home Automation Equipment Press Setup Icon, then press Program Home Control Devices. Select the device you would like to pro- gram from the Home Control Menus. With the ability to control up to 40 devices, it is a good idea to take notes on the devices you have installed, as well as their addresses.
- Page 20 Setting Pool and Spa Temperature The Smart Touch system has a temperature set point for the Pool temperature and a separate set point for the Spa temperature. These set points are factory set to 80 degrees F for the Pool and 100 degrees F for the Spa. To reset the Temperature from the Main Menu.
- Page 21 The Keys to a successful Home Automation System are: Use only high quality Power Line devices from Innovative Pool Products. We carry quality components from various manufacturers on our Web Site at InnovativePools.com.
- Page 22 QUICK KEY Macro Planner IMPORTANT: BEFORE YOU BEGIN TO SET UP YOUR QUICK KEY MACROS YOU MUST FIRST ENTER THE HOUSE CODE OF YOPU POOL SYSTEM. THEN LABEL ALL OF YOUR POOL AND HOME CON- TROLS AND SET ALL THE ADDRESSES OF YOUR HOME CONTROLS. EXAMPLE House Code of Pool System ____H_________ Quick Key #1 Name ___Party Time___________________...
- Page 23 Quick Key Macro Set Up House Code of Pool System _____________ Quick Key #2 Name ______________________ PLC Trigger __ ____ To trigger this macro from the SpaTemp or a Decora Spa Control, the PLC trigger must be the same house code as the pool control units 1 and 2 On or OFF.
- Page 24 Quick Key Macro Set Up House Code of Pool System _____________ Quick Key #4 Name ______________________ PLC Trigger __ ____ To trigger this macro from the SpaTemp or a Decora Spa Control, the PLC trigger must be the same house code as the pool control units 1 and 2 On or OFF.
- Page 25 Quick Key Macro Set Up House Code of Pool System _____________ Quick Key #6 Name ______________________ PLC Trigger __ ____ To trigger this macro from the SpaTemp or a Decora Spa Control, the PLC trigger must be the same house code as the pool control units 1 and 2 On or OFF.
- Page 26 Quick Key Macro Chart Follow the step by step instructions on this screen. 1. Label your Quick Key. 2. Set a PLC or X-10 trigger (If Desired). 3. Select your devices to be controlled. 4. Set the state of each device. (On, Off, Dim level) Keyboard for Labeling Quick Key.
-
Page 27: Spatemp (Optional Spa Side Control)
SpaTemp Optional Spa Side Control The SpaTemp spa side control is back lit for good night time visibility and is fully programmable from spa side. It displays temperature and the status of the Spa Function and up to 5 additional functions. It also allows you to change the heater set point. -
Page 28: Decora Spa Control (Hardwire And Pedestal Mounted Decora Switches)
Decora Spa Control DSC-1H and Decora Pedestal Hardwired Decora Switch Decora Pedestal Programming Instructions The DSC-1 comes from the factory with the following settings. From top to bottom on the right side is Spa,Spa Heater Enable, Aux 1, Aux 2, and Aux 3 or Spa Overflow. To change from the factory settings 1.) Press both the up and down arrows at the same time. - Page 29 Using your Decora Switch over the Power Line Receive Heater Firing Indicator Transmit Decora Pedestal Your Decora Pedestal uses your existing electrical wiring to communicate with your Smart Touch Power Center at the pool equipment. This method of communication allows only one signal to travel over the house wiring at a time. When you press a button on the Decora Pedestal it sends a signal to the Power Center and the Power Center answers back acknowledging the command.
Need help?
Do you have a question about the Smart Touch LE and is the answer not in the manual?
Questions and answers