Table of Contents
Advertisement
Available languages
Available languages
Quick Links
Advertisement
Table of Contents

Related Manuals for Fuba ODE8500 T2HEVC


Summary of Contents for Fuba ODE8500 T2HEVC
- Page 3 Gentile Cliente, Fuba ODE8500 T2HEVC Vi ringraziamo per aver scelto il ricevitore digitale terrestre modello In questa guida sono fornite informazioni sull’utilizzo del dispositivo, sulle connessioni, sui comandi e sulla cura dell’apparecchio, con le quali potrete approfondire la conoscenza del vostro nuovo ricevitore.
-
Page 4: Table Of Contents
Indice Sezione Installazione ....................................1 Norme di sicurezza e smaltimento .............................. 1 Descrizione del prodotto e collegamenti ............................. 2 1.2.1 Pannello frontale ................................2 1.2.2 Pannello posteriore e connessioni ........................... 2 ... -
Page 5: Sezione Installazione
ODE8500 T2HEVC 1 Sezione Installazione 1.1 Norme di sicurezza e smaltimento Per un utilizzo sicuro dell’apparecchio, e per la vostra incolumità, vi invitiamo a leggere attentamente i seguenti consigli riguardanti le misure di sicurezza. ALIMENTAZIONE Interponendo l’alimentatore in dotazione, il ricevitore deve essere collegato esclusivamente ad una presa di corrente da 230V~ 50Hz. -
Page 6: Descrizione Del Prodotto E Collegamenti
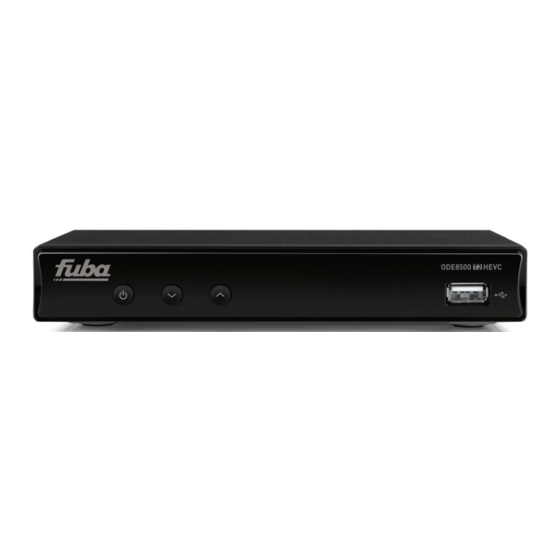
Fuba 1.2 Descrizione del prodotto e collegamenti 1.2.1 Pannello frontale q Tasto accensione e spegnimento in standby. ▼ Tasto cambio canale precedente. ▲ Tasto cambio canale successivo. IR Sensore a raggi infrarossi per telecomando. LED Indicatore a LED di stato operativo (VERDE) e Stand-by (ROSSO). -
Page 7: Telecomando
ODE8500 T2HEVC 1.3 Telecomando La conoscenza del telecomando costituisce la base per l’utilizzo del ricevitore e per una facile navigazione tra i vari menu e funzioni. 1.3.1 Batterie Informazioni ed avvertenze Inserire o sostituire le batterie al primo utilizzo del prodotto o quando il telecomando non risponde più propriamente alla pressione dei tasti. -
Page 8: Programmazione Dei Tasti Tv
Fuba 1.3.3 Programmazione dei tasti TV 1.3.3.1 Cambio codice TV I codici TV predefiniti si trovano nella lista allegata alle presenti istruzioni (vedi Appendice A). Identificare prima la marca del televisore da comandare, poi seguire i passi qui sotto elencati: 1. -
Page 9: Prima Installazione Del Ricevitore
ODE8500 T2HEVC 1.4 Prima Installazione del ricevitore Una volta terminato il collegamento del ricevitore (par. 1.2.2) e connesso l’alimentatore alla presa di rete elettrica, il ricevitore si avvierà automaticamente. Se non dovesse accadere, accendere il dispositivo utilizzando l’apposito tasto q del telecomando o del pannello frontale. -
Page 10: Sezione Per L'utilizzo Semplificato
Fuba 2 Sezione per l’utilizzo semplificato AVVERTENZA Prima di leggere questo capitolo è necessario aver letto attentamente il capitolo precedente. Per semplificare l’utilizzo del ricevitore e la gestione dei numerosi canali digitali, sono presenti alcune finestre e menu raggiungibili con la pressione di un singolo tasto del telecomando (par. 1.3.2). Essi sono pensati per l’uso frequente e le loro funzioni sono indispensabili per un’interazione rapida col ricevitore. -
Page 11: Opzione Audio E Sottotitoli
ODE8500 T2HEVC 2.5 Opzione Audio e Sottotitoli In caso la trasmissione del canale corrente sia in multi audio/lingua e/o contenga sottotitoli, l’utente può selezionare la traccia audio e/o i sottotioli che preferisce. Procedere come segue: Premere il tasto AUDIO o SUB del telecomando. -
Page 12: Registrazione Programmi Tv
Fuba 2.6.2.3 Registrazione Programmi TV NOTE Il ricevitore è dotato di un singolo sintonizzatore televisivo, perciò, mentre una registrazione è in corso, esso consentirà anche di visualizzare un canale diverso, a patto che quest’ultimo sia trasmesso sulla stessa frequenza del canale in registrazione. -
Page 13: Sezione Per L'utilizzo Avanzato
ODE8500 T2HEVC 3 Sezione per l’utilizzo avanzato AVVERTENZE La modifica di alcuni parametri dei menu potrebbe pregiudicare il corretto funzionamento del ricevitore stesso. Leggere perciò attentamente questa sezione del manuale prima di procedere con eventuali regolazioni. Per evitare manomissioni, alcune funzioni sono protette da un codice di sicurezza definito direttamente dall’utente in fase di prima installazione (vedi par. -
Page 14: Cancella Tutti
Fuba NOTA Il canale cancellato verrà ricaricato in lista in seguito ad un aggiornamento canali oppure ad una re-installazione dell’intera lista canali (par. 3.3). 3.2.2 Cancella Tutti Utilità di cancellazione di tutti i canali. 3.3 Menu Installazione Durante la prima installazione viene eseguita la ricerca automatica dei canali disponibili. Periodicamente, in occasione dell’attivazione di nuovi servizi televisivi e radiofonici o di modifiche da parte delle emittenti televisive, si suggerisce di... -
Page 15: Regolazione Ora Locale
ODE8500 T2HEVC 4:3 Pan&Scan : Per schermi 4:3. Le immagini trasmesse in 16:9 vengono adattate proporzionalmente all’altezza dello schermo, tagliandone le porzioni laterali. Uscita Audio Digitale : Codifica delle uscite audio digitali tra Stereo digitale ( LPCM Out ) e passaggio audio originale... -
Page 16: Altro
Fuba Config.PVR Tasto BLU ( ): Configurazione della memoria USB per la registrazione e/o il TimeShift. Riferirsi al par. 2.6.2.1. 3.4.9 Altro 3.4.9.1 Modo Canali Tutti In Chiaro Modalità di cambio canali tramite i tasti CH+/CH- tra: tutti i canali (... -
Page 17: Mappa Dei Menu
ODE8500 T2HEVC Selezionare quindi una stazione radio in lista con i tasti freccia ▼/▲ e premere il tasto OK per ascoltarla. Per cambiare stazione servirsi dei tasti freccia ▼/▲ o CH-/CH+; in alternativa, accedere di nuovo alla lista delle stazioni premendo il tasto OK. -
Page 18: Guida Alla Risoluzione Dei Problemi
Fuba 5 Guida alla risoluzione dei problemi SINTOMO POSSIBILE CAUSA RIMEDIO Il ricevitore è scollegato dalla rete Controllare ricevitore elettrica. collegato alla rete elettrica. Il Display sul pannello frontale non si Accertarsi l’alimentatore accende. L’alimentatore è inserito ma non ATTENZIONE funzionante. - Page 19 ODE8500 T2HEVC SINTOMO POSSIBILE CAUSA RIMEDIO Memoria formattata Formattare la memoria con File System propriamente. FAT32. memoria viene Memoria USB non compatibile. Provare un’altra memoria USB. riconosciuta. La sola porta USB del box non è Utilizzare l’eventuale alimentatore sufficiente ad alimentare la memoria.
-
Page 20: Caratteristiche Tecniche
Fuba 6 Caratteristiche tecniche Tipo prodotto Ricevitore digitale terrestre zapper HD DVB-T/DVB-T2 H.265 VHF: 174÷230MHz Frequenze di ingresso/uscita UHF: 470÷862MHz Decodifica Video MPEG-2, MPEG-4 H.264/H.265 Decodifica Audio MPEG Layer I & II, AAC+ (HE-AAC v1), Dolby Digital, Dolby Digital Plus... - Page 23 Dear Customer, Fuba ODE8500 T2HEVC Thank you for choosing the digital terrestrial receiver model This guide provides information on the operation of the equipment, connections, commands, and care of the device, with which you can deepen your understanding of your new receiver.
- Page 24 Index Installation section ..................................... 1 Safety precautions and disposal ..............................1 Product description and connections ............................2 1.2.1 Front panel ..................................2 1.2.2 Back pannel and connections ............................2 ...
- Page 25 ODE8500 T2HEVC 1 Installation section 1.1 Safety precautions and disposal For a safe use of the appliance and for your own safety, please read the following advice concerning safety measures. POWER SUPPLY Using the supplied power supply unit, the receiver should only be connected to a mains socket 230V ~ 50 Hz.
- Page 26 Fuba 1.2 Product description and connections 1.2.1 Front panel q Power on/off button in standby. ▼ Switch to previous channelbutton. ▲ Switch to next channelbutton. IR Infrared sensor for remote control. LED LED operating status indicator ( ) and standby (...
- Page 27 ODE8500 T2HEVC 1.3 Remote control Knowledge of how to use the remote control forms the basis for using your receiver and for easy navigation between the various menus and functions. 1.3.1 Batteries Information and warnings Replace and insert batteries before the first use of the product or when the remote does not properly respond to keystrokes.
- Page 28 Fuba 1.3.3 Programming the TV buttons 1.3.3.1 Changing TV code Default TV codes are in the list attached to these instructions (see Appendix A). First identify the make of the TV you want to control, then follow the steps listed below: 1.
- Page 29 ODE8500 T2HEVC 1.4 First start of your receiver Once you have connected the receiver (para.1.2.2) and then the power supply between the receiver and the mains supply, the receiver will start up automatically. If this does not happen, turn the device on using the appropriate button q of the remote control or on the front panel.
- Page 30 Fuba 2 Section for simplified use WARNING Before reading this chapter you should have read the previous chapter. To simplify the use of the receiver and the management of several digital channels, there are some Windows and Menus that are accessible by pressing a single button on the remote control (see section 1.3.2). They are meant for frequent use and their functions are essential for speedy interaction with the receiver.
- Page 31 ODE8500 T2HEVC Select with the arrow keys ▲/▼ the audio track or subtitle you want. Press OK to confirm. In addition, under an audio track, the arrows ◄/► help you manage the distribution of audio channels Stereo Mono...
- Page 32 Fuba Scheduled recording You can schedule multiple timer recordings manually (or simply a viewing) by accessing the menu System Setup > Timer Setting (para. 2.7). Alternatively, in the presence of EPG information on the event program, program it in the EPG menu (section 2.3).
- Page 33 ODE8500 T2HEVC 3 Section for advance use WARNINGS Changing some parameters of the menu may impair the correct functioning of the receiver. Therefore, thoroughly read this section of the manual before proceeding with any adjustments. To avoid tampering, some functions are protected by a security code directly defined by the user during first installation (see para.
- Page 34 Fuba NOTE The deleted channel will be reloaded on the list during a channels update or a reinstallation of the entire channel list (section 3.3). 3.2.2 Delete All Utility to delete all channels. 3.3 Installation menu During the first installation, an automatic available channel scan is done. Periodically, during the activation of new television and radio services or modifications by the broadcasters, it is suggested to reinstall or do update the channel list of the receiver.
- Page 35 ODE8500 T2HEVC Digital Audio Output LPCM Out : Encodes the digital audio outputs between Digital Stereo ( ) and passage of original BS Out audio as per source ( WARNING BS Out When the digital audio output is set to in correspondence with different audio tracks from stereo (PCM) such as Dolby Digital multi-channel, the audio volume can be set only from the external audio device connected to the receiver.
- Page 36 Fuba 3.4.9 Other 3.4.9.1 Channel Play Type Clear Change channel play type using the buttons CH+/CH- between: all channels ( ), only free channels ( ) or only the encrypted channels ( Encrypted 3.4.9.2 Auto Standby The receiver is equipped with automatic shut-off function for energy saving. This means that after three hours in operating mode without any action on your part, the receiver will automatically go into standby.
- Page 37 ODE8500 T2HEVC 4 Menu map The menu of the receiver is structured as follows: Main Menu -- Media Player ---- PVR ---- Video ---- Music ---- Image -- Edit Channel ---- TV Channel List ---- Radio Channel List ---- Delete All...
- Page 38 Fuba 5 Troubleshooting guide PROBLEM POSSIBLE CAUSE REMEDY The receiver is disconnected from the Check that the receiver is plugged in. mains power supply. The Display on the front panel does not light up. The power supply is plugged in but it Make sure the power supply is working.
- Page 39 ODE8500 T2HEVC PROBLEM POSSIBLE CAUSE REMEDY broadcaster does allow recording. You cannot record. Free up disk space intended for Not enough memory. recording. receiver switches Energy saving function activates. Consult paragraph 3.4.9.2. automatically. You forgot your PIN. Perform a reset (see section 3.5.2).
- Page 40 Fuba 6 Technical characteristics Product type Digital terrestrial receiver zapper HD DVB-T/DVB-T2H.265 VHF: 174÷230MHz Input/output frequencies UHF: 470÷862MHz Video decoding MPEG-2, MPEG-4 H.264/H.265 Audio decoding MPEG Layer I & II, AAC+ (HE-AAC v1), Dolby Digital, Dolby Digital Plus Menu language ENG, ITA, FRA, DEU, POL, RUS, SPA, CES ●...
- Page 41 A. TV code list DAYTRON 004 009 JC PENNEY 000 004 005 008 009 012 014 DELL 027 042 169 021 044 046 074 089 091 129 ABEX 061 DGISTAR 133 JCB 002 ACER 260 278 DIAMOND VISION 076 170 206 JENSEN 004 009 110 ACME 015 DIGIMATE 218...
- Page 42 NIKO 248 RCA 000 003 004 005 009 014 021 040 046 SYLVANIA 004 008 009 058 064 111 117 NORCENT 035 047 175 078 080 082 084 086 091 095 104 108 130 151 160 161 167 180 198 NTC 049 131 143 149 150 153 189 SYMPHONIC 023 045 151 180 198...
- Page 44 Codice Prodotto / Product code 21005257 Ricevitore digitale terrestre / Digital terrestrial receiver DVB-T/T2 HD AVC/HEVC, USB PVR ready Fuba ODE8500 T2HEVC ITALY TELE System Digital Via dell’Artigianato, 35 36050 Bressanvido (VI) Internet: www.telesystem-world.com Tel. assistenza tecnica: 199 214 444 (da Italia/Italy only)
Need help?
Do you have a question about the ODE8500 T2HEVC and is the answer not in the manual?
Questions and answers