Table of Contents
Advertisement
Quick Links
10X20 E-Z Frame Standard Structure Assembly Instructions
This kit includes:
(12) 90 Degree Brackets
(33) 120 Degree Brackets
(38) I or 30 Degree Brackets
(54) T Brackets
To complete your structure project you will need to purchase:
(81) 2X2 lumber - commonly known as a 2X2 – actual dimensions vary slightly from store to store. When
purchasing your lumber it is a good idea to take one of your brackets along to verify that the lumber you are
purchasing will fit your bracket correctly. You do not want the lumber to fit too loosely or too snuggly.
2X2 lumber can come in pine, cedar, redwood or treated lumber. Treated lumber, redwood or cedar is best
if planning to place your structure directly on the ground. Typically when buying 2X2 lumber, it is best to
buy it in a bundle that is still strapped instead of loose lumber and let it sit for a couple of days to finish
drying out before you cut the straps because pine lumber tends to twist if it has not finished drying yet. If
buying unbundled boards just be sure to glance down the end of each board to make sure it is straight and
does not have any bows in it before buying it.
(600) 1 ¼" wood screws
(6) Hinges (Be sure to buy a size hinge that will support the weight of your door)
(2) Door Latch
- Materials needed to cover your structure depending on use. This can be plastic, tarps, glass. Chicken wire,
siding or metal. Or use your imagination!
Tools needed to complete structure:
-
Table saw or skill saw
-
Screw Gun, Drill with Phillips bit or a Phillips screwdriver (please keep in mind there are a lot of screws
needed to fasten brackets so an electric screw driver of some sort would make the project much easier)
-
Level
-
Measuring tape
Advertisement
Table of Contents

Summary of Contents for E-Z FRAME 10X20 Standard
- Page 1 10X20 E-Z Frame Standard Structure Assembly Instructions This kit includes: (12) 90 Degree Brackets (33) 120 Degree Brackets (38) I or 30 Degree Brackets (54) T Brackets To complete your structure project you will need to purchase: (81) 2X2 lumber - commonly known as a 2X2 – actual dimensions vary slightly from store to store. When purchasing your lumber it is a good idea to take one of your brackets along to verify that the lumber you are purchasing will fit your bracket correctly.
- Page 2 Assembly Instructions: Step 1: Please make sure to read all the assembly instructions before starting your project. Step 2: Identify all your brackets so you know which bracket goes where. The diagram below shows which bracket is used for which area of your project. Please note: When assembling make sure brackets are facing the directions shown in this diagram.
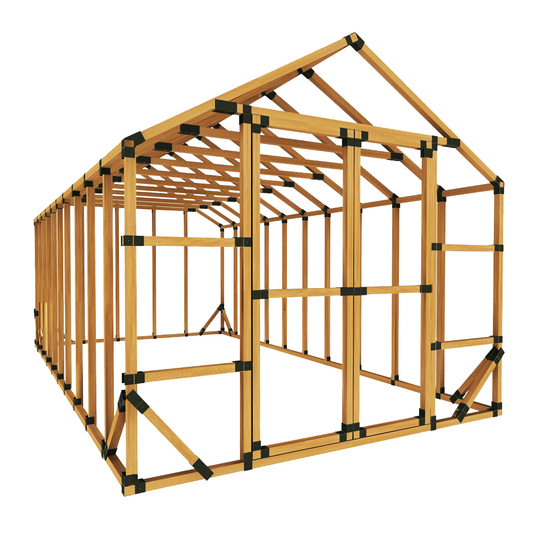
- Page 3 Assemble your structure: Below is a diagram of an assembled structure. Your structure should look like this once assembled. Note: When assembling your structure make sure you put a screw in each hole in each bracket to make sure your structure is rigid and solid when completed.
- Page 4 measure down from the ridge bracket down each truss board. Failure to do this may push the truss out and cause it not to fit. Layout your roof as shown in the roof plan diagram below. Step 6: Next you can either add each of the stud wall pieces or assemble them all together on the ground and fit them in the base at once.
- Page 5 Step 8: Assemble the front of your structure. Do not add screws until you have everything adjusted how you would like them. First add your K boards by sliding in the T brackets and adding the studs. Then build your door assembly. Attach your door assembly using the hinges you purchased.
- Page 6 E-Z Frame Structures & Shelters LLC E-Z Frame Structures & Shelters LLC and E-Z Frameup.com are not responsible for any harm or damages to the structure or person as a result of misuse of the product or alteration of the design or design by someone other than E-Z Frameup.com or E-Z Frame Structures & Shelters LLC. If...
Need help?
Do you have a question about the 10X20 Standard and is the answer not in the manual?
Questions and answers