Table of Contents
Advertisement
Advertisement
Table of Contents

Summary of Contents for LogicBlue LevelMatePRO+
- Page 1 User Manual Copyright © 2020 LogicBlue Technology...
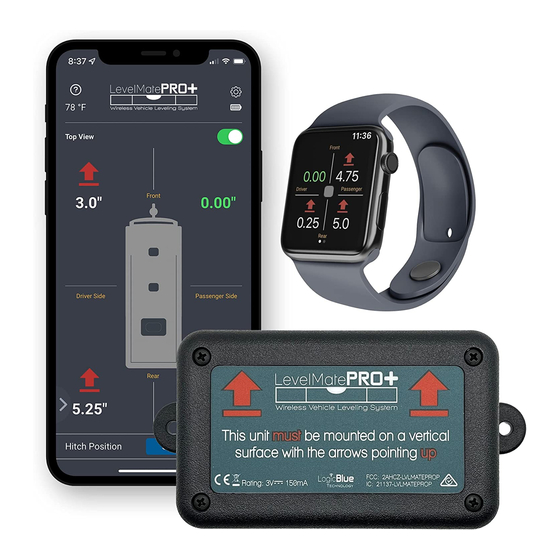
- Page 2 Thank you for purchasing a LevelMatePRO+ wireless vehicle leveling system. This product was designed for ease of use and utilizes the best possible components and engineering to achieve accuracy you can count on. We believe you will find it to be an extremely useful and time saving tool.
- Page 3 How Long this Coverage Lasts The limited warranty period for LogicBlue products is 1 year from the original date of purchase. Proof of purchase from the customer will be required for all warranty claims.
- Page 4 As with all electronic devices, they are susceptible to damage by static electricity discharge. Before removing the cover of this product be sure to discharge the static electricity in your body by touching a piece of grounded metal. FCC STATEMENT 1.
- Page 5 IC Statement This device complies with Industry Canada licence-exempt RSS standard(s). Operation is subject to the following two conditions: (1) this device may not cause interference, and (2) this device must accept any interference, including interference that may cause undesired operation of the device.
- Page 6 Setup and Install the LevelMatePRO+ 1) Remove the 4 screws on the lid, remove the lid and set aside. 2) Remove the battery from the packaging and install it with the plus (+) sign up as in figure 1. The LevelMatePRO+ uses a CR2450 battery.
- Page 7 installed upside down, the battery has an anti-discharge sticker on the bottom that needs to be removed, or the battery is dead and needs to be replaced with a new one. NOTE: You will have 10 minutes from the time you switched the LevelMatePRO on to allow new smartphones or tablets to “learn”...
- Page 8 Bluetooth Signal Strength to insure that your selected mounting location is suitable (figure 4). Follow the steps at the top of this screen to perform the signal strength test. If the measured signal strength is acceptable you will be directed to make a permanent mount using the provided mounting screws.
- Page 9 the unit to ignore motion during sleep mode and will require that the on/off switch be cycled to wake from sleep. The Reverse Front View setting will show the back view of the vehicle on the leveling screen when enabled. This can be beneficial for both driveable and towable vehicles when using the front/side display mode on the Leveling screen.
- Page 10 VDC allowing it to be powered in a number of different ways. After plugging in the micro-USB end of the supplied USB cable, the A-male end can then be plugged into any standard A-female USB port. You can also wire the unit directly to the vehicle 12 VDC system by cutting off the A-male end of the USB cable and using the white (positive) and black (ground) internal wires to connect to the corresponding supplies of positive and ground on the vehicle system.
- Page 11 figure 2 figure 3 figure 4 figure 5...
- Page 12 figure 6 figure 7 figure 8 figure 9...
- Page 13 Label faces rear Label faces Driver’s Side Label faces passenger side Label faces Label faces front Driver’s side figure 10...
- Page 14 Using the LevelMatePRO+ 1) Position your vehicle Move your vehicle to the location where you would like to begin leveling. 2) Connect to the LevelMatePRO+ After you have completed installation and configuration of your LevelMatePRO unit and app (at the beginning of this manual), you are ready to begin using the product to level your vehicle.
- Page 15 which side of the trailer needs to be raised to achieve a level position from side- to-side. The displayed measurement indicates how much height will be required on the side where the arrow is displayed. If you are using ramps for leveling, place the ramp(s) either in the front or rear of the tire(s) on the side indicated by the red arrow.
- Page 16 6) Level your towable vehicle from front-to-back Once your vehicle is level from side-to-side you are ready to begin leveling from front-to-back. For this step you will be using the bottom section of the Leveling screen. Similar to the side-to-side leveling step, when the vehicle is not in a level position there will be a red arrow pointing up or down near the front of the trailer graphic side view (figure 11).
- Page 17 of the vehicle. To level the vehicle, simply stack your blocks in front of or behind each wheel to the height indicated for that wheel. Once the blocks are stacked, drive onto all of the stacks of blocks at the same time and the vehicle should reach a level position.
- Page 18 0.00”. It is also important to understand that if you overshoot a height this will result in the opposite wheels to then be indicated as needing to be raised. For example, prior to leveling the front wheels are both displaying 0.00” and the rear wheels are both displaying 3.50”.
- Page 19 figure 13 figure 14 figure 15 figure 16...
- Page 20 Using the LevelMatePRO+ with Apple Watch NOTE: To use the LevelMatePRO app for Apple Watch, your watch must be connected to an iPhone. Apple Watches connected to an Android phone cannot access Apple Watch apps as they do not have access to the Apple app store. 1) Install the LevelMatePRO app on Apple Watch The LevelMatePRO app should automatically install on the Apple Watch that is connected to your iPhone.
- Page 21 NOTE: Changing the Leveling screen view from front and side to top view or vice-versa is not possible directly from the Apple Watch app and must be done on the iPhone. 4) Save and Recall Hitch position If your LevelMatePRO+ is configured for a towable vehicle type (travel trailer, fifth wheel or popup/hybrid) you will have access to the Save and Recall Hitch Position features on your Apple Watch.
- Page 22 May 2016, the LevelMatePRO. LogicBlue Technology is a testament to what can be done with good ideas, hard work and a never-give-up attitude. We love what we do and it is our passion to bring products to consumers that are useful, user friendly and work reliably and accurately.
Need help?
Do you have a question about the LevelMatePRO+ and is the answer not in the manual?
Questions and answers
Is there a “best” place in the RV for the placement of the level mate pro?
The best placement for the LogicBlue LevelMatePRO+ in an RV is a secure location where it can maintain a stable connection and provide accurate leveling readings. It should be attached using the provided hardware, ensuring a firm and reliable installation. The device's compact design allows it to be placed conveniently without taking up much space.
This answer is automatically generated
where is the user manual for the LevelMateMax? The instructions are not clear using the app. I am ready to return this unit.... it is not worth $150!