Advertisement
Table of Contents
- 1 Table of Contents
- 2 Package Contents / System Requirements
- 3 Registration / Technical Support
- 4 Technical Specifications
- 5 Device Layout
- 6 Using Your Razer Turret
- 7 Installing Your Razer Turret
- 8 Configuring Your Razer Turret - Gaming Lapboard
- 9 Configuring Your Razer Turret - Mouse
- 10 Configuring Your Razer Turret - Macros
- 11 Configuring Your Razer Turret - Stats and Heatmaps
- 12 Safety and Maintenance
- 13 Legalese
- Download this manual
The key to securing victory every time, is having an arsenal of controls more
impressive than your opponents. The Razer Turret puts the power of desktop grade
gaming peripherals right in your lap as you play your favorite game titles on the
couch. In addition to the undeniable precision achieved by using a keyboard and a
mouse, this highly ergonomic lapboard also gives you the power to execute typing
commands while you're gaming or browsing, without having to switch devices
constantly.
Arm yourself with the Razer Turret, and dominate leaderboards from the comfort of
your couch.
1 | razer™
Advertisement
Table of Contents

Related Manuals for Razer TURRET


Summary of Contents for Razer TURRET
- Page 1 The key to securing victory every time, is having an arsenal of controls more impressive than your opponents. The Razer Turret puts the power of desktop grade gaming peripherals right in your lap as you play your favorite game titles on the couch.
-
Page 2: Table Of Contents
7. CONFIGURING YOUR RAZER TURRET – GAMING LAPBOARD ....20 8. CONFIGURING YOUR RAZER TURRET – MOUSE ........29 9. CONFIGURING YOUR RAZER TURRET – MACROS ........41 10. CONFIGURING YOUR RAZER TURRET – STATS AND HEATMAPS ..46 11. SAFETY AND MAINTENANCE ............... 56 12. LEGALESE .................... 60... -
Page 3: Package Contents / System Requirements
SYSTEM REQUIREMENTS For RF USB dongle connectivity: PC / Mac / Razer Forge TV* with a free USB port Windows® 10 / Windows® 8 / Windows® 7 / Mac OS X (10.8 – 10.11) *requires third party app For Bluetooth®... -
Page 4: Registration / Technical Support
To learn more about Razer Synapse and all its features, visit www.razerzone.com/synapse. If you are already a Razer Synapse user, register your product by clicking on your email address at the Razer Synapse application and select Warranty Status from the dropdown list. -
Page 5: Technical Specifications
3. TECHNICAL SPECIFICATIONS RAZER TURRET LAPBOARD Anti-ghosting capability for up to 10 simultaneous key presses Chiclet styled keycaps Dedicated Android buttons Cortex quick launch button Battery life of up to 4 months - The life expectancy of this battery depends upon its usage ... -
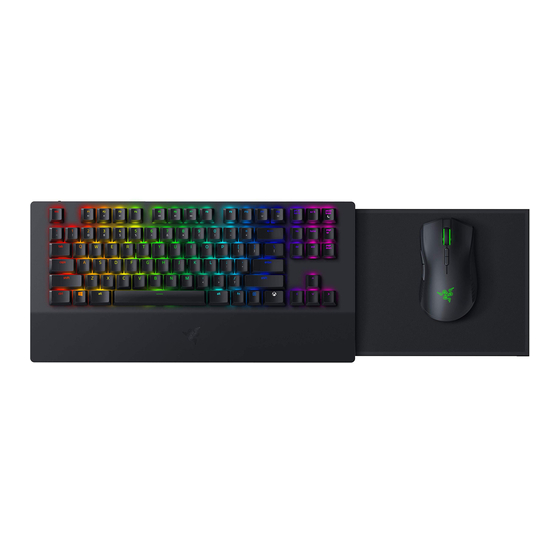
Page 6: Device Layout
4. DEVICE LAYOUT RAZER TURRET GAMING LAPBOARD A. Power / Pairing mode button B. Bluetooth Smart ( ) / RF (2.4) slider switch C. LED indicator D. Volume control keys E. Media keys F. Android keys G. Mouse mat 6 | For gamers by gamers™... - Page 7 RAZER TURRET GAMING MOUSE A. Left mouse button B. Right mouse button C. Scroll wheel D. Battery / Pairing Indicator E. Mouse button 5 F. Mouse button 4 G. Sensitivity Stage Up H. Sensitivity Stage Down I. Detachable top mouse cover J.
-
Page 8: Using Your Razer Turret
GETTING STARTED Both the Razer Turret gaming lapboard and the Razer Turret gaming mouse are set to Bluetooth mode by default. When setting up your Razer Turret for the first time, please insert the battery into the mouse as follows: Remove the top cover of the Razer Turret gaming mouse by lifting the back of the cover and pulling it backwards. - Page 9 Reattach the top cover onto the mouse. Please ensure it is secured. Note: We recommend removing the rechargeable battery from the mouse if you are not intending to use it for a prolonged period of time. Repeat the above steps to remove the battery. 9 | razer™...
- Page 10 1. Select the appropriate power plug for your region and attach it to the power adapter. 2. Connect the charging dock to the power adapter and plug it into a suitable power source. 3. Fold back the mouse mat on the Razer Turret gaming lapboard. 10 | For gamers by gamers™...
- Page 11 4. Place the folded Razer Turret gaming lapboard and mouse into the charging dock. Ensure that the devices are securely in place. The LED flashes red to indicate that the battery is currently charging. Razer Turret gaming lapboard Razer Turret gaming mouse 5.
- Page 12 The Razer Turret goes into power saving mode after a 15 minutes idle period. Simply press any key or move the mouse to wake the device. The Razer Turret will then automatically attempt to reconnect to the last paired device.
- Page 13 LED indicator will stay lit in blue for 5s before fading off. Note: To pair your Razer Turret gaming mouse to a different device, disconnect the current Bluetooth connection from host device. Then, press and hold the 4 side buttons for 3s to manually activate pairing mode.
- Page 14 Razer Turret gaming lapboard 1. Push the Slider switch on the Razer Turret gaming lapboard to 2. Press the Power button to turn the Razer Turret gaming lapboard on and activate pairing mode. The LED indicator will start to blink in blue.
- Page 15 LED indicator will stay lit in blue for 5s before fading off. Note: To pair your Razer Turret gaming lapboard to a different device, disconnect the current Bluetooth connection from host device. Then, press and hold the power button for 3s to manually activate pairing mode.
- Page 16 2. Remove the top cover of the Razer Turret gaming mouse by lifting the back of the top cover and pulling it backwards. Retrieve the USB dongle. Reattach the top cover. 3. Plug the USB dongle to the device you wish to pair to.
- Page 17 USING THE USB EXTENSION DOCK Plug the USB extension dock to your gaming system to increase the reach of its USB port. Ensure that the RF USB dongle is within line-of-sight of the Razer Turret for optimum performance. USING THE RAZER TURRET GAMING LAPBOARD Pressing the “FN”...
- Page 18 Media keys The media keys allow you to play/pause a track or skip tracks backward and forward. Backward Play/pause Forward Android shortcut keys Back and Home shortcut keys for Android devices Back Home 18 | For gamers by gamers™...
-
Page 19: Installing Your Razer Turret
Step 3: Create your Razer ID or login to Synapse with your existing Razer ID. *Applicable for Windows 8 or later. Note: Razer Synapse is only available when the Razer Turret is connected to a PC. 19 | razer™... -
Page 20: Configuring Your Razer Turret - Gaming Lapboard
7. CONFIGURING YOUR RAZER TURRET – GAMING LAPBOARD Disclaimer: The features listed here require you to log in to Razer Synapse. These features are also subject to change based on the current software version and your Operating System. The Razer Turret displays as 2 separate devices on the Razer Synapse device selector on the bottom left, allowing you to configure the Razer Turret gaming lapboard and the Razer Turret gaming mouse separately. - Page 21 Each profile can be set to FN + 0 - 9 using the SHORTCUT dropdown menu for fast profile switching. Each profile can also be set to automatically activate when you run a program or application through the use of the LINK PROGRAM option. 21 | razer™...
- Page 22 Customize Tab The Customize Tab is where you can modify the basic functionalities of your device such as key assignments to suit your gaming needs. The changes made in this tab are automatically saved to your current profile. 22 | For gamers by gamers™...
- Page 23 KEYBOARD FUNCTION from the Key Assignment Menu and enter the key you wish to use on the given field below. You may also include modifier keys such as Ctrl, Shift, Alt or any of those combinations. 23 | razer™...
- Page 24 Inter-device from the Key Assignment Menu, a sub-menu will appear. DEVICE TO LINK allows you to choose which currently connected Razer device can be linked while FUNCTION allows you to choose which functionality you want to use for the linked device.
- Page 25 Previous Track - Play the previous track. Next Track - Play the next track. Windows 8 Charms This option enables you to assign the key into an Operating System shortcut command. For more information please visit: http://windows.microsoft.com/en- us/windows-8/getting-around-tutorial 25 | razer™...
- Page 26 Windows Shortcuts This option enables you to assign the key into an Operating System shortcut command. For more information please visit: http://support.microsoft.com/kb/126449 Disable This option renders the assigned key unusable. Use Disable if you do not want to use the key or if it interferes with your gaming. 26 | For gamers by gamers™...
- Page 27 The Gaming Mode Tab allows you to customize which keys to disable when Gaming Mode is activated. Depending on your settings, you may choose to disable the Windows key, Alt + Tab and Alt + F4. An indicator will light up when the function is currently turned ON. 27 | razer™...
- Page 28 Power Tab The Power Tab allows you to manage your device’s energy consumption when running on batteries. You can set your device to enter sleep mode when it has been idle for a certain amount of time. The Power Tab also allows you to be notified when the device’s power is at a certain level.
-
Page 29: Configuring Your Razer Turret - Mouse
8. CONFIGURING YOUR RAZER TURRET – MOUSE Disclaimer: The features listed here require you to log in to Razer Synapse. These features are also subject to change based on the current software version and your Operating System. The Razer Turret displays as 2 separate devices on the Razer Synapse device selector on the bottom left, allowing you to configure the Razer Turret Lapboard and the Razer Turret Mouse separately. - Page 30 Profile A profile is a convenient way of organizing all your custom settings and you can have an infinite number of profiles at your disposal. Any changes made within each tab are automatically saved to the current profile and stored into the cloud servers. You can create a new profile by clicking the button or delete the current profile by clicking the...
- Page 31 The changes made in this tab are automatically saved to your current profile. Top View The Top View is where you can customize the mouse buttons and the scroll wheel. 31 | razer™...
- Page 32 Left Side / Right Side View The two views allow you to customize the side buttons of your mouse. 32 | For gamers by gamers™...
- Page 33 KEYBOARD FUNCTION from the Button Assignment Menu and enter the key you wish to use on the given field below. You may also include modifier keys such as Ctrl, Shift, Alt or any of those combinations. 33 | razer™...
- Page 34 Mouse Function This option allows you to change the mouse buttons into other mouse functions. To choose a mouse function, select MOUSE FUNCTION from the Button Assignment Menu and an ASSIGN BUTTON submenu will appear. Listed below are the functions which you can choose from the Assign Button submenu: Left Click - Performs a left mouse click using the assigned button.
- Page 35 Inter-device from the Button Assignment Menu, a sub-menu will appear. DEVICE TO LINK allows you to choose which currently connected Razer device can be linked while FUNCTION allows you to choose which functionality you want to use for the linked device.
- Page 36 Switch Profile The Switch Profile enables you to change profiles on the fly and immediately load all your pre-configured settings. When you select Switch Profile from the Button Assignment Menu, a sub-menu will appear that will allow you to choose which profile to use.
- Page 37 This option enables you to assign the button into an Operating System shortcut command. For more information please visit: http://support.apple.com/kb/ht1343. Disable This option renders the assigned button unusable. Use Disable when you have no need for a button or if a particular button interferes with your gaming. 37 | razer™...
- Page 38 Performance Tab The Performance Tab allows you to enhance the speed and precision of your mouse pointer. Similar to the Customize Tab, the changes made here are automatically saved to your current profile. Listed below are the performance options and their descriptions. Sensitivity Sensitivity pertains to how much effort is needed to move the mouse pointer in any direction.
- Page 39 The higher the polling rate, the more often the computer receives information about the status of your mouse, thus increasing the mouse pointer’s reaction time. You can switch between 125Hz (8ms) and 500Hz (2ms) by selecting your desired polling rate on the dropdown menu. (Recommended setting: 500Hz) 39 | razer™...
- Page 40 Power Tab The Power Tab allows you to manage your device’s energy consumption when running on batteries. You can set your device to enter sleep mode when it has been idle for a certain amount of time. The Power Tab also allows you to be notified when the device’s power is at a certain level.
-
Page 41: Configuring Your Razer Turret - Macros
9. CONFIGURING YOUR RAZER TURRET – MACROS Disclaimer: The features listed here require you to log in to Razer Synapse. These features are also subject to change based on the current software version and your Operating System. MACROS TAB The Macros Tab allows you to create a series of precise keystrokes and button presses. - Page 42 The Macro section allows you to input the delay in-between commands. In RECORD DELAY the delay in-between commands are registered as how it is entered. The DEFAULT DELAY uses a predefined time (expressed in seconds) as the delay. And NO DELAY omits all the pauses in-between keystrokes and button presses.
- Page 43 The buttons gives you the option to move the command up or down. The button allows you to put in additional keystrokes, button presses or time delays either before or after the selected command. 43 | razer™...
- Page 44 Once you have pressed the Insert button, a new display window will appear beside the list of macro commands. The dropdown menu on this window allows you to choose a keystroke or a delay to be added in before or after the highlighted macro command.
- Page 45 You may add in a new set of macro commands by clicking the button on the keystroke menu; or input time delays on the duration field using the delay menu. 45 | razer™...
-
Page 46: Configuring Your Razer Turret - Stats And Heatmaps
10. CONFIGURING YOUR RAZER TURRET – STATS AND HEATMAPS Disclaimer: The features listed here require you to log in to Razer Synapse. These features are also subject to change based on the current software version and your Operating System. STATS & HEATMAPS Note: The images shown here are for reference only and may differ from the actual device. - Page 47 Return to Razer Synapse and a new “Stats” tab will be available. Simply click the tab to open the function window. 47 | razer™...
- Page 48 Games List Stats & Heatmaps work by tracking the usage of all supported devices for each game. When the feature is enabled, it automatically scans your system for installed games and adds them to the Games List located on the left side of the screen. Click to show or hide the Games List.
- Page 49 Stats Tab By default, the Stats Tab shows you the overall statistics of all your Razer devices for all games and all time. You can select a specific game via the game list on the left side, change the time period using the SHOWING dropdown menu, or the Razer device using the DEVICES dropdown menu.
- Page 50 Heatmaps Tab - Mouse Heatmaps Tab shows detailed information about your Razer device’s in-game usage. This includes: The Mouse Clicks tab, a heat map showing the frequency of mouse clicks on different spots of your screen. 50 | For gamers by gamers™...
- Page 51 This tab also displays the locations on screen where your mouse cursor stops in the form of white dots. The longer your cursor hovers at that spot, the larger the dot. Mouse heatmaps can be overlayed on game screenshots. 51 | razer™...
- Page 52 Editing the Heatmap Image Click to change the background image and/or transparency of the heatmap overlay Here you can also adjust the transparency of the heatmap overlay on the background image Click to save the changes or to exit without saving. 52 | For gamers by gamers™...
- Page 53 Heatmaps Tab - Keyboard Heatmaps Tab shows the most frequently used keys on your Razer device for each game on your Games List. 53 | razer™...
- Page 54 Social Media You can share your heatmap image on social media networks such as Facebook or Twitter directly from Razer Synapse. From the Heatmaps tab, click the Share button on the bottom right of the screen. You will be prompted to login to the selected social media using an existing account if you have not already done so.
- Page 55 You can also login to your social media accounts first from the “SETTINGS” screen. From the Stats & Heatmaps window, click . Select the “ACCOUNTS” tab. Click CONNECT next to the social media network you wish to sync with. Enter your login details and wait for the connection to complete. 55 | razer™...
-
Page 56: Safety And Maintenance
To operate your Razer Turret safely and reduce the possibility of heat-related injuries, follow these guidelines: 1. Set up your Razer Turret and power adapter on a stable work surface that allows for adequate air circulation under and around the computer/TV. - Page 57 If you are unsure of the correct operational voltage, please contact your local distributor and/or retailer. 1. Use only the power adapter that came with your Razer Turret, or the Razer-authorized power adapter that is compatible with this product.
- Page 58 SAFETY GUIDELINES In order to achieve maximum safety while using your Razer Turret, we suggest that you adopt the following guidelines: 1. Should you have trouble operating the device properly and troubleshooting does not work, unplug the device and contact the Razer hotline or go to www.razersupport.com...
- Page 59 MAINTENANCE AND USE The Razer Turret requires minimum maintenance to keep it in optimum condition. Once a month we recommend you unplug the device from the computer and clean it using a soft cloth or cotton swab with a bit of warm water to prevent dirt buildup.
-
Page 60: Legalese
LIMITATION OF LIABILITY Razer shall in no event be liable for any lost profits, loss of information or data, special, incidental, indirect, punitive or consequential or incidental damages, arising in any way out of distribution of, sale of, resale of, use of, or inability to use the Product. - Page 61 COSTS OF PROCUREMENT For the avoidance of doubt, in no event will Razer be liable for any costs of procurement unless it has been advised of the possibility of such damages, and in no case shall Razer be liable for any costs of procurement liability exceeding the retail purchase price of the Product.
Need help?
Do you have a question about the TURRET and is the answer not in the manual?
Questions and answers