Table of Contents
Advertisement
Advertisement
Table of Contents

Related Manuals for Singular Sound AEROS


Summary of Contents for Singular Sound AEROS
- Page 1 AEROS loop studio Manual Firmware 3.0.0...
-
Page 2: Table Of Contents
MIDI Compatability...........30 General Technical Information........31 Changelog..............33 INTRODUCTION Welcome to your AEROS Loop Studio. Get ready to take full advantage of your new looping powers! IMPORTANT NOTE: The AEROS uses 9v, center negative, 300 mA power. It is recommended to always use the Power Supply that was included with the Aeros to prevent unwanted noise and damage. -
Page 3: Navigating Your Aeros
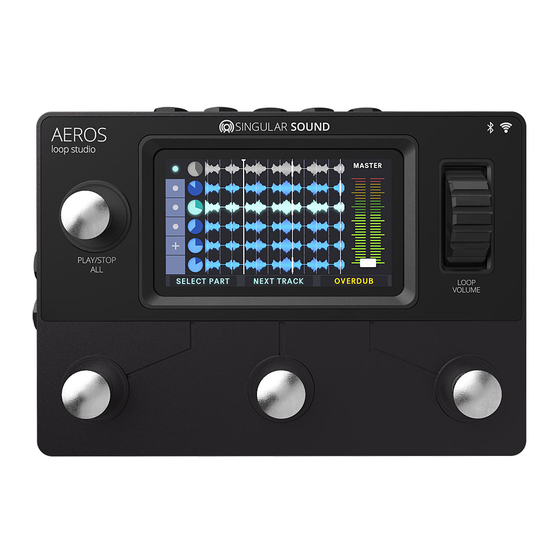
Navigating Your AEROS There are three ways to navigate your AEROS: The touch screen (just like your smartphone), the wheel, and the footswitches. You can always tell what the three bottom footswitches do by reading the on-screen labels — this will come in handy when looping! The PLAY/STOP ALL footswitch and the VOLUME WHEEL do not change functionality. - Page 4 Navigating Your AEROS HOME SCREEN When you turn on your AEROS, you will start in the Home Screen. From here you can access different areas. LOOP STUDIO - Where masterpieces are created. It will load your last saved song automatically.
-
Page 5: Setting Up For The First Time
Try remaining connected to Wi-Fi whenever possible to ensure your have all the latest improvements and features. We're constantly improving the firmware, and there may be a new version available at the time you set up your AEROS. AEROS Loop Studio: Manual... -
Page 6: Your Instrument
Your Instrument Plugging an instrument into the AEROS: The AEROS has two ¼” (6.35mm) Inputs. You can record in stereo or in mono. The two ¼” (6.35mm) outputs function in the same way. The AEROS also has a stereo Aux In audio input that you can plug an additional instrument into. -
Page 7: Starting A New Song
To start looping, press the Loop Studio icon or press the Play/Stop All button from the main menu. Your last saved song will load automatically. (If you have no saved songs, a new empty song will be loaded). AEROS Loop Studio: Manual... - Page 8 (p. 10) and 6x6 Controls (p. 13). You can also press the icons on the screen to do the following: Edit Song (including any of the song-specific settings) Save Song Home Page Song List New Song AEROS Loop Studio: Manual...
- Page 9 Here's some information to start you out: The AEROS Loop Studio is the first looper pedal to allow parallel tracks (loops that play at the same time as each other) and song parts (groups of parallel tracks that you can switch between).
- Page 10 It's a small trade-off tied to the amount of unique tracks you have available. We recommend you try both modes and see what fits your style, or master both to get the most out of your AEROS in any situation! AEROS Loop Studio: Manual...
-
Page 11: 2X2 Controls
So you can have at most two layers per track -- your base layer and your most recent overdub layer. For each track, the most recent overdub is merged with the base layer when the song is saved. This frees up internal memory. AEROS Loop Studio: Manual... - Page 12 Press is more immediate, however, holding to delete all tracks while stopped will start playback of the song for a few seconds before the delete command is enacted. AEROS Loop Studio: Manual...
- Page 13 In the Mixer: You can use the volume wheel to control the relative volume levels of each track. If no tracks are muted, selecting the master track from the mixer view will give option to “Mute All”. If at least one is muted, the option will be to “Unmute All”. AEROS Loop Studio: Manual...
-
Page 14: 6X6 Controls
So you can have at most two layers per track -- your base layer and your most recent overdub layer. For each track, the most recent overdub is merged with the base layer when the song is saved. This frees up internal memory. AEROS Loop Studio: Manual... - Page 15 “+” sign), pressing the Action button will begin a new recording on that song part. ○ If the selected song part already has a recorded track, the Action button plays the song part. HOLD: ● Opens the Mixer AEROS Loop Studio: Manual...
- Page 16 Press is more immediate, however, holding to delete all tracks while stopped will start playback of the song for a few seconds before the delete command is enacted. AEROS Loop Studio: Manual...
- Page 17 The thin bars on the right show the L and R input volume levels. If the bars are red you are clipping and should lower the volume of your instrument. In the Mixer: You can use the volume wheel to control the relative volume levels of each track. AEROS Loop Studio: Manual...
-
Page 18: Mixer
You can also mix hands-free: select tracks with the middle button and adjust the relative volume with the volume wheel. Mute or unmute with the right button. Note: Opening the mixer does not stop the song! AEROS Loop Studio: Manual... -
Page 19: Colors & Icons
Each beat is shown by a thin white line Beat (only in quantized mode) Each measure is shown by a thick white line Measure (only in quantized mode) End of Loop The end of the loop is shown by a thick red line AEROS Loop Studio: Manual... - Page 20 Green Waveform: Currently selected layer Blue Waveform: Layer is currently playing, but is not selected Yellow Waveform: Currently recording overdub Gray Waveform: Muted track Faded Waveform: Layer is undone. Undone layer can be brought back or overwritten AEROS Loop Studio: Manual...
- Page 21 Solid red outline: Indicates the base track while recording (current longest track in a song part) if Sync Length setting is enabled. This is to show which track is setting the length rules. AEROS Loop Studio: Manual...
- Page 22 Currently playing song part Green dot: currently selected song part Flashing Green dot: Song part transition cued Hollow dot: unselected existing song part Flashing red plus sign: new song part is cued and will start recording soon AEROS Loop Studio: Manual...
-
Page 23: Settings
Song Name: Edit the name of your song at any time. Song saved to: Save this song to either the internal memory of the AEROS or to an SD card. (Max SD card size is 32GB) Record: Sets how the audio will be recorded to the AEROS. - Page 24 Tempo: Speed of the song. How many beats per minute (BPM). Count in: How many measures of clicks before the AEROS begins recording. Count in is only active when recording the first track in a song part while AEROS is stopped.
- Page 25 Main input routing: Selects where the live sound going into the Main Input is sent. You may select one, both, or neither (the ability to use neither was requested by users who use a mixer going into the AEROS and want to prevent a 'phasing' effect): ● Main Out ●...
- Page 26 Out so you only hear the click while the audience hears the Main Out. Click Volume: How loud the click track is played. MIDI IN Start: Sets how the AEROS responds to a MIDI Start message, you can choose one, both, or neither, though at least one is recommended.
-
Page 27: Loading And Exporting Songs
Songs that are stored in the internal memory of the AEROS will be indicated by the blue AEROS folder icon. Songs that are stored in an SD Card (if that SD card is currently inserted into your AEROS) will be indicated by the blue SD Card icon. -
Page 28: Beatbuddy Integration
Your AEROS Loop Studio has built in plug and play functionality with the BeatBuddy, our hands-free drum machine pedal. Currently AEROS can be controlled by the BeatBuddy (BeatBuddy is ‘Master’, AEROS is ‘Slave’). We will be implementing the AEROS as Master capability in a future update. AEROS AS SLAVE, BEATBUDDY AS MASTER To use the AEROS as a slave, you’ll need a... - Page 29 AEROS. PLEASE NOTE: The time signature is only sent from the BeatBuddy when you first load a song on the BeatBuddy. So if you start a new song on the Aeros, you will need to change the song on the BeatBuddy for the time signature to be sent.
- Page 30 The Next Part (transition) and Stop commands (outro, pause) from the BeatBuddy will overide the Change Song Part/Stop Song setting if it is set to “End of Loop”, so AEROS will not wait until the end of the loop to change parts or stop the song when it receives these commands, that way it stays in sync with the BeatBuddy.
-
Page 31: Midi Compatability
AEROS is set to respond to MIDI messages sent on ALL channels. Making the AEROS respond to only one specific MIDI channel is coming soon. AEROS passes through all MIDI commands it receives in the MIDI In port to the MIDI Out port. -
Page 32: General Technical Information
DACs, <1ms latency, and 20hz – 20kHz range Digital dry through bypass: AEROS does not affect the pass through audio quality or latency, but the AEROS must be powered on to pass through audio. External expression pedal: This is intended as an alternative to using the volume wheel. - Page 33 ‘pops’ if audio is recorded over the loop seam. Crash Log: If your AEROS crashes while using an SD card, the AEROS will save a log of that crash to the SD, which you can email as a zipped (compressed) file to support@singularsound.com.
-
Page 34: Changelog
See the help text next to these settings for details ● Added track offsets: If sync start is off, the Aeros will now keep the relative differences between the start points of tracks after the Aeros is stopped or changes song parts ●... - Page 35 ● Removed measure number in track clock during count in KNOWN BUG: All the startpoints of the loops get aligned when Aeros is stopped, even if they were not aligned when recorded. (This bug is also present in previous non-beta firmware versions and should be fixed soon) Firmware 2.12.2 Changelog:...
- Page 36 ● Changed to Manual Save: Previous versions of the firmware saved the song automatically every time the song was stopped. This caused some delay as the song was being saved so the Aeros could not be started again immediately. With the new manual save system (you must press the save button on the stopped screen to save the song), you get to choose when the song is saved.
Need help?
Do you have a question about the AEROS and is the answer not in the manual?
Questions and answers