
Related Manuals for mabe MFT25PVQLG

Summary of Contents for mabe MFT25PVQLG
- Page 1 MFT25PVQLG PM01...
-
Page 3: Important Safety Instructions
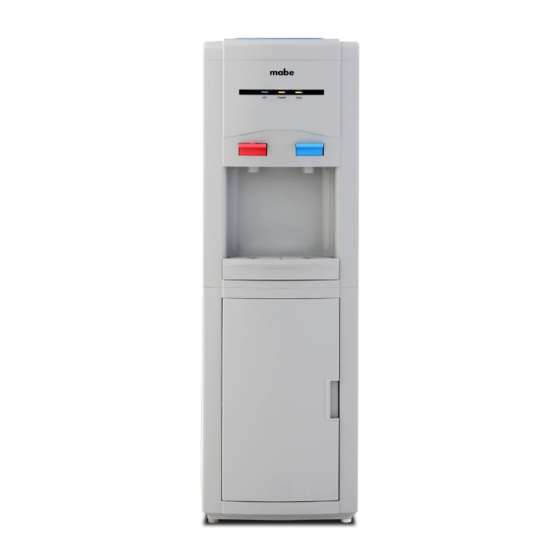
welcome Everything you want to know for the proper operation of your product is here and on our websites. We invite you to know your product, read the instructions and take full advantage of it. before use, please read and follow all safety rules and operating instructions important safety instruction: warning... - Page 4 “Operating your water dispenser” 1. top cover 2. hot tap with safety lock 3. cold tap 4. water receptacle 5. door 6. heating switch 7. coling switch 8. condensor 9. water drain cap 10. power cord...
- Page 5 The following conditions are not considered normal use: • If it has not been operated in accordance with instructions for use provided in Spanish. • Damage caused by accident, electric shock, voltage fluctuations, electric power than specified or catastrophes. • If it has been used for commercial, industrial or other than de- scribed in the operating instructions use purposes. • If the product has been repaired by persons and / or non-authorized service workshops. installation guidelines: • Remove the exterior and interior packing. • Place your appliance on a floor that is strong enough to support the dispenser when it is fully loaded. The unit is provided with four plastic feet, if it does not sit level on the floor, adjust the front feet to level the unit well to the floor.
-
Page 6: Operating Your Water Dispenser
• Plug the dispenser into the electrical outlet. We are ready to com- plete the first cycle. In order to do that, wait for the hot water to reach temperature in approximately 10 minutes, and then wait for the cold to reach temperature (another 40 minutes, approximately). • Unplug the dispenser from the electrical outlet. Proceed to drain the water from the faucets one at a time until no more water remains. (Note: To facilitate this operation, use a large container). • Then, drain any water left in the tanks by opening the drain plug located on the back, until it drains completely. • Proceed to close the drain cap. • Remove the cap from the 5-gallon bottle and use a clean cloth to wipe off the neck of the bottle. • Place the 5-gallon bottle of water on the water intake, allow water to stand for approximately one minute. • Push water faucet buttons to insure water flows from both faucets. • Plug dispenser back into the electrical outlet. • Now you are ready to use your water dispenser. NOTE: Your water dispenser has been cleaned and sanitized before leaving the factory, but in case a taste problem develops, place two tablespoons of baking soda and add tap water. - Page 7 taking dispenser out or service • If the water dispenser will not be used for a long period of time, unplug the power supply cord. • Turn off the hot water. • Drain the water through the faucets. • Drain the water from tanks by drainage hole from the back of the dispenser. caution • Do not use the bottle with any crack, leakage or holes. • The back of the product should be put in shady places and kept away from wall and high-temperature elements. Please also put the product away from TV, video, or other valuables.
- Page 8 Bracket Wall In order to ensure the water dispenser with enough stability, users should follow below instructions to fix the unit: 1. Remove one of the body rear’s screw (upper right corner or upper left corner) (Picture 1) 2. Install a bracket where you have removed the screw already, fix the bracket tightening the removed screw on the right location (Picture 2) 3. Fix the bracket on the wall side or similar object (if the wall side is too rigidity), you can make a hole by electric drill, then using expanded screw tightening the bracket (Picture 3) 4. Children should be supervised to ensure that they do not play with the appliance. 5. Household used only 6. Do not store explosive substances such as aerosol cans with flammable propellant in this appliance. 7. If the supply cord is damaged, it must be replaced by the manufacturer, by its service agent or similarly qualified persons in order to avoid a hazard.
-
Page 9: Maintenance
maintenance • Remove power plug or disconnect from the mains before performing any maintenance or servicing the product. • Never use detergent or chemicals harmful to health to clean the water tanks. • Do not directly spray water on the surface of the product. • Wipe the front and back of the product with water-soaked soft cloth. • If dust of other exterior substance has accumulated on the condenser, wipe off with water-soaked soft cloth. • After cleaning the product, completely dry it. Fill the water to the tanks until waters comes out of the hot water faucet, then connect the electric power plug. If the surface of the electric heater in the hot water tank is deposited by water deposition, heating capacity will decrease. Fill hot water tank with aqueous solution of 2% aitric acid and keep for about two hours then cleaning. If the problems can not be solved, contact your dealer or the Service... -
Page 10: Troubleshooting
troubleshooting problem possible cause Water dispenser Not plugged in. does not operate. The circuit breaker tripped or a blown fuse. Check to be sure the cold switch on the Water cooler is not back is ON. cold enough. The water dispenser does not have the correct clearances. Check to be sure the hot switch on the Water dispenser back is ON. hot water is not hot enough.
Need help?
Do you have a question about the MFT25PVQLG and is the answer not in the manual?
Questions and answers