
Subscribe to Our Youtube Channel
Related Manuals for Nagra TUBE DAC


Summary of Contents for Nagra TUBE DAC
- Page 1 TUBE DAC – D/A converter User manual P/N: 2055111159 All rights reserved – © 2019 rev 3...
-
Page 2: Table Of Contents
USB power ..................20 Remote ....................21 About ....................22 USB set-up with computers ..............23 Connecting the TUBE DAC to your system ..........24 Setting the headphones amplifier level ........... 24 Operating your TUBE DAC ........... 26 Front selector ..................26 Nagra Modulometer ................ -
Page 3: Safety Warning
We guarantee our products against all manufacturing defects, for a period of three years for the TUBE DAC and six months for the tube, running from the date of delivery to the customer (validated by the serial number on the device casing and the invoice from an official Nagra dealer). -
Page 4: Congratulations
Congratulations! You have just acquired one of the best digital-to-analog converters ever built. The TUBE DAC was created by an engineering team with more than 60 years’ experience designing world-class products for the professional audio, national security and military businesses. The professional and Hi-Fi product ranges are designed by the same Research and Development department. -
Page 5: Installation
Installation Positioning In order to avoid risks of fire and electric shock, the TUBE DAC should be used exclusively indoors. It has been designed for a usage in moderate climate. If possible, it is preferable not to place other HiFi elements on top of your TUBE... - Page 6 (MPS: when the 4 output LEDs on front panel are switched ON, CLASSIC PSU: when the blinking LED on the right side of front panel switches OFF). Now you can start up the TUBE DAC by selecting the desired position on front selector. Disconnection First, turn the TUBE DAC front selector to OFF and wait for its complete shutdown (when display and modulometer backlight switch OFF).
-
Page 7: Rear Panel Connection Block
Note about the Ground connector This connection is seldom used but may solve specific setup issues concerning “hum”. Your Nagra dealer will assist you on when and how to use this connector. Nagra –... -
Page 8: Audio Inputs
AES/EBU PCM: up to PCM 192kHz 4-7: ST (MM fiber) DSD: up to DSD256 (DSD4x) PCM: up to PCM 384kHz S/PDIF 1 BNC PCM: up to PCM 192kHz S/PDIF 2 RCA PCM: up to PCM 192kHz Nagra – TUBE DAC... -
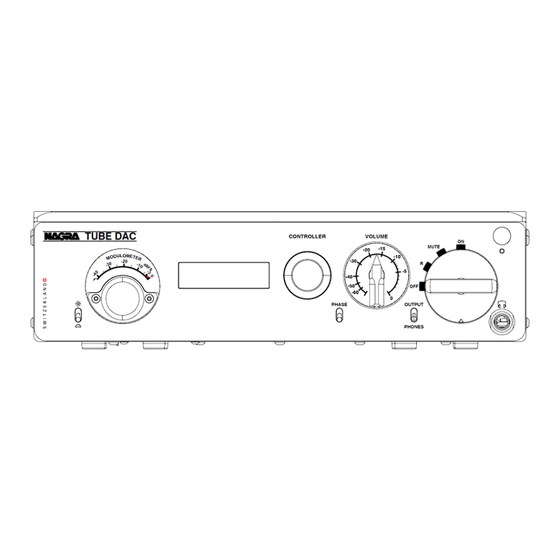
Page 9: Front Panel
10. Infra Red sensor window for the remote control, and its activation LED *In standby mode the power consumption is less than 100 mW. Please note that when turned ON, the TUBE DAC will go through a 2 minute pre-heating phase. This is in order to optimize the warming-up of tubes and critical components. -
Page 10: Setting Your Tube Dac
Setting your TUBE DAC Using the rotary controller knob along with the display, your TUBE DAC can be personalized to integrate it into your system. Please take a moment to learn more about the settings that you can change to enjoy your music even better. -
Page 11: Menu Tree Or Map
REMOTE BUTTON F NO REMOTE BUTTON DEFAULT ASSIGN. AUDIO SETTINGS -- LINE LEVEL -- HIGH -- LINE MODE --- DIRECT VARIABLE - OUTPUT PHASE - NORMAL REVERSE -- USB POWER --- ALWAYS ON IF INPUT ACTIVE Nagra – TUBE DAC... -
Page 12: Setting The Language
Press the Controller knob briefly, then currently selected --- LANGUAGE --- language will start to flash. Rotate the Controller knob to select the ENGLISH desired language and press the Controller knob once more to store the desired selection. Nagra – TUBE DAC... -
Page 13: Naming Of The Digital Inputs
Naming of the digital inputs Each of the digital inputs of the TUBE DAC can be named by the user to identify different sources easily. 10 characters are available to name each of your digital inputs. Each name can include letters, numbers and special characters, which are presented in the following order: A…Z a…z _-*#/,.:;0123456789... -
Page 14: Reset Of Input Names
If you are unhappy with the names you have chosen, you can reset all the input names to “Factory Settings”. Go into the INPUT NAMES menu, scroll to the last one: Press the Controller knob 2 s and DEFAULT NAMES all input names are reset to factory setting. HOLD CTRL Nagra – TUBE DAC... -
Page 15: Input Assignment
Input assignment The TUBE DAC features a wide array of inputs. You may not need all of them. To make input selection easier, you can decide which input you want to be active, and on which IR remote control key it will be accessible. In the Menu, go to “INPUT ASSIGNEMENT”:... - Page 16 Rotate the Controller knob to the last position of input list. REMOTE BUTTON A Press 2 s on the Controller knob DEFAULT ASSIGN. and all input assignments are reset to factory setting. HOLD CTRL Nagra – TUBE DAC...
-
Page 17: Audio Settings
Line level In order to match levels with your preamplifier or your power amplifier, the TUBE DAC features two selectable output levels. For a 0 dBFS (maximum level) you may select either LOW (1.3 V ) or HIGH (2 V ) as your analog output level. -
Page 18: Line Mode
Line mode The TUBE DAC can operate as a pure D/A converter connected to an external preamplifier or an integrated amplifier that both possess their own volume control. In this case, you should have a fixed output level: DIRECT (the signal won’t pass through the TUBE DAC potentiometer, and no control is possible). -
Page 19: Absolute Phase
- OUTPUT PHASE - shown here. NORMAL To change the phase, press the Controller knob and select NORMAL or REVERSE by rotating it, then confirm by pressing once again the Controller knob, the new desired OUTPUT PHASE is stored. Nagra – TUBE DAC... -
Page 20: Usb Power
USB POWER setting is stored. Note IF INPUT ACTIVE is set, the computer will only see the TUBE DAC when USB input is selected. If USB ALWAYS ON is set, the computer will always see the TUBE DAC. -
Page 21: Remote
You can select here RC-5 encoding format if using the IR Remote Control Unit delivered with your TUBE DAC or another universal IR Remote Control Unit that uses the same RC-5 format (see page 30 for more details). It is also possible to work with another IR Remote Control Unit using RECS-80 format as Nagra RCU II. -
Page 22: About
Whenever you change the tube, you can reset it. Normally the internal tube of the TUBE DAC should last for a minimum of 5’000 hours of normal operation. To reset the counter, press the Controller button to get confirmation message. -
Page 23: Usb Set-Up With Computers
Simply select the Nagra TUBE DAC device in the audio settings menu. You will need to install a driver and update your ASIO drivers as well; the drivers are to be found on the USB key supplied with your Nagra TUBE DAC. More information on inputs and formats The TUBE DAC comes with 7 different digital inputs. -
Page 24: Connecting The Tube Dac To Your System
Turn the TUBE DAC front selector to OFF, switch off the external power supply and unplug DC power cables from TUBE DAC back panel. Wait for 15 minutes before any intervention into your device. If you are not sure what to do, please contact your Nagra dealer. - Page 25 Headphones amplifier board Jumpers The headphones amplifier board is located on the right side of TUBE DAC, with two series of jumpers for settings as explained below: No attenuation (factory setting) 6 dB attenuation (-6 dB) Limited power output Note When listening through headphones, the perceive level is always lower than the actual level.
-
Page 26: Operating Your Tube Dac
The 0 dB corresponds to full scale signal, meaning the maximum digital level. The modulometer, in the TUBE DAC, is a twin pointer digitally controlled instrument: Left channel - black needle Right channel - red needle Nagra –... -
Page 27: Modulometer & Display Intensity Adjustment
There are 7 different intensity levels. Phase mode selection The outputs of the TUBE DAC can be set to phase inversion PHASE mode when you activate the PHASE switch. Pulling up the toggle switch will activate the phase inversion. Pulling it down will deactivate the phase inversion. -
Page 28: Ir Remote Control Unit
Press on “+” key to select one input after current input selection in menu list. Power OFF - ON key Toggle key to switch OFF and ON the TUBE DAC. When switching ON, the TUBE DAC automatically select the last input active before last power OFF. -
Page 29: Use Of An Universal Ir Remote Control Unit
The TUBE DAC is factory set to the Philips RC-5 format encoding. Changing device number If you wish to use a specific device number for your TUBE DAC (for instance on a RCU-II), select the desired DEVICE number (DEVICE 1 to DEVICE 6) into REMOTE menu (REMOTE paragraph in SETTING YOUR TUBE DAC section). -
Page 30: Burn-In Period
Please check in the menu to see how many hours your tube has been operating. The TUBE DAC tube is a high grade military tube selected by Nagra according to exacting criteria. Their theoretical minimum useful life is 5000 hours. Actually, some tubes operate consistently for more than 10 000 hours. -
Page 31: Technical Specifications
Technical specifications Below are the typical specifications for the Nagra TUBE DAC. Your own specific TUBE DAC’s exact specifications are to be found on the “protocol” delivered with your unit. Digital inputs 1x AES/EBU, 2x S/PDIF, 2x NAGRA-LINK, 1x Optical, 1x Audio USB (UCA2) -
Page 32: Declaration Of Conformity
Declaration of conformity Nagra – TUBE DAC... - Page 33 For more detailed information about recycling of this product, please contact your local authority, your household waste disposal service or the shop where you purchased the product. Applicable to the following devices: TUBE DAC and all the package content Nagra – TUBE DAC...
Need help?
Do you have a question about the TUBE DAC and is the answer not in the manual?
Questions and answers