
Summary of Contents for ZELTIQ COOLTONE
- Page 1 User Manual COOLTONE™ System Manufactured for: Zeltiq Aesthetics, Inc. 4410 Rosewood Drive Pleasanton, CA 94588 USA ZELTIQ Customer Service Worldwide: (+1) 925-474-8160 USA: (+1) 888-935-8471 (1-888-ZELTIQ1) CS-UM-EMS-01-EN2...
- Page 2 © All rights reserved. No part of this manual may be reproduced, saved or transferred by any means, including electronic, mechanical and photographic without the prior written approval. CoolTone is a trademark. CS-UM-EMS-01-EN2...
-
Page 3: Table Of Contents
COOLTONE User Manual Table of Contents Customer Service ......................5 Supplies ........................6 Contents of the CoolTone™ System ....................6 Foreword ........................7 Indications for Use ..........................7 Contraindications ..........................7 Safety Cautions and Warnings ......................8 Precautions ............................10 Adverse Events .......................... - Page 4 Table of Contents COOLTONE User Manual Securement System ........................26 General treatment screen ......................... 28 ............................30 Error Messages / Troubleshooting ................30 Error messages: ..........................30 Service required ........................... 30 Initialization failed ......................... 30 System errors ..........................31 Self Trouble-Shooting ........................33 ............................
-
Page 5: Customer Service
COOLTONE User Manual Customer Service Customer Service To report issues with the performance or use of your System, contact Zeltiq Customer Service: ZELTIQ Customer Service Worldwide: (+1) 925-474-8160 USA: (+1) 888-935-8471 (1-888-ZELTIQ1) CS-UM-EMS-01-EN2... -
Page 6: Supplies
COOLTONE User Manual Supplies Supplies Contents of the CoolTone™ System 1 CoolTone™ System including: • 1 Control Unit • 2 Applicators • 1 Securement system (including 2 applicator covers and 2 straps) • 1 CoolTone™ System User Manual • 2 Mains cable – user select plug type based upon outlet type... -
Page 7: Foreword
• Active applicator should never be placed over implanted electrical devices like cardiac pacemakers, cochlear implants, intrathecal pumps, hearing aids etc. • The CoolTone should be used with caution in persons with Graves’ disease, active bleeding disorders or seizure disorders. -
Page 8: Safety Cautions And Warnings
Ensure that persons with pacemakers are not present in vicinity of the device in operation less than 1.2 meters, or approx. 4 feet. Application of CoolTone must be in the abdomen, buttocks and thighs areas. Application in the heart, head area or area of growth plate is not permitted. - Page 9 Packaging materials must be disposed of properly. It is important to ensure that these are not accessible to children. The CoolTone is intended as a standalone device. No other electrical device should be operated on the patient while being treated with the CoolTone.
-
Page 10: Precautions
Local erythema or skin redness Application Information Before using the CoolTone on a patient, the user should become acquainted with the operating instructions and individual treatment methods as well as the indications / contraindications, warnings and application information. Additional sources of information about types of treatment should be consulted. -
Page 11: System Overview
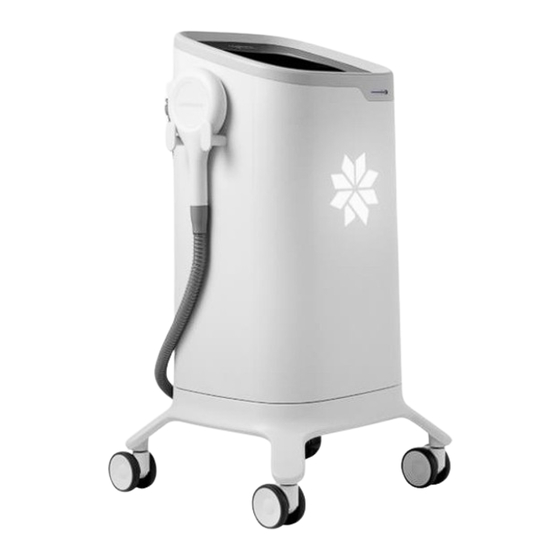
Chapter 1: System Overview COOLTONE User Manual System Overview This chapter describes the control unit, the applicator, and the user interface. Control Unit The control unit (Figure 1) is a portable device that is used to start, stop, and monitor treatments. - Page 12 Chapter 1: System Overview COOLTONE User Manual 6 (A) 6 (B) Figure 2: Rear of the Control Unit Connectors for applicators A and B Ventilation grid Mains connector Main switch Serial no / Identification plate CS-UM-EMS-01-EN2...
-
Page 13: Touch Screens And Displays
COOLTONE User Manual Chapter 1: System Overview Figure 3: Applicators Touch Screens and Displays Figure 4: Start Treatment 11 Total operating time 12 Remaining treatment time 13 Back to Previous Screen 14 Start Treatment 15 Applicator selection (A and/or B) -
Page 14: Device Set Up
After the transport and before switching on the device, make sure that the castors are in the ‘locked’ position. Note: Make sure that the CoolTone is placed on a stable and flat surface 1. Connect mains cable Connect the mains cable to the socket as shown below on the device (8, Figure 2) and connect it to the mains. - Page 15 COOLTONE User Manual Chapter 1: System Overview The device may only be connected to earthed sockets. Be aware that connecting the power cable with the power switch turned on may cause malfunction. 2. Switching the device on Switch on the device with the power switch (9, Figure 2).
-
Page 16: Settings
Chapter 1: System Overview COOLTONE User Manual Settings 1. Startup screen Once the device is switched on, a self-test is carried out and the start-up screen opens. 2. Initialization screen After the start-up, the device continues the self-test while the initializing screen is shown. -
Page 17: Home Screen
COOLTONE User Manual Chapter 1: System Overview 3. Home screen After performing the self-test, the device automatically displays the home screen. Pressing “New Treatment button” starts a new treatment. Insert treatment card in slot. CS-UM-EMS-01-EN2... - Page 18 Chapter 1: System Overview COOLTONE User Manual Leave treatment card in the slot. The confirmation image should appear. CS-UM-EMS-01-EN2...
-
Page 19: Select Patient Details
COOLTONE User Manual Chapter 1: System Overview 4. Select Patient Details Select the patient gender by pressing the button “Male” or “Female.” Select “Yes” or “No” to confirm if patient is new to practice. Press “Next” to proceed to Treatment Area screen 5. -
Page 20: Position Applicator
Chapter 1: System Overview COOLTONE User Manual Select one of the treatment areas by pressing on the area of treatment. The selected treatment area is highlighted in yellow. 6. Position Applicator Once the applicators are placed on the selected treatment area, the user can press the button “Next” to get to the treatment screen. -
Page 21: Start Treatment
COOLTONE User Manual Chapter 1: System Overview 7. Start Treatment Select the applicator(s) applied for treatment and start the treatment. To select Applicator “A” or “B” or both “A” and “B”: Ensure that the Applicator box is checked. Default is unchecked blue box. -
Page 22: Running Treatment
Chapter 1: System Overview COOLTONE User Manual 8. Running Treatment Adjust treatment intensity as needed throughout treatment. Refer to Chapter 2 Treatment for detailed description of conducting a treatment. (A) Selection of the Intensity of Applicator A (B) Selection of the Intensity of Applicator B (C) Option to sync the intensity of both applicators. -
Page 23: Completed Or Interrupted Treatment
COOLTONE User Manual Chapter 1: System Overview 9. Completed or Interrupted treatment Once the treatment is completed, the user can start a new treatment for the same patient or for a new patient after cooldown is completed Do not turn system off when it is cooling down. -
Page 24: Treatment
The CoolTone consists of a control unit and 2 applicators. The CoolTone control unit monitors the temperature of the applicator. In addition, the device will check with regular intervals the connection between applicator and control unit. Please refer to Chapter 3 in case any error message should pop-up. -
Page 25: Applicator Placement
COOLTONE User Manual Chapter 2: Treatment Applicator Placement Applicator connection Before connecting or disconnecting the applicators, check that the device is turned off. To disconnect the applicators, turn the knob to the left. To connect the applicators, hold the applicator end to the connecting pins and slowly turn the knob to the right side. -
Page 26: Securement System
Ensure that the CoolTone logo on the applicator is visible through the white securement cover. If the CoolTone logo is not visible, adjust securement cover. The blue side of the cover should be in contact with treatment area. This proper placement ensures that the magnetic field is facing the patient during treatment. - Page 27 COOLTONE User Manual Chapter 2: Treatment 2. Place the strap under the patient. Apply the applicator(s) over the desired treatment area(s). 3. Place one end of the strap over the applicator(s). Place the connection piece on the strap. 4. Secure the other end of the strap over the connection piece.
-
Page 28: General Treatment Screen
Chapter 2: Treatment COOLTONE User Manual General treatment screen (1) Program information This screen shows the selected treatment program (buttocks, abdominals or thighs). (2) Remaining treatment time Graphically displays the course of treatment. (3) Start/ Stop By pressing the button “Start,” the treatment starts and the button changes into “Stop.”... - Page 29 COOLTONE User Manual Chapter 2: Treatment is not activated, it shows “Sync” instead of “Synced”. Otherwise press the “Synced” button to deactivate it and change back to “Sync.” Move the yellow button up and down to change the intensity of the applicator B in increments of 1 percent.
-
Page 30: Error Messages / Troubleshooting
If the equipment does not operate normally during use, please check the items listed in Table 1 before requesting service. If none of the following problems apply, or if the following remedies do not help, turn off the power to the equipment and contact Zeltiq Customer Service. Error messages:... -
Page 31: System Errors
COOLTONE User Manual Chapter 3: Error Messages / Troubleshooting System errors If an error in the system occurs, the information about the error and a corresponding error number as well as a short description how to proceed is shown in Pop Up screen:... - Page 32 Chapter 3: Error Messages / Troubleshooting COOLTONE User Manual Table 1: Error Messages and Action Message Message text Action number T100-YYY Internal Temperature Wait until the system is cooled down. Power the control unit off, connect both applicators and T200-YYY Applicator Error power it on.
-
Page 33: Self Trouble-Shooting
COOLTONE User Manual Chapter 3: Error Messages / Troubleshooting Self Trouble-Shooting If the system encounters a problem, it displays a message to help you diagnose and resolve the issue. When an error message occurs, carry out the recommended action, if any. If the problem persists, record both codes and contact Customer Service (see page 5). -
Page 34: Cleaning And Maintenance
If liquid penetrates the device during cleaning or disinfecting, please put the unit out of service, protect it from being used again and contact your Zeltiq Customer Service. Make sure that the labels of the device (such as warnings, labels of control devices, identification plate) are not damaged when cleaning and disinfecting. -
Page 35: Disinfection
COOLTONE User Manual Chapter 4: Cleaning and Maintenance Mechanical Pre-Cleaning: cleaning of the Turn over the applicator sleeves to be sure that they do not stick to securement other clothes. Close the Velcro of the applicator sleeves and the system strap. -
Page 36: Routine Inspection Of Equipment
Avoid locations subject to excessive shock or vibration, exposure to chemicals or explosive gases. The CoolTone is manufactured according to the safety regulations of IEC 60601-1, Rev 3.1. The manufacturer can only be considered responsible for the safety and reliability if:... - Page 37 The device does not contain any parts that can be repaired or serviced by the operator. Modifications of this device are not permitted. Service and replacement of components may only be performed by certified service technicians from Zeltiq Customer Service or the manufacturer. CS-UM-EMS-01-EN2...
-
Page 38: System Symbols
Chapter 4: System Symbols COOLTONE User Manual A P P E N D I X A System Symbols The following symbols are used on the components of the system and on its supplies, packaging, and labelling. Table 3: System Symbols... - Page 39 COOLTONE User Manual Appendix A: System Symbols Description Symbols Reference No. Title This symbol marks the parts of the Protective earth IEC 60417-5019 device that are connected to PE (ground) (ground). This symbol indicates the manufacturer ISO7000-2498 Serial number serial number of the device or accessories.
- Page 40 Appendix A: System Symbols COOLTONE User Manual Description Symbols Reference No. Title This symbol indicates the maximum and minimum temperature limits at ISO 7000-0632 Temperature limit which the device shall be stored and transported. This symbol indicates the correct ISO 7000-0623 This way up upright position of the device package.
-
Page 41: System Specifications
Appendix B: System Specifications COOLTONE User Manual A P P E N D I X B System Specifications This product may contain remanufactured parts or parts that have had incidental use, all of which are equivalent in performance to new parts. -
Page 42: Electrical Safety
Appendix B: System Specifications COOLTONE User Manual Dimensions and Weight Table 6: Dimensions and Weight Item Height Depth Width Weight Control unit 1100 mm 600 mm 600 mm Approx 80 kg Electrical Specifications Electrical Safety Class I Equipment, Single-Phase AC, Continuous Operation... - Page 43 Portable RF communication equipment (including peripherals such as antennas) should be used no closer than 30 cm (approx. 1 foot) to any part of the device CoolTone including cables specified by the manufacturer. Otherwise, degradation of the performance of this equipment could result.
- Page 44 Nearby electronic equipment may be affected. RF Emissions CISPR 11 Class A Harmonic emissions The device CoolTone is suitable for use in all IEC 61000-3-2 performed establishments, including domestic establishments and those because the...
- Page 45 25/30 cycles case of interruptions in the 25/30 cycles power supply, it is recommended Single phase: at 0° that the device CoolTone be Single phase: at 0° powered from an uninterrupted power supply or a battery. Voltage 0% U...
- Page 46 Appendix B: System Specifications COOLTONE User Manual Table 11: Electromagnetic Immunity to HF radio communication equipment Immunity Test Maximum Band Distance Test Frequency Service Modulation Energy (MHz) Level (MHz) (V/m) Pulse 380- TETRA 400 Modulation 18 Hz GMRS 460, FRS 460...
-
Page 47: Data Module Specifications
Data Module Specifications The device includes two data modules (Modem and Wi-Fi). Table 12 below lists the specifications for each model. Use each module only with the antenna provided by ZELTIQ. Table 12: Data Module Specifications (Modem & Wi-Fi) Effective... -
Page 48: Disposal Of Hazardous Materials
Appendix C: Disposal of Hazardous Materials COOLTONE User Manual A P P E N D I X C Disposal of Hazardous Materials Various components of the system may contain materials whose disposal is subject to regulation. The upper module of the system contains a lithium battery, which is not serviceable by the customer.
Need help?
Do you have a question about the COOLTONE and is the answer not in the manual?
Questions and answers