Table of Contents
Advertisement
Quick Links
VIP-CAM-CTRL1
UHD/4K & USB OVER IP TX/RX
USER MANUAL
For technical support, please contact us at support@purelinkav.com.
For order support, please contact your local dealer.
PureLink™
22-10 State Route 208
Fair Lawn, NJ 07410 USA
Tel: +1.201.488.3232
Fax: +1.201.621.6118
E-mail: sales@purelinkav.com
VIP-CAM-CTRL1 USER MANUAL
VERSION 1.0
Advertisement
Table of Contents

Summary of Contents for PureLink VIP-CAM-CTRL1
- Page 1 VIP-CAM-CTRL1 UHD/4K & USB OVER IP TX/RX USER MANUAL PureLink™ 22-10 State Route 208 Fair Lawn, NJ 07410 USA Tel: +1.201.488.3232 Fax: +1.201.621.6118 E-mail: sales@purelinkav.com For order support, please contact your local dealer. For technical support, please contact us at support@purelinkav.com. VIP-CAM-CTRL1 USER MANUAL VERSION 1.0...
-
Page 2: Table Of Contents
Table of Contents Introduction ..............................3 Key Features ..............................3 Control Surface ............................4 Control Surface continued ..........................5 Connection Diagram ............................ 7 Operation ..............................8 Entering access PIN ..........................8 PIN Error ..............................8 Correct PIN ............................... 8 Enter OSD menu ............................8 OSD Menu List .............................. 9 Setting up cameras for control ........................9 Selecting camera for control ........................9 Technical Information ..........................11 VIP-CAM-CTRL1 USER MANUAL VERSION 1.0... -
Page 3: Introduction
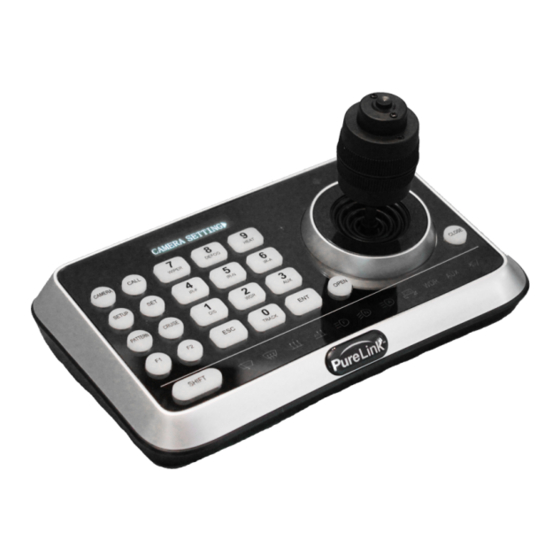
Introduction The VIP-CAM-CTRL1 provides full control of up to 255 PureStream™ VIP-CAM series cameras, as well as most cameras that support VISCA and PELCO control communications. Quickly access pan, tilt, zoom, and focus adjustments with the smooth 4D joystick, as well as direct iris control. Recall presets using the numeric keypad. -
Page 4: Control Surface
Control Surface VIP-CAM-CTRL1 USER MANUAL VERSION 1.0... -
Page 5: Control Surface Continued
① OLED screen: displays status of current operation. ② CALL (Call preset): Input preset number, then press CALL key to call a preset ③ CAMERA (Switch cameras): Input camera number, then press CAMERA key to switch to another camera. ④ SET (Set / Clear preset): Input preset number, then press SET key to set or delete a preset (Short press to “set”; long press to “clear”). ⑤ SETUP (Enter setup menu): Press SETUP key to enter menu and program the keyboard ⑥ CRUISE (Auto Cruise): Press CRUISE key to do auto cruise. ⑦ PATTERN (Pattern Scan): Press PATTERN key to do pattern scan ⑧ F1, F2 (Reserved): These keys are reserved. ⑨ SHIFT (Extension key): used with other keys for special functions. ⑩ ESC (Exit / Delete): EXIT a menu or DELETE in other operations. Control Surface continued ⑪ 0~9 (Numbers) used to input numbers. Combine with SHIFT key to activate various functions shown on number keys. For example, press SHIFT + 1 will turn on DIS function of the camera. ⑫ ENT (Confirm) confirm menu setting. VIP-CAM-CTRL1 USER MANUAL VERSION 1.0... - Page 6 ⑬ OPEN (IRIS Open) activate IRIS open of the camera. It is also a “confirm” key in a menu. ⑭ Joystick: Pan, Tilt, Zoom and Focus Non-Menu State: Left/Right/Up/Down: Pan/Tilt the camera correspondingly Twist clockwise: Zoom In, Twist anti-clockwise: Zoom Out; Press Zoom/ Focus Switch Key and Twist: Focus Near/Far Menu State: Right: Enter a submenu or Confirm; Left: Return to previous menu or exit (expect some not returnable menus); Up: Move to last option; Down: Move to next option. ⑮ CLOSE (IRIS Close): activate IRIS close of the camera; it is “return” key in a menu. ⑯ Status Display area This area is used to display status of functions that are turned on, relative icons will be back lighted. ⑰ MENU (Enter Camera Menu) This key is used to enter camera menu. ⑱ Zoom / Focus Switch Key: switch between zoom and focus function. Operation: Press this key, the crisscross of indicator lighter near the joystick will go out, twist the joystick to zoom in / out; press this key again, the crisscross of indicator lighter will be lightened, twist the joystick will adjust focus value. VIP-CAM-CTRL1 USER MANUAL VERSION 1.0...
-
Page 7: Connection Diagram
Connection Diagram VIP-CAM-CTRL1 USER MANUAL VERSION 1.0... -
Page 8: Operation
Operation Entering access PIN After powered on, “USER PIN” will show on the controller’s screen. The initial pin is “111111”. - - - - Enter “USER PIN” See “PIN SETTING” to set pin. PIN Error When “USER PIN:ERROR” shows on screen, it indicates wrong pin was input. Enter correct pin to get to next step Correct PIN Screen shows“ ”camera icon and default camera number. If there is no further operation for long time, screen will display current time automatically. If still no operations, the controller will enter sleeping mode. Enter OSD menu Press SETUP key. Screen shows “ADMIN PIN:”. Initial admin pin is “111111“. VIP-CAM-CTRL1 USER MANUAL VERSION 1.0... -
Page 9: Osd Menu List
OSD Menu List Setting up cameras for control Set the camera IDs separately. Set the cameras protocol, baud rates to the same values. Then every camera can be controlled easily by choosing their relative ID. Selecting camera for control Press the ‘CAMERA’ button. Enter the ID of the camera using the numeric keypad. Press ENT (enter). Setting a PTZ preset Press the ‘SET’ button. Enter the preset number you want to save to with the numeric keypad. Press the ENT (enter) button. VIP-CAM-CTRL1 USER MANUAL VERSION 1.0... - Page 10 Recalling a PTZ preset Press the “CALL” button. Enter the preset number you want to recall with the numeric keypad. Press the ENT (enter) button. Make sure you have selected the camera ID you want to operate. Move the joystick left or right. The degree you move the joystick will impact the speed of the adjustment. Tilt Make sure you have selected the camera ID you want to operate. Move the joystick up or down. The degree you move the joystick will impact the speed of the adjustment. Zoom Make sure you have selected the camera ID you want to operate. Rotate the joystick clockwise or counterclockwise. The degree you move the joystick will impact the speed of the adjustment. VIP-CAM-CTRL1 USER MANUAL VERSION 1.0...
-
Page 11: Technical Information
Focus Make sure you have selected the camera ID you want to operate. Press the button on the top center of the joystick down to change from Zoom mode to Focus mode. Rotate the joystick clockwise or counterclockwise. The degree you move the joystick will impact the speed of the adjustment. Technical Information VIP-CAM-CTRL1 USER MANUAL VERSION 1.0... - Page 12 TERMS & CONDITIONS PureLink shall repair or replace the Product if it develops a material fault during the period of warranty, on condition that i) the Product has only been subject to normal use in a domestic or commercial environment in a manner consistent with its specification and functionality, ii) the Product has been cared for reasonably and only subjected to reasonable wear and tear, iii) the defect has not been caused by willful or negligent abuse or neglect, or any accident or improper installation procedure, iv) the serial number of the Product has not been altered or removed.
- Page 13 On any products returned and accepted with an RMA number, return freight charges following repair of items under warranty shall be paid by PureLink, shipping by the standard ground carrier of its choice. ADVANCE WARRANTY REPLACEMENTS PureLink’s advance replacement service offers a Replacement Unit upon request - free of charge for eligible products purchased less than one (1) year of the warranty claim. Products purchased more than one (1) year prior to the warranty claim do not qualify for advance replacement services. Advance replacement requests must be validated by a member of PureLink’s Technical Support Team. Replacement units may be new or refurbished and is subject to availability. PureLink is responsible for shipping the Replacement Unit to your designated location by standard ground service. All other shipping methods will be responsibility of the Dealer. Original Unit Return – the Original Unit must be returned within thirty (30) calendar days of the return authorization date. Failure to return the Original Unit within this period will be subject to a minimum 15% re- stocking fee. Dealer is solely responsible for the shipping of the Original Unit to PureLink. TO MAKE A WARRANTY CLAIM To make a warranty claim, promptly notify PureLink within the warranty periods described above by calling PureLink’s Technical Support Department at 1-201-488-3232. PureLink, in its sole discretion, will determine what action, if any, is required under this warranty. Most problems can be corrected over the phone through close cooperation between Customer and a PureLink technician. To better enable PureLink to address a warranty claim, please have the Product’s serial and model numbers. If PureLink, in its sole discretion, determines that an on-site visit or other remedial action is necessary, PureLink may send a representative to Customer’s site. CUSTOMER SERVICE Technical support inquiries can be submitted electronically at purelinkav.com/tickets. For immediate assistance please contact PureLink’s Customer Care Team at +1 (201) 488-3232 VIP-CAM-CTRL1 USER MANUAL VERSION 1.0...
Need help?
Do you have a question about the VIP-CAM-CTRL1 and is the answer not in the manual?
Questions and answers