Table of Contents
Advertisement
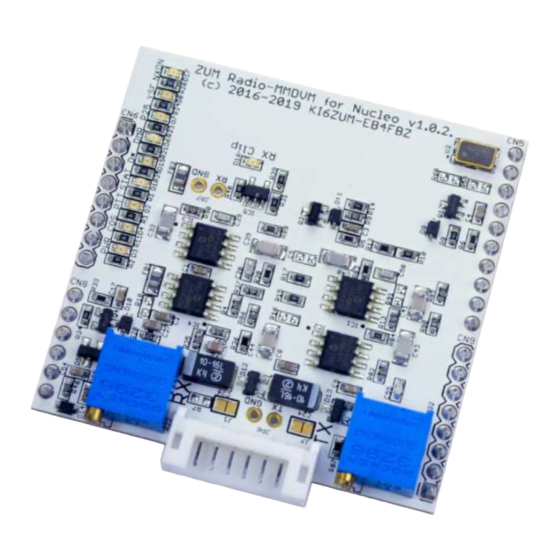
MMDVM-Nucleo rev. 1.0 board
Designed for repeater and high power hotspot applications – connects to user supplied
Raspberry Pi board and radio(s)
Connects to STM32F446 MB1136 Nucleo Board
Fifth generation analogue filter design that provides an extremely low BER compared to
previous generations
Two multi-turn pots for fine RX and TX adjustments
Onboard LEDs to show status and modes (PTT, COS, Power, D-Star, DMR, P25, Fusion,
NXDN and POCSAG)
Onboard LED to show receive signal level clipping
8 pin JST Connector with pigtail wires
Utilizes open source MMDVM software
Supports NucleoTNC projec
t
Advertisement
Table of Contents

Subscribe to Our Youtube Channel
Summary of Contents for ZUM Radio MMDVM-Nucleo
- Page 1 MMDVM-Nucleo rev. 1.0 board Designed for repeater and high power hotspot applications – connects to user supplied Raspberry Pi board and radio(s) Connects to STM32F446 MB1136 Nucleo Board Fifth generation analogue filter design that provides an extremely low BER compared to previous generations ...
-
Page 2: Table Of Contents
Building the NucleoTNC firmware ...................... 18 Assembling the NucleoTNC ......................... 31 Flashing the NucleoTNC firmware ...................... 32 Configuring the NucleoTNC firmware ....................32 Connecting the MMDVM-Nucleo board to radios ................32 Using mmdvmcal to calibrate the board ....................33 Support ............................... 33... -
Page 3: Wiring Connections
Wiring connections Here is a picture of the 8 pin header with cable showing wire colors: Here is a table of the pin numbers, names and wire colors: Pin number Signal name Description Wire color CTRL Control (output) Black COS/STAT1 Carrier sense (input) RX audio Receive audio from radio (input) -
Page 4: Adjusting Signal Levels (Hardware)
Here’s an example radio’s (FT-7900) pin connection via the mini DIN 6 connector on the rear of the radio: Pin number Signal name Wire color Mini DIN 6 connector RX audio White 9600 from radio Signal ground Yellow TX audio Green Audio to radio Blue... -
Page 5: Jumper Description Table
Here are some signal images captured on an Oscilloscope RX-(JP7) TX-(JP6) Noise without signal (JP7) Here is a list of the jumpers on the board and their settings: Jumper Description Table Bypass Pad Description Disable DC blocking capacitor on Radio RX audio Enable DC blocking capacitor on Radio RX audio Bypass R7 Enable R7, this allows you to reduce the RX signal coming from... -
Page 6: Led Description Table
LED Description Table LED NAME Description Board is transmitting Board is receiving STAT Status NXDN NXDN Enabled POCSAG POCSAG Enabled D-Star Enabled DMR Enabled P25 Enabled YSF Enabled Board is receiving power... -
Page 7: Adding An External Nextion Display
Adding an external Nextion display A NEXTION display can be used by connecting it to the Morpho headers on the Nucleo board. Nextion display pins Nucleo pins CN7-18 CN7-20 CN10-21 CN10-33 For connecting a NEXTION display, make sure that each colored wire matches the connections shown in the images below. - Page 8 Here is an image of the display working. To get the Nextion display working, make sure your settings are correct within Pi-Star. The MMDVM Display Type: should be set to “Nextion”, the Port: should be set to “Modem” and the correct Nextion Layout: should be selected.
-
Page 9: Adjusting Rx And Tx Signals
Adjusting RX and TX signals Here is a picture of the two trim pots used to adjust the signal levels of the RX and TX audio Turning the RX audio trim pot counter-clockwise will increase the signal level, while turning the trim pot clockwise will decrease the signal level. -
Page 10: Configuring Pi-Star (Including Adjusting Signal Levels Via Software)
Configuring Pi-Star (including adjusting signal levels via software) From the “Configuration” menu, set the Radio/Modem type to “ZUMSpot Libre (USB)”, set your “Callsign” and then select Apply Changes. Next select the “expert” menu, and then select “MMDVMHost”... - Page 11 Scroll down to the “Modem” section to access the invert and level settings then select “Apply Changes” Scroll back up to the top of the page and select “Configuration”.
- Page 12 Next, select “Power” Next, select “Reboot”...
-
Page 13: Building Mmdvm Firmware
Building MMDVM firmware On Windows 10 Install bash using these instructions: bash-windows-10 Once bash is installed, install GCC for ARM. Open the command prompt and type in the following instructions. o bash o sudo apt-get install gcc o sudo apt-get install make o sudo apt-get remove gcc-arm-none-eabi o sudo apt-get install gcc-arm-none-eabi gdb-arm-none-eabi libstdc++-arm-none- eabi-newlib libnewlib-arm-none-eabi... -
Page 14: Flashing Nucleo F446
Edit Config.h. Uncomment the line: #define MODE_LEDS o If you want to connect a Nextion display, then also uncomment the line: #define SERIAL_REPEATER To start build run: make nucleo Binaries will be under the bin/ folder Flashing Nucleo F446 ... - Page 15 Go to Open File and look for the folder where the compiled HEX file is in Select the HEX file and click Open Click on “Download”...
- Page 16 Once the flashing is done. Click on “OK” in the popup window and then disconnect from the Nucleo board so you can remove it from your computer.
-
Page 17: Mmdvm-Nucleo With Nucleotnc Firmware
NucleoTNC is an open source TNC project (https://github.com/mobilinkd/NucleoTNC) which runs on an STM32L432KC Nucleo32 board. It functions as a1200 baud KISS TNC over a USB serial port. With a simple adapter PCB the MMDVM-Nucleo board can be paired with the STM32L432 Nucleo board. -
Page 18: Building The Nucleotnc Firmware
Building the NucleoTNC firmware Download CDT Eclipse with GNU MCU Eclipse plugin from here: https://github.com/gnu-mcu-eclipse/org.eclipse.epp.packages/releases/ If on macOS, follow the install steps listed on that page Get the latest NucleoTNC source code from GitHub git clone https://github.com/mobilinkd/NucleoTNC.git Open Eclipse and select Import projects…... - Page 19 Navigate to the directory where you cloned the NucleoTNC project. Once selected press Finish You should now see the project name Nucleo_L432KC_TNC. If you select the drop-down arrow you will see the folders and files that belong to the project.
- Page 20 With the project selected, click on Project and make sure is no check mark next to Build Automatically. If there is then unselect it so it doesn’t constantly try and build while making modifications to the project settings. With project selected, click on Project and go to Build Configurations →...
- Page 21 With the project selected, go to Project → Properties On the properties window, Go to C/C++ Build → Settings, select the Tool Settings tab and make sure the Target Processor section is selected.
- Page 22 Change the ARM family (-mcpu) section to cortex-m4 Change the Float ABI section to Library with FP (softfp)
- Page 23 Click on Preprocessor under GNU ARM Cross C Compiler. Delete the KISS_LOGGING symbol under Defined symbols (-D). Do the same thing for the GNU ARM Cross C++ Compiler...
- Page 24 Click on Includes under the GNU ARM Cross C++ Compiler section. Add the path to the boost library on your machine. To install boost: Windows (with Bash installed) and Linux sudo apt-get install libboost-all-dev macOS (using homebrew) brew install boost...
- Page 25 Select General under GNU ARM Cross C++ Linker. Click on the plus button to add the linker script file: "${workspace_loc:/${ProjName}/STM32L432KC_FLASH.ld}"...
- Page 26 Select Miscellaneous under GNU ARM Cross C++ Linker. Make sure the check box next to the item Use newlib-nano (--specs=nano.specs) is checked. Then click on Apply and Close A pop up window will show. Click Yes...
- Page 27 With project selected, click on Project and click on Clean. Click on the Clean button so that the project directory is cleaned before starting a build. If you run into this issue: Error: Program "arm-none-eabi-gcc" not found in PATH. Then try this: o With the project selected, go to Project ->...
- Page 28 During the Build steps if you run into this issue: arm-none-eabi- --format=berkeley firmware.elf Cannot run program "arm-none-eabi-": Unknown reason Do the following: o With the project selected, go to Project -> Properties o Go to C/C++ Build -> Settings -> Tool Settings -> GNU ARM Cross Create Flash Image o In the command field change the text ${cross_prefix}${objcopy}${cross_suffix} o To this: ${cross_prefix}objcopy${cross_suffix} o Go to C/C++ Build ->...
- Page 29 In the command field change the text ${cross_prefix}${cross_size}${cross_suffix} o To this: ${cross_prefix}size${cross_suffix}...
- Page 30 Go to C/C++ Build -> Settings -> Build Steps Under the section Post-build steps. Change the text in the command field ${cross_prefix}${cross_objcopy}${cross_suffix} firmware.elf -O binary firmware.bin To this: ${cross_prefix}objcopy${cross_suffix} firmware.elf -O binary firmware.bin Then click on Apply and Close ...
-
Page 31: Assembling The Nucleotnc
These components need to be soldered first since the MMDVM-Nucleo board will cover the pads. Make sure to trim the leads as short as possible to prevent the possibility of them shorting against the... -
Page 32: Flashing The Nucleotnc Firmware
These two images below show the MMDVM-Nucleo board mounted and soldered to the adapter board. Flashing the NucleoTNC firmware These steps are only for use with the NUCLEO-L432KC board. To flash the NucleoTNC firmware you must first either build the firmware following the steps in the section “Building the NucleoTNC firmware”... -
Page 33: Using Mmdvmcal To Calibrate The Board
Using mmdvmcal to calibrate the board This is a web page with a good tutorial on how to use the mmdvmcal software tool and a spectrum analyzer to adjustment the signal levels for DMR: https://www.f5uii.net/en/installation-calibration-adjustment-tunning-mmdvm-mmdvmhost- raspberry-motorola-gm360/5/ Another document describing the spectrum adjustment process: http://www.swedmr.se/wp-content/uploads/2017/08/Justering-av-repeater-med-MMDVM.pdf Support Great video from W1MSG showing getting started with Pi-Star:...
Need help?
Do you have a question about the MMDVM-Nucleo and is the answer not in the manual?
Questions and answers