
Summary of Contents for Aqua Science CLEAR MAX
- Page 1 Owners Manual Applicable to CLEAR MAX, PURE MAX and ecoRO 4 and 5 Stage Models m o r e s o l u t i o n s b e t t e r p r o d u c t s g r e a t s e r v i c e A q u a S c i e n c e A Z .
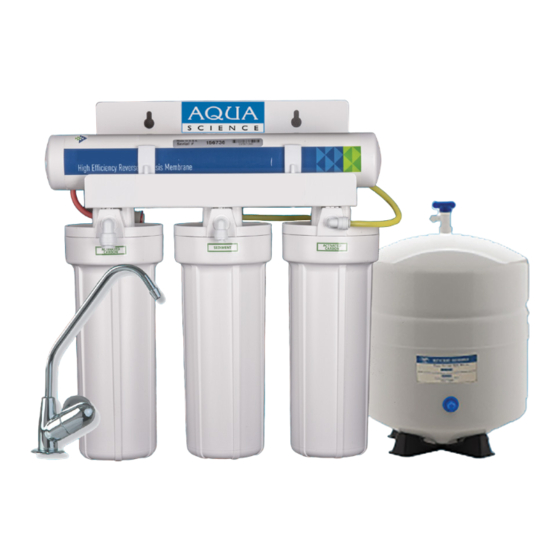
- Page 2 A q u a S c i e n c e A Z . c o m Solutions For Life CONGRATULATIONS! Your choice in a Reverse Osmosis System will yield purer, healthier and better tasting water in your household. You have invested in a sophisticated home drinking water appliance.
-
Page 3: Specifications
A q u a S c i e n c e A Z . c o m Solutions For Life IMPORTANT: Before installing this reverse osmosis system, make certain your water supply complies with the following operating speci- fications. Failure to do so may reduce the effectiveness of the system and will void the warranty. - Page 4 A q u a S c i e n c e A Z . c o m Solutions For Life INSTALLATION (CONTINUED) RO MEMBRANE PRECAUTIONS Selecting the Faucet Location Chlorine will destroy the TFC membrane. If you use this RO system with a chlorinated or periodically chlorinated supply, it is ABSOLUTELY The drinking water faucet should be positioned with function, convenience NECESSARY to use a carbon pre-filter (included with the system).
- Page 5 A q u a S c i e n c e A Z . c o m Solutions For Life • Remove the drain clamp from the drain-pipe and enlarge the hole with a 3/8-inch drill bit. Use a file Illustration of to remove rough edges from the Drilling Sink...
-
Page 6: Testing Your Reverse Osmosis System
A q u a S c i e n c e A Z . c o m Solutions For Life INSTALLATION (CONTINUED) Connecting the Storage Tank to the System Illustration Shows To prevent leaks, apply 5 or more wraps of plumbers tape to threads on Instruction #8 tank. -
Page 7: Optional Installation
A q u a S c i e n c e A Z . c o m Solutions For Life OPTIONAL INSTALLATION Connecting your RO System to Refrigerator Icemaker / Water Dispenser • If you are connecting this unit to your refrigerator/icemaker with initial RO installation, wait to turn on the icemaker until the post-polishing filter has been flushed according to Step 11. - Page 8 A q u a S c i e n c e A Z . c o m Solutions For Life FILTER CHANGES Replacing the Pre-Filter The cartridges should be replaced every 6-12 months If your water contains a high amount of sediment, it may be necessary to change the sediment cartridge more frequently.
-
Page 9: Sanitizing The System
A q u a S c i e n c e A Z . c o m Solutions For Life SANITIZING THE SYSTEM TROUBLESHOOTING GUIDE 1. Remove black rubber “O”-rings from grooves in housings. Wipe grooves Leaks Between Bottom of Housing and Cap and “O”-rings clean, set “O”-rings aside for now. -
Page 10: Service Log
A q u a S c i e n c e A Z . c o m Solutions For Life SERVICE LOG Date of Installation ____________________________________ Serial # ____________________________________ Date Service Comments C A L L F O R S E R V I C E 4 8 0 - 8 9 4 - 0 7 7 0...
Need help?
Do you have a question about the CLEAR MAX and is the answer not in the manual?
Questions and answers