Advertisement
Quick Links
H. H. MØRCH
DP-8
Instructions
Contents of the packing
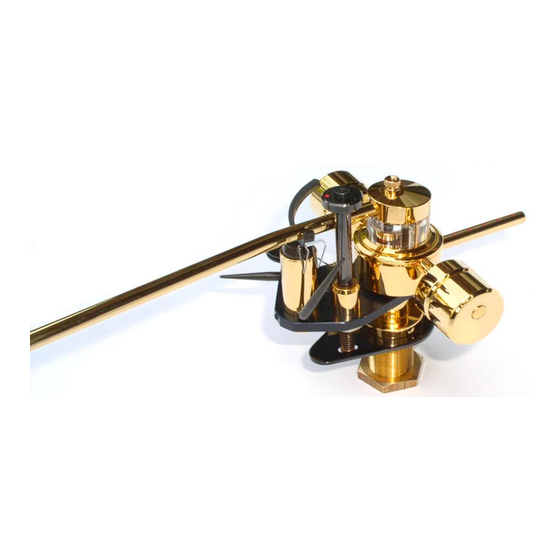
In the packing of the tonearm you will find the arm base in which the bearings are encapsulated in a
heavy body. The bearings are the link between the moveable part of the tonearm and its support. This
support can move up and down in a bush, which is holding the arm base. A black pear shaped plate is
attached to the said bush with just one screw. This pear shaped plate is supporting the integrated
VTA device, the antiskating device and the lifter cylinder. The said bush is holding the arm base with a
big nut to the turntable chassis. A high quality cord is supplied for connecting the arm base to the
amplifier. In North America this cord is not included.
Further you will find one arm tube according to the choice that you have had from advice from your
dealer. Or you have seen the Cartridge Armtube Combination List (under Instructions) in our website.
There also will be 4 weights with O-rings, 4 weights with screws, finger lever with screws, knurled nut,
hexagon spanner, syringe with silicone fluid, a thin plexiglass rod and a narrow piece of thick paper.
The tonearm usually is supplied with the arm rest mounted on the pick-up lifter, but if desired a
separate arm rest could be supplied instead.
Spatial requirements
The vertical distance between the plane where the tonearm is mounted to the plane where the record
is placed should be between 28 mm (1 1/8") and 40 mm (1 9/16").
If the diameter of the turntable platter is larger than 32 cm (12 5/8") then it is recommended to use a
12" armtube.
Mounting the bush
First it has to be decided exactly where to place the bush with the arm base. The center of the bush
should be at a distance of 212 mm (8 5/16'') from the center of the turntable platter and there has to
be room enough for the counterweight rod to move freely.
Fig. 1. The outline of the white area is indicating the room needed for the tonearm.
Page 1
Advertisement

Subscribe to Our Youtube Channel
Summary of Contents for H. H. MORCH DP-8
- Page 1 H. H. MØRCH DP-8 Instructions Contents of the packing In the packing of the tonearm you will find the arm base in which the bearings are encapsulated in a heavy body. The bearings are the link between the moveable part of the tonearm and its support. This support can move up and down in a bush, which is holding the arm base.
- Page 2 The counterweight rod is having a rear overhang of 70 mm (2 3/4”) as to the center of the said bush. If there is plenty of room for the counterweight rod consideration should be taken as to where the arm base should be positioned to give a convenient position for the armtube when resting in the arm rest.
- Page 3 Push the armtube towards the turntable spindle so that one of the side rods touches the VTA spindle. Push the weights in this side towards the VTA device while holding the enclosed thick paper between the VTA device and the smaller weight. With the smaller weight in this position put the hexagon key into the screw of this weight.
- Page 4 Fig. 5. Tightening the screw of the smaller weight on the other side. On each side put the paper between the bigger weight and the smaller weight and push the bigger weight slightly towards the smaller weight. Then tighten the screws a little having the hexagon key pointing backwards and about 30 up from horizontal (Fig.
- Page 5 Fig. 7. By raising the counterweight rod 1 mm the weights in both sides must come up simultaneously. Putting on the counterweights Then the weights with O-rings for the counterweight rod should be put on. In order to make it possible to balance all phono cartridges the tonearm is supplied with three counterweights - large, medium, and small - having the hole eccentrically positioned and with a tracking force weight having a centrally positioned hole.
-
Page 6: Mounting The Cartridge
Take off the armtube. The accompanying syringe contains about 0.6 ml of silicone fluid. Pull the black piston out of the lifter cylinder and place it in a completely clean place. Then inject 0.05 ml but absolutely no more than 0.1 ml of the fluid behind the lifter handle shaft inside the lifter cylinder. When doing this the lifter handle must be in "lowered"... - Page 7 Put the tracking force weight near the end of the counterweight rod. Move the counterweight/s backwards or forwards until the arm tube is balancing in about horizontal position. When doing this, see that there is space to move a weight forwards to apply tracking force. The large counterweight gives 2 g when moved 1 indentation forwards.
-
Page 8: Center Of Gravity
If a separate arm rest is used, it is adjusted to a height, so that the arm tube rests on it, when the pick- up lifter is in "raised" position. Center of Gravity Raise the pick-up lifter. Put the black rubber between the lifter cylinder and the spring for antiskating, so that the spring doesn't pull. - Page 9 Lateral balance The direction of the counterweight rod extended to the stylus is the line of lateral balance. The lateral balance was coarse adjusted after mounting the weights on the side rods (see Fig. 7). Fig. 13. Fine adjustment by turning the heavy end of any counterweight to the side that comes up first. Fine adjustment can be done in the same way but with the armtube resting on the raised pick-up lifter, and the anti skating handle should be turned as far counter clockwise as possible.
- Page 10 Coarse adjustment can be done with the stylus running between the grooves next to the label of the record: Without starting the turntable motor, place the stylus between these grooves. Then move the turntable platter slowly forwards with your hand. The stylus should move inwards slowly. Then move the turntable slowly a little backwards.
Need help?
Do you have a question about the DP-8 and is the answer not in the manual?
Questions and answers