Table of Contents
Advertisement
Advertisement
Table of Contents

Related Manuals for Sphere 7 Series


Summary of Contents for Sphere 7 Series
- Page 1 Series 7 18.5"/21.5"/23.6" More information https://www.caravansplus.com.au...
- Page 2 The Manual is applied to below models: S7LED185, S7LED185BT. S7LED215, S7LED215BT, S7LED215BTWIFI. S7LED236, S7LED236BT, S7LED236BTWIFI. NOTE:The Bluetooth functions are only apply to these models including S7LED185BT, S7LED215BTWIFI, S7LED236BT and S7LED236BTWIFI. The SMART TV functions are only apply to S7LED215BTWIFI and S7LED236BTWIFI models.
-
Page 3: Table Of Contents
Channel Menu Picture Menu Sound Menu Bluetooth Time Menu Option Menu Lock Menu Photo Menu Music Menu Movie Menu Text Menu SMART TV Quick Start & General Information Configuration Home, Favorites & Web Apps & Settings Troubleshooting Important Safety Instructions Warranty Information More information https://www.caravansplus.com.au... - Page 4 LINE OUT CVBS ANT IN ANT IN Coaxial Earphone Mini YPbPr RJ45 USB IN Smart ARC IN Mini AV PC AUDIO Power: Coaxial: Earphone: CVBS OUT: Mini YPbPr: Mini AV: LINE OUT: PC audio: HDMI: CI: VGA: USB: ANT IN: Smart TV RJ45 IN:...
- Page 5 Remote control for no-smart models POWER: Switch between Standby and On. AUTO TUNE: AUTO TUNE “DTV” ONE TOUCH TUNE. AUTO TUNE INPUT MENU VOL+ VOL- ANGLE LANGUAGE DVD SETUP DVD MENU REVEAL SIZE HOLD S.PAGE INPUT TEXT INDEX T.SHIFT AUTO MENU DVD TITLE REPEAT...
- Page 6 POWER: Switch between Standby and On. Remote control for smart models AUTO TUNE: AUTO TUNE “DTV” ONE TOUCH TUNE. AUTO TUNE ANGLE LANGUAGE DVD SETUP DVD MENU REVEAL SIZE HOLD S.PAGE TEXT INDEX T.SHIFT AUTO DISPLAY REPEAT R.LIST NICAM/A2 ASPECT P.MODE S.MODE AUDIO...
-
Page 7: Channel Menu
Channel Menu (When DTV is selected as the source) Use the coloured buttons on the remote to edit the channels. First press the buttons on the remote to highlight the channel you want to select, then: Press the button to delete the channel from the program list. Blue Press the button to skip the selected channel (this channel... - Page 8 Unicable: Select Off. Search: Select Search and press OK on the remote control to start auto tuning. For your convenience, this sphere TV is pre-tuned with Free to Air New Zealand Satellite TV Channels as transmitted on the Optus D1 Satellite.
-
Page 9: Picture Menu
Picture Menu Sound Menu Picture Mo d e S o u n d Mo d e Pres uttons to select Picture mode, and go into next interface by pressing the Press th uttons to select Sound Mode. Then press the button to select from a list button. -
Page 10: Bluetooth
BLUETOOTH Dis c o n n ect Press the / buttons to select the Disconnect and OK to select. Use this option to Disconnect the currently paired Bluetooth device, but not turn off the TV’s Bluetooth transmitter. This will also re-activate the TV’s internal speakers. B lu eto oth R e s et Should your Bluetooth device stop working or its operation become intermittent, or you wish to clear some of the Bluetooth devices from the Paired List, then press the /... -
Page 11: Time Menu
Time Menu Option Menu Daylight Saving C lo ck The clock and date is automatically programmed from information received from DTV Channels. You should not need to use this sub-menu once you have received a DTV signal, however this can be manually changed if required. O S D L a n g u a g e Select OSD Language with the buttons then press OK to adjust the on-screen Language. -
Page 12: Lock Menu
Lock Menu D MI C E C DMI CEC allows devices connected to the TV via HDMI to communicate back and forth with the TV. Please see below for specific CEC settings L o ck S y stem Select Lock System with the buttons and press OK. -
Page 13: Pvr
R E C O R D Liv e T V Ensure you have a correctly formatted USB drive inserted in the TV before recording. If the USB drive is not formatted properly, the TV will display a message advising that the USB drive needs to be formatted. -
Page 14: Photo Menu
MEDIA MENU Select “MEDIA” as a Source on the TV using the remote Control Music Menu Press buttons to select Photo/Music/Movie/Text, and then press the OK button 1. Select MUSIC with the buttons, and then press the OK button to enter sub_menu. to select the appropriate selection. -
Page 15: Text Menu
SMART TV Quick Start & General Information Text Menu 1. Select TEXT with the buttons, and then press the OK button to enter sub_menu. Internet Connection 2. Select C:\, then press the OK button to select the USB drive. To use the Smart TV functions you must have access to a WiFi network or wired (LAN) network. The TV features an inbuilt WiFi receiver and this is the preferred option to connect the TV to the Internet. -
Page 16: Configuration
Configuration Next you will be presented with the Date & Time screens. If you are connected to the Internet, this OK on the remote. Then press OK again which selects information should be automatically completed so just press the OK button on the remote to cycle English as the system Language through these screens. -
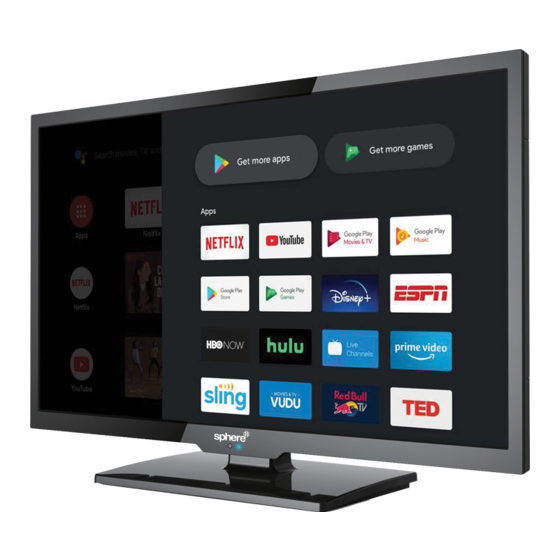
Page 17: Home, Favorites & Web
Home, Favorites & Web Apps & Settings Apps Menu Home Menu This Smart TV comes with a number of pre-installed Apps. You can install a new App using the The Home Menu consists of four main Sub Menus. The default menu is Favourites. This has Appinstaller App. - Page 18 is accessed by the DVD SETUP button. Up and down More information https://www.caravansplus.com.au...
- Page 19 S p h ere Pixel G u ara ntee 'Zero' Dead pixels within the first · 14days / '4' or More Dead pixels will warrant a replacement TV for the remainder of the 12Months warranty (A Dead Pixel is a dark spot with no colour mostly seen on a White screen) ·...
Need help?
Do you have a question about the 7 Series and is the answer not in the manual?
Questions and answers
why does my sphere 7 series tv not have a bluetooth connection option
The Sphere 7 Series TV does not have a Bluetooth connection option if it is not one of the models that support Bluetooth. According to the manual, Bluetooth functions are only available on specific models, including S7LED185BT, S7LED215BTWIFI, S7LED236BT, and S7LED236BTWIFI. If the TV model does not include "BT" or "BTWIFI" in its name, it does not support Bluetooth connectivity.
This answer is automatically generated