
Summary of Contents for Count Auto Pro Touch
- Page 1 Auto Pro Touch 1-2017 Version 1.0 Numbering, Perforating and Scoring Machine. Serial Number ___________________________ Date ___________________________________...
- Page 2 Page left blank intentionally...
-
Page 3: Table Of Contents
ROLLER MAINTENANCE: ......................7 NUMBERING HEADS: ........................7 REMOVABLE SCREWS: ......................... 7 COMPONENT IDENTIFICATION ......................8 SETTING UP YOUR AUTO PRO TOUCH ..................... 9 DELIVERY TRAY INSTALLATION ....................9 PAPER STOP ASSEMBLIES ......................9 MACHINE OPERATION ........................10 MAIN POWER ..........................10 TOUCH SCREEN CONTROLLER ....................... - Page 4 FEED TABLE ASSEMBLY ........................18 ADJUSTING THE FEED RAILS ...................... 19 SQUARING THE FEED RAILS ....................... 19 PAPER CALIPER ASSEMBLY COMPONENT IDENTIFICATION ............20 PAPER CALIPER ASSEMBLY HEIGHT ADJUSTMENT FOR PAPER THICKNESS ......21 ADJUSTING THE PAPER SEPARATOR SPRING ................21 CHANGING THE STATIONARY WHEEL ..................
-
Page 5: Introduction
INTRODUCTION PREFACE The Auto Pro Touch is a precision Pneumatic Numbering, Perforating, and Scoring machine. With its intuitive touchscreen design it can perform up to 12 numbers per page. It has an automatic bottom friction feed that is easy to setup. The bottom feed caliper assembly self-fans the paper for a smooth consistent feed. -
Page 6: Electrical Specifications
Air Compressor with Min 60 PSI. (Not Included) NOTE: Older buildings, overloaded lines, and bad grounds can affect the operation of your Auto Pro Touch. A regulated dedicated line is recommended. Operating the machine through a power strip is not recommended. -
Page 7: Care And Maintenance
CARE AND MAINTENANCE The Auto Pro Touch is a precision machine. It is very important to keep it free of excessive dust, dirt and foreign matter. We recommend that you keep the machine covered when not in use. BEARINGS/BUSHINGS: The AUTO PRO TOUCH uses 2 different style bearings sealed roller bearing and bronze bushings. -
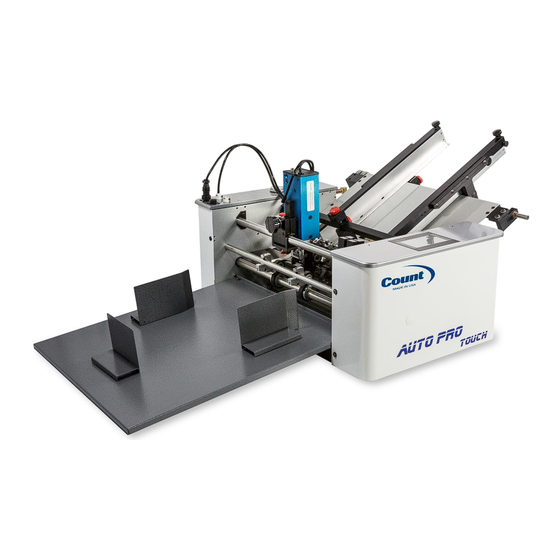
Page 8: Component Identification
COMPONENT IDENTIFICATION Feed Table Assembly Micro Skew Adjustment Feed Rail Numbering Head Paper Stop Touch Screen Perf and Score Assemblies Delivery Tray REFERENCES Paper Stop Pg. 9 Delivery Tray Pg. 9 Touch Screen Pg. 11 Feed Rail Pg. 18 Feed Table Assembly Pg. -
Page 9: Setting Up Your Auto Pro Touch
SETTING UP YOUR AUTO PRO TOUCH 1. Open top of crate and remove components. 2. Assemble stand part # CTS100 (If ordered). (See Directions) 3. Place machine on stand or table. 5. Place delivery tray in front so tray hooks under the steel dowels located directly below the exit shaft. -
Page 10: Machine Operation
MACHINE OPERATION MAIN POWER On the rear panel of the machine under the feed table is the main power switch. This is the on and off power for the entire machine. When switched on the touchscreen will turn on, this is how you know the machine is on. -
Page 11: Touch Screen Controller
TOUCH SCREEN CONTROLLER THE TOUCH SCREEN CONSISTS OF FOUR SECTIONS: 1. Count Logo and Service Access 2. Perf Mode 3. Number Mode 4. Feeder Mode TOUCH SCREEN OPERATION When the machine is turned on the display may take up to 7 seconds for the home screen to display. -
Page 12: Perf Mode
PERF MODE From the home screen, press the perf mode button the perf mode screen will be displayed Home: Takes you back to the home screen. Counter Reset: Resets the displayed counter to 0. Jog Left and Right: Slowly advances the rollers forward or backward. Batch Counter: Allows for stopping the machine after a batch number is reached. -
Page 13: Feed Mode
FEED MODE Feed mode is the mode to run your AUTO PRO TOUCH as a feeder into other types of finishing equipment. Ex. Laminators folders, staplers. etc. Home: Takes you back to the home screen. Counter Reset: Resets the displayed counter to 0. -
Page 14: Transport Operation
TRANSPORT OPERATION • The Run Button will start the transport motor in any given mode. Press it again to stop the transport. Each Mode has a timeout feature to preserve the life of the machine. • A document may be slowly advanced through the transport by pushing and holding one of these buttons. -
Page 15: Programming For Number Mode
PROGRAMMING FOR NUMBER MODE In Numbering Mode it is important to understand how to program the positions. The machine must be programmed using the lead edge as reference. What this means is the position 2 cannot be before position 1. The distances of the program must be from the low to high stating with the lead edge. -
Page 16: Saving Numbering Jobs
SAVING NUMBERING JOBS Press the Number Mode Button > Enter In Distance For each Position in mm > Select Head > Save > Select Location to save in 1, 2, 3, or 4. RECALLING NUMBERING JOBS: Press the Number Mode Button > Recall > Select the Program Number > Accept > Accept > Run. -
Page 17: Batch Counter
BATCH COUNTER Press the Batch Counter button from the run screen in any mode and it will take you to the Batch Count Screen. Press the Enter Batch Amount Button to enter in the number you want to run per batch. -
Page 18: Feed Table Assembly
M-S0H0825 FEED TABLE ASSEMBLY WRASAAM0550 WRASAPP0005 W-OF0640 Feed Rail Lock Knob – WRASAAM0550 Locks the position of the feed rail laterally. Nut –Adjustment Feed – W-OF0640 Use this to adjust the lateral position of both rails at the same time. Micro-Lateral Adjustment Lock –... -
Page 19: Adjusting The Feed Rails
Each machine is tested and will come to you with the feed rails squared by our quality assurance department. The feed rails on your Auto Pro Touch are designed to adjust easily in case of a problem with skewed feeding. By loosening the feed rail alignment lock knobs you can move each rail independently to square them to your stock. -
Page 20: Paper Caliper Assembly Component Identification
PAPER CALIPER ASSEMBLY COMPONENT IDENTIFICATION Height Adjustment Knob - WRASAAM0610 Raises and lowers stationary roller to adjust for paper thickness. Height Adjustment Lock Knob - WRASAAM0600 Locks the height adjustment assembly in position after correct setting is achieved. Paper separator Spring - W-OFS340 Fans stack and works with stationary roller to correctly space sheets for... -
Page 21: Paper Caliper Assembly Height Adjustment For Paper Thickness
PAPER CALIPER ASSEMBLY HEIGHT ADJUSTMENT FOR PAPER THICKNESS To adjust this for your job, turn your Auto Pro Touch on and set the machine to run. Loosen the height adjustment lock. Hold a sheet under the Caliper Assembly and using the height adjustment knob lower the assembly until you feel a slight pull. -
Page 22: Changing The Stationary Wheel
CHANGING THE STATIONARY WHEEL The stationary wheel is a consumable part. After use it will develop flat spots and should be turned frequently so paper is always being presented to a round surface, not a flat spot. If you are having a problem with doubles on thinner stocks, try replacing this roller. This is very simply done by removing the wheel bolt and replacing the wheel. -
Page 23: Loading The Feeder
DO NOT USE BLANKET WASH! • The Auto Pro Touch is capable of running 14 lb. single sheets, 6 part forms and 80 lb. cover. Its flexibility is directly related to the operator’s experience. •... -
Page 24: Replacing Feed Wheels
The red light for X4 should be illuminated when there is a piece of paper blocking the sensor. If not the sensor needs to be replaced. 3. If all above steps work correctly sensor is working properly, if not, contact the Count Machinery Company service department. -
Page 25: Numbering Head
NUMBERING HEAD Power Cord Vertical Bracket Height Adjustment Lock Down Knob Screw U Frame Assembly Repeat Selector Air Head Connector and Cord Numbering Head The Numbering Heads can be operated simultaneously and the wheelset can be rotated by hand in any direction. -
Page 26: Numbering Head Part Numbers
Wheel Assembly Ink Swing Arm Repeat Selector C Clip Repeat Selector Shaft Repeat Selector NUMBERING HEAD PART NUMBERS: Numbering Head - W-ASFCM0100 Complete 7 digit reverse pneumatic numbering head. Vertical Head Bracket - W-OF2696 Vertical Head Bracket Assy. - W-ASAHD0014 Complete assembly includes: W-OF2696, M- OH0475, M-S0H0835, M-S0H0575, WRASAAM0620, &... -
Page 27: Depressing A Wheel
DEPRESSING A WHEEL The standard Pneumatic Numbering Head can recess the first four (4) wheels so there is no image when striking. For example, to print the number 4750 instead of 0004750, you will need to depress the first three wheels. To do so, remove the Numbering Head from the Head Bracket and hold it upside down resting it on a flat surface. -
Page 28: Adjusting The Vertical Bracket
ADJUSTING THE VERTICAL BRACKET The machine comes with the numbering head leveled correctly from the factory. The top of the vertical bracket is slotted to allow for movement. The effect of this movement depends on the orientation of the head. To make an adjustment to the vertical bracket, simply loosen the top screw and slide toward the direction desired, then retighten the screw. -
Page 29: Tips For Leveling Head
“2.” The head will now strike the same number twice. NOTE: After selecting a repeat sequence, replace head and run a test sheet through the Auto Pro Touch. You should get this: If you get this: The number changes at the wrong strike, the wheel cam is not in sync with the paper. - Page 30 button on the top of the numbering head one (1) time. The cam is now in the correct changing sequence.
-
Page 31: Ink Cartridge
INK CARTRIDGE The ink cartridge slides under the swing arm and locks into place. When installing a new ink cartridge, first remove the foam pad using an X-acto knife and place a small cut into the reservoir. This will supply ink to the foam through the action of the swing arm. Start with a small hole as it is easier to make the hole larger, but if you start with the hole too large you cannot control the flow of the ink. -
Page 32: Perf Shaft & Strike Plate
PERF SHAFT & STRIKE PLATE A – Support Bar – W-OF0232 This is the shaft that the roller wheels and perf score are mounted on. B – Lower Sensor Eye Assy. – M-S0E1317 Located in the platen strike plate. REMOVING THE PERF SHAFT Remove the non operator side cover. -
Page 33: Perforating And Scoring Assemblies
The perf depth is adjustable by the screw on the top of the upper assembly. The tighter you turn the screw the more pressure and thus the deeper the perforation. As the Auto Pro Touch can perforate through a wide variety of stocks this is a very important adjustment. For a good standard starting point use your T-handle wrench to tighten the spring loaded screw on the upper assembly until you feel the perf blade touch the lower assembly. -
Page 34: Gripper Wheel Perf-Score Mounting
GRIPPER WHEEL PERF-SCORE MOUNTING The rollers will come from the factory set up to run an 8.5in sheet of paper. When changing paper size all the rollers should be placed in the paper path and evenly spaced. The rollers should never be placed within 1in of the edge of the sheet of paper. The more rollers used the more control you have on the sheet. - Page 35 HEAD FIRES BUT NUMBER DOES NOT ADVANCE: 1. Head set too low cannot make full stroke 2. Possible damage or broken action indicator. 3. May need to send to the Count service department for repair. • NUMBERS TURN OUT OF SEQUENCE: 1.
- Page 36 Page left blank intentionally...
- Page 37 Martin Yale Industries, LLC Wabash, IN 46992 • USA • Phone 260•563•0621 • Fax 260•563•4575 251 Wedcor Avenue, www.martinyale.com 1/17 M-S027954 R0...
Need help?
Do you have a question about the Auto Pro Touch and is the answer not in the manual?
Questions and answers