Table of Contents
Advertisement
Quick Links
To install the Lathe Wizard, you will need a medium crescent wrench or set of open-end or box
wrenches and a set of Allen wrenches. You will also need a ¾" template guide for your router.
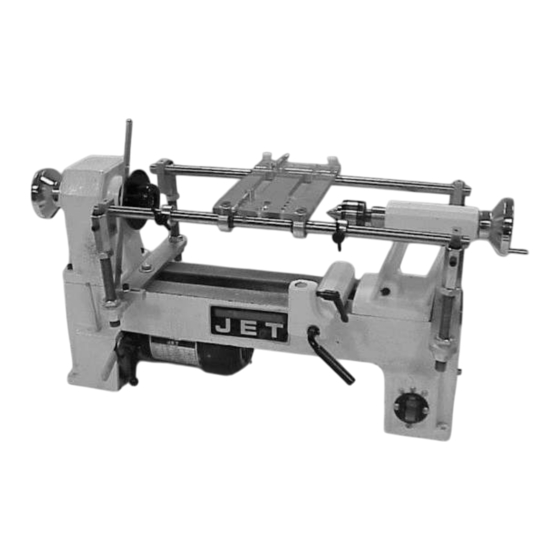
1. Installing the index:
The index plate has 24 holes and is made of Delrin®,
which is a high quality machinable plastic also know as acetal. It
is c" thick by 4" in diameter and comes in three sizes to fit 1", 1
¼" and 1 ½" spindles. Before placing t he index plate on the
spindle, first install the "O" ring which is supplied. After the
"O"ring and the index plate, the nose nut is screwed on to secure
the plate. The "O"ring is there to provide sufficient friction to
prevent the plate from vibrating loose during use and to eliminate
the need for a wrench to tighten the assembly. The index plate
holes are slightly tapered so that it makes a difference which side
is presented to the stop arm. The stop arm pin will fit tighter in one side than the other. You can
decide which side you prefer.
2. Installing the bed plates:
There are two bed plat es which are made of d" X 1 ½"
X 11" aluminum. They come with two bed nuts to fit your lathe.
The bed nuts are beneath the ways and are secured with a d" X
? hex head bolt. Make sure the boss on the top of the
rectangular nut extends up into the bed slot. One of the bed
plates has two ¼-20 holes on one end. This plate goes next to
the head sto ck with the holes at the front of the lathe. Inst all
The Lathe Wizard
Setting up the b asic unit
Advertisement
Table of Contents

Summary of Contents for The Beall Tool Company The Lathe Wizard
- Page 1 Setting up the b asic unit To install the Lathe Wizard, you will need a medium crescent wrench or set of open-end or box wrenches and a set of Allen wrenches. You will also need a ¾" template guide for your router.
- Page 2 Thompson shafts. Slide one through the holes in the top of the rear support rod brackets. The tail stock end of the lathe wizard can be any where you like depending on t he length of your part and the position of the tail stock. The front...
- Page 3 The router base should be positioned as close as possible to the work so that the router bit will reach the part. A small plunge router works best with the Lathe Wizard but other too ls can be mount ed as well. We have an accessory adapt er for the Dremel® tool and a drawing is included for constructing a holder for a Foredom®...
- Page 4 prevent over-travel. If a plunge router is used, the router depth stop can be set for the desired depth of cut. With a standard router, the rear of the router base can be raised by inserting a wedge between the back of the base and the shaft. Before turning on the router and starting a cut, make sure the index is installed and the pin is firmly locked in an index hole.
Need help?
Do you have a question about the The Lathe Wizard and is the answer not in the manual?
Questions and answers