Advertisement
Quick Links
Advertisement

Related Manuals for Quasar ARM

Summary of Contents for Quasar ARM
- Page 1 QUASAR user guide...
-
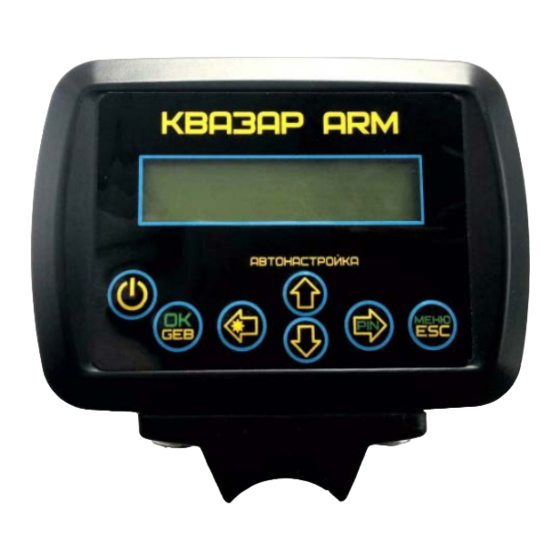
Page 2: Electronic Unit
Electronic unit: 1 - LCD display. 2 - Turn on / off the device. 3 - “OK” button, enter button for the soil balance menu. 4 - “Left” button, backlight on / off button. 5 - Button. 6 - “Right” button, pinpoint call button. 7 - “Cancel”... - Page 3 Switching on the device – briefly pressing the button on / off the device. Turn off the device - press the on / off button of the device. The “*” symbol is displayed when the backlight is on, it is not recommended to search with the backlight on during daylight hours, this significantly increases power consumption.
- Page 4 Pinpoint - called by pressing the "right" button. Static search mode - designed to more accurately localize the target. Exit - pressing any key. To set the initial state of sensitivity of the pinpoint, press the "Left" button, using the "Up / Down" buttons the sensitivity of the pinpoint is adjusted.
- Page 5 The device menu is called up by pressing the \ esc Menu button. Menu block diagram: Audio Menu - AUDIO SETTINGS. Volume-adjustment of the volume level. The range of volume levels is 0-31. Operating values at the level of 5-10. Volume variation Sets the sound level of the target, depending on the level of response.
- Page 6 Sound scheme-options for scoring goals. Scheme 1: Frequency smoothly varies depending on the VDI of the target over the entire range. Scheme 2: Frequency varies smoothly depending on the VDI from 90 to 131 degrees. Goals below 90 are voiced in low tone, above 41 in high tone.
- Page 7 FM Transmitter - a wireless FM signal transmitter, you can use wireless headphones with an FM receiver, or connect wired headphones to your phone / player, turn on the FM receiver on them, and hide the device somewhere in the inside pocket to search comfortably, because between the device and the search engine do not “hang”...
- Page 8 while the current consumption of the TX output stage (in mA) is also displayed on the screen. When you press any of the Up or Down buttons, the device switches to the mode of automatic selection of the resonant frequency according to the maximum current of the output stage.
- Page 9 calibration mode, while the user has about 4 seconds to spend a few times a piece of ferrite over the coil. A small piece of ferrite should be used, and do not bring it close to the sensor. The angle of response from it will be calculated, but to save this setting, you must click the OK button.
- Page 10 COIL BALANCE menu item - SENSOR BALANCE In each subparagraph, the projection of the unbalance vector X (top line) and Y (bottom line) is displayed in graphical form, as well as the unbalance range in millivolts (top line) and the angle of the unbalance vector in degrees (bottom line) in numerical form.
- Page 11 No compensator –the actual balance of the sensor with the compensator turned off. Compensator on / off –– enable or disable the auto- compensator. USER PROFILE Menu Item - USER PROFILES Save setting-record the current settings in the selected profile. There are 8 profiles available.
- Page 12 The choice of higher levels of filtration gives the possibility of a higher scanning speed by the search coil of soil. Quasar-AWP allows you to select five combinations of digital filter configuration. It can take the following values: •...
- Page 13 • Slow-slow • Normal — normal • Fast — fast • Very Fast — very fast Change the value with the buttons "Right" and "Left." “OK” - exit with saving the result, “Esc” - exit without saving. Menu item MAIN SCREEN –– SCREEN VIEW Signograph + VDI - display of the VDI scale consisting of 16 segments, the top row - the segments of the scale, the bottom row on the left: VDI value, the bar of the response level from...
- Page 14 target in the segment of the VDI scale during posting. Convenient working value of 20-25. MASK menu item - HIDDEN MASK OF SECTORS Set Mask-Allows you to enable / disable any of the 16 sectors in the VDI range. The top line displays the current mask, the bottom line shows the cursor, which can be moved with the "Left"...
- Page 15 • "FAST" –fast To memorize a value, it is necessary to press the “OK” button; when exiting via “Esc”, changes are not remembered.
Need help?
Do you have a question about the ARM and is the answer not in the manual?
Questions and answers