
Summary of Contents for Human Med Body-Jet Evo
- Page 1 User Manual „In this world, there is nothing softer and thinner than water. But to compel the hard and unyielding it has no equal.“ (Laozi)
- Page 3 No part of these operating instructions may be reproduced in any form whatsoever (photocopy, microfilm or any other process), or processed, reproduced or distributed using electronic systems without the prior written permission of Human Med. The information included in these operating instructions may be amended or supplemented without prior notification and does not represent any obligation on the part of Human Med.
- Page 4 Doc-No.: 900054 Human Med AG ® Rev./Date: 0/29.08.2012 User manual body-jet...
- Page 5 Device label, meaning of device label symbols and other symbols 3.2. Description of the WAL applicator and WAL cannulae 3-11 3.2.1. Elements of the sterile singe-use WAL applicator 3-11 Human Med AG Doc-No.: 900054 Page 1 ® User manual body-jet Rev./Date: 1/03.12.2012...
- Page 6 4.3.3.2. Connection of the WAL applicator 4-16 4.3.3.3. Fixation of the tubing 4-21 4.3.3.4. Connection of the suction tube 4-22 4.3.3.5. Venting of the infiltration pump 4-23 Page 2 Doc-No.: 900054 Human Med AG ® Rev./Date: 1/03.12.2012 User manual body-jet...
- Page 7 Applicator coding 6.3. Error messages 6.4. Detection of an infiltration pump in the socket Cleaning, disinfection, transport and storage after OP 7.1. Cleaning and disinfection after OP Human Med AG Doc-No.: 900054 Page 3 ® User manual body-jet Rev./Date: 1/03.12.2012...
- Page 8 Maintenance, warranty, disposal and customer service 9.1. Maintenance 9.1.1. Authorized persons 9.1.2. Safety inspections 9.1.3. Modifications and replacement of components 9.1.4. Periodic maintenance 9.2. Warranty 9.3. Disposal 9.4. Customer service Page 4 Doc-No.: 900054 Human Med AG ® Rev./Date: 1/03.12.2012 User manual body-jet...
- Page 9 Chapter 1 - General description of the body-jet Contents ® General description of the body-jet evo ............................2 1.1. Medical indications ..................................2 1.2. Contraindications ................................... 2 Human Med AG Doc-No.: 900054 Page 1-1 ® User manual body-jet Rev./Date: 0/29.08.2012...
- Page 10 1.1. Medical indications ® In addition to applications in liposuction for body shaping and treatment of lipoedema the body-jet evo from Human Med can also be used for recovery of natural body fat for autologous adipose tissue transfer. 1.2. Contraindications ®...
-
Page 11: Table Of Contents
Electrical safety and electromagnetic compatibility ............................4 2.7. Prevention of electrical shock ..................................4 ® 2.8. Particular safety instructions for use of the body-jet evo ..........................5 Human Med AG Doc-No.: 900054 Page 2-1 ® User manual body-jet Rev./Date: 0/29.08.2012... -
Page 12: Safety Precautions And Safety Features
2.3. Safety of equipment and instruments ® The body-jet evo complies with all relevant and generally accepted engineering practices as well as with the applicable occu- pational protection and accident prevention regulations. Page 2-2 Doc-No.: 900054 Human Med AG ® Rev./Date: 0/29.08.2012 User manual body-jet... -
Page 13: Safe Practice By Medical Staff
Human Med assumes no liability for any damage resulting from using the device without instruction or through improper use. In case of any uncertainty or question, please contact Human Med. We will be glad to give you further assistance and to receive your suggestions concerning this user manual. -
Page 14: Electrical Safety And Electromagnetic Compatibility
Replace defective accessories. For spare parts or servicing please contact our customer service. For your own safety and that of your patients, never attempt to repair by yourself. Any modification to the equipment will exempt Human Med from liability. Page 2-4 Doc-No.: 900054... -
Page 15: Particular Safety Instructions For Use Of The Body-Jet
Operational safety The device must be installed and initially put into operation only by qualified staff who has been trained by Human Med or their authorized representatives how to put into operation and install the necessary components, as well as how to connect the accessories required for medical application. - Page 16 The device has been designed in a way that serious operating errors are excluded. To ensure safe infiltration the drive unit is monitored. To ensure safe suction the suction unit vacuum is monitored. Page 2-6 Doc-No.: 900054 Human Med AG ® Rev./Date: 0/29.08.2012 User manual body-jet...
- Page 17 Description of the WAL applicator and WAL cannulae ........................ 11 3.2.1. Elements of the sterile single-use WAL applicator ........................11 3.2.2. Instructions for the use of WAL cannulae ..........................12 Human Med AG Doc-No.: 900054 Page 3-1 ® User manual body-jet...
-
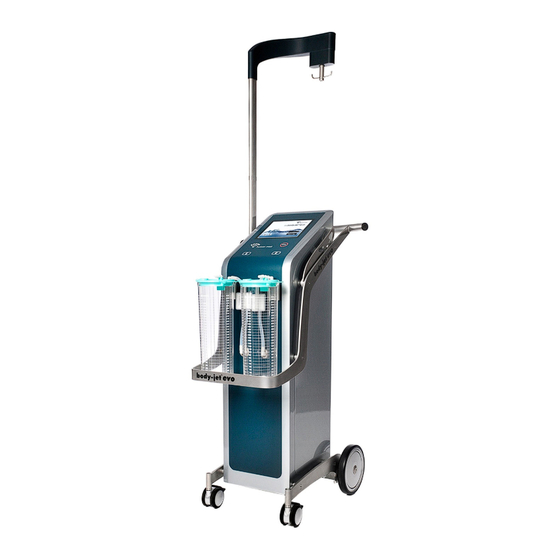
Page 18: Description Of The Body-Jet
Front wheel brakes: are used to lock the device in place Tubing holder: is used for fixation and strain relief of the WAL applicator Fig. 3-1: body-jet® evo, front view Page 3-2 Doc-No.: 900054 Human Med AG ® Rev./Date: 1/23.11.2012 User manual body-jet... - Page 19 • the suctioning in the OP mode „SUCTION ONLY“ Rear wheel brakes: are used to lock the device in place ® Fig. 3-2: body-jet evo, rear view Human Med AG Doc-No.: 900054 Page 3-3 ® User manual body-jet Rev./Date: 1/23.11.2012...
-
Page 20: Control Panel For Device Operation
By pushing the help button "?“ you can obtain information on operating the device and clearing possible errors. By pushing the button „Settings“ you can adjust device parameters for operating the device. Page 3-4 Doc-No.: 900054 Human Med AG ® Rev./Date: 1/23.11.2012 User manual body-jet... - Page 21 A screen highlighted in red indicates a device or operating error. Instructions for troubleshooting will follow. The color of the logo signals the current operating state of the device. White – The device is switched on. Human Med AG Doc-No.: 900054 Page 3-5 ®...
- Page 22 The suction container that has to be supplied with vacuum is selected by pressing one of these keys. The container in current use can be identified by the illumination of its respective key. Page 3-6 Doc-No.: 900054 Human Med AG ® Rev./Date: 1/23.11.2012 User manual body-jet...
-
Page 23: Functional Elements Of The Suction Unit
Vacuum hose with overflow / bacterial barrier Plug-in coupling connector Suction port Fig. 3-4: Suction unit Vacuum elbow connector Angle connector Port for angle connector (K) Closing cap Fig. 3-5: Suction unit Human Med AG Doc-No.: 900054 Page 3-7 ® User manual body-jet Rev./Date: 1/23.11.2012... - Page 24 This symbol indicates the maximum date until which the product may be used. Fig. 3-6: Overflow / bacterial barrier ® Never use the body-jet evo without overflow/ bacterial barrier! Page 3-8 Doc-No.: 900054 Human Med AG ® Rev./Date: 1/23.11.2012 User manual body-jet...
-
Page 25: Device Label, Meaning Of Device Label Symbols And Other Symbols
This symbol means that the device is equipped with an applied part type BF and complies with the requirements of standard IEC 60601-1 relating on protection. This symbol indicates that pushing on the sides of the device is prohibited. This symbol refers to the date of manufacture of the device. Human Med AG Doc-No.: 900054 Page 3-9 ®... - Page 26 Council Directive 2002/96/EC of 27 January 2003 on waste of electrical and electronic equipment (WEEE). The device can also be returned to Human Med for proper disposal. This symbol signifies that the device is in conformity to the specifications of the Council Directive 93/42/EEC for medical products;...
-
Page 27: Description Of The Wal Applicator And Wal Cannulae
Infiltration pump with piston: Is used to produce the pre- selected flow for detachment of the fat cells. Infiltration tubing: Is used for transporting the pressurized fluid from the infiltration pump (G) to the hand-piece (A). Human Med AG Doc-No.: 900054 Page 3-11 ®... -
Page 28: Instructions For The Use Of Wal Cannulae
For liposuctions with the objective to use the grafted fat for autologous fat transfer or laboratory purposes, you should exclusively use WAL cannulae with handles made of stainless steel. Page 3-12 Doc-No.: 900054 Human Med AG ® Rev./Date: 1/23.11.2012 User manual body-jet... - Page 29 4.3.3.2. Connection of the WAL applicator ................................16 4.3.3.3. Fixation of the tubing ....................................21 4.3.3.4. Connection of the suction tube ................................. 22 4.3.3.5. Venting of the infiltration pump ................................. 23 Human Med AG Doc-No.: 900054 Page 4-1 ® User manual body-jet...
-
Page 30: Preparatory Activities
The equipment housing is not entirely water-tight. Therefore, be careful not to spill liquids around or on the equipment. Do not install the device in direct proximity of hoses or bins containing liquid. Page 4-2 Doc-No.: 900054 Human Med AG ® Rev./Date: 1/23.11.2012 User manual body-jet... -
Page 31: Installation Of The Body-Jet Evo
Always keep a safety distance of at least 1 m between the device and the sterile areas, particularly the tables for instruments, operating tables and staff in sterile garment. Apply the brakes of all four roller wheels when placing the device. If the device shall be moved, release all brakes before. Human Med AG Doc-No.: 900054 Page 4-3 ®... -
Page 32: Components / Device Combination
In the event of a vacuum generation failure, the suction tube of the WAL applicator is allowed to be connected to any other compatible suction device. Other combinations of equipment are not allowed and will result in exemption of Human Med from liability. -
Page 33: Preparations For Use
The device must not be used, if the identification labels have been damaged. 4.1.4.2. How to bring the rack into working position Fixing screw Swivel Outer frame Fig. 4-1: Bring the rack into working position Human Med AG Doc-No.: 900054 Page 4-5 ® User manual body-jet Rev./Date: 1/23.11.2012... - Page 34 When pulling out or moving the swivel joint, be careful not to trap your fingers between the fixing screw (A) and the swivel (B) or between the arm (C) and the outer frame (D). Page 4-6 Doc-No.: 900054 Human Med AG ® Rev./Date: 1/23.11.2012 User manual body-jet...
-
Page 35: How To Bring The Rack Into Transport Position
When pulling out or moving the swivel joint, be careful not to trap your fingers between the fixing screw (A) and the swivel (B) or between the arm (C) and the outer frame (D). Human Med AG Doc-No.: 900054 Page 4-7 ®... -
Page 36: Attachment Of The Fluid Bags
4.1.4.5. Connection of the body-jet Connect the device to a properly installed grounded outlet (chapter 2.7. „Prevention of electrical shock“ on page 2-4). Connect the foot-bellows to the foot-bellows ports. Page 4-8 Doc-No.: 900054 Human Med AG ® Rev./Date: 1/23.11.2012 User manual body-jet... - Page 37 (6) of the overflow / bacterial barrier must be attached to the suction container (Fig. 4-7). Prior to use, the suction container und suction bags must always be checked for cracks and other damage. Either a damaged container or a damaged bag must not be used! Human Med AG Doc-No.: 900054 Page 4-9 ®...
-
Page 38: Device Settings
Service: You will get to the screen „Settings for service“; this is password-protected. Return: You will close the screen „User settings“ and get back to the last opened screen. Page 4-10 Doc-No.: 900054 Human Med AG ® Rev./Date: 1/23.11.2012 User manual body-jet... -
Page 39: Op Preparations
4.3.2. Selection of the OP mode The startup screen offers optional applications of the device, either a water jet-assisted liposuction (WAL) or a simple suction without water-jet (SUCTION ONLY). Human Med AG Doc-No.: 900054 Page 4-11 ®... -
Page 40: Op Preparation In Op Mode "Wal
Test of the overflow/ bacterial barrier ® Before using the suction unit of the body-jet evo, first check the functions of the overflow/ bacterial barrier! Page 4-12 Doc-No.: 900054 Human Med AG ® Rev./Date: 1/23.11.2012 User manual body-jet... - Page 41 The difference between the value indicated when the plug-in coupling connector has been attached, and the value indicated when the plug-in coupling connector has been removed, must not exceed 200 mbar. Human Med AG Doc-No.: 900054 Page 4-13 ®...
- Page 42 Insertion of the suction bag When inserting the suction bag into the suction container proceed as follows: Unfold the suction bag (Fig. 4-14). Fig. 4-14: Unfold the suction bag Page 4-14 Doc-No.: 900054 Human Med AG ® Rev./Date: 1/23.11.2012 User manual body-jet...
- Page 43 (Fig. 4- 16). The vacuum value with open angle connector (K) must not exceed 500 mbar; otherwise the suction bag must be replaced. Human Med AG Doc-No.: 900054 Page 4-15 ®...
-
Page 44: Connection Of The Wal Applicator
Take care to leave the hand-piece of the WAL applicator in the sterile area and hand the connection parts over to the operator of the device. This medical product is exclusively intended for single use. Page 4-16 Doc-No.: 900054 Human Med AG ® Rev./Date: 1/23.11.2012 User manual body-jet... - Page 45 The infiltration tube (1) of the WAL applicator must lead upwards whereas the transfer tubes (2) for the fluid supply must lead downwards (Fig. 4-19). Fig. 4-19: Position of the infiltration pump Human Med AG Doc-No.: 900054 Page 4-17 ®...
- Page 46 The total weight of the fluid bags must not exceed 6000g! In case fluid bottles or canisters are used, these must be vented properly. We recommend using fluid bags only. Page 4-18 Doc-No.: 900054 Human Med AG ® Rev./Date: 1/23.11.2012 User manual body-jet...
- Page 47 (B) and prick it into the fluid bag to be used first (Fig. 4-22). The clamp of this transfer tube (B) remains open. Fig. 4-22: Connect the transfer tube to the fluid bag Human Med AG Doc-No.: 900054 Page 4-19 ®...
- Page 48 Fig. 4-24: Tube clamp fixed to the rack When infiltration fluid is spilled onto the device or its components, wipe it off immediately and thoroughly with a soft cloth and warm water. Page 4-20 Doc-No.: 900054 Human Med AG ® Rev./Date: 1/23.11.2012 User manual body-jet...
-
Page 49: Fixation Of The Tubing
(Fig. 4-25). Fig. 4-25: Tubing holder The infiltration tube should be on top of the suction tube (Fig. 4- 26). Fig. 4-26: Tubing holder Human Med AG Doc-No.: 900054 Page 4-21 ® User manual body-jet... -
Page 50: Connection Of The Suction Tube
Please find detailed information on how to proceed in this case in chapter 6.2 „Applicator coding“ on page 6-5. Fig. 4-28: Screen „Checklist“ for OP preparation Page 4-22 Doc-No.: 900054 Human Med AG ® Rev./Date: 1/23.11.2012 User manual body-jet... -
Page 51: Venting Of The Infiltration Pump
29). Fig. 4-29: Screen „OP Preparation 2“ Take care to direct the water-jet into a suitable container when venting the infiltration pump. Never direct the water jet towards persons! Human Med AG Doc-No.: 900054 Page 4-23 ® User manual body-jet... - Page 52 WAL applicator. If you push the “No” button, you will get back to the screen “OP Preparation 2”; and the venting can be continued. Fig. 4-31: Terminate venting Page 4-24 Doc-No.: 900054 Human Med AG ® Rev./Date: 1/23.11.2012 User manual body-jet...
- Page 53 5-16. If you push the “No” button, you will get back to the screen “OP Preparation 2”; and the venting can be continued. Fig. 4-33: Error message during venting process Human Med AG Doc-No.: 900054 Page 4-25 ®...
- Page 54 Chapter 4 - Preparatory activities Page 4-26 Doc-No.: 900054 Human Med AG ® Rev./Date: 1/23.11.2012 User manual body-jet...
- Page 55 5.1.4.2. Removal of the infiltration pump ................................16 5.1.4.3. Post-processing of the device ................................... 20 ® 5.2. Working with the body-jet evo in the OP mode „SUCTION ONLY“ .................... 21 Human Med AG Doc-No.: 900054 Page 5-1 ® User manual body-jet Rev./Date: 1/23.11.2012...
-
Page 56: Working With The Body-Jet ® Evo
• SHORT – short rapid jet phase and pause • MEDIUM – even jet phase and pause • LONG – long jet phase with short pauses Page 5-2 Doc-No.: 900054 Human Med AG ® Rev./Date: 1/23.11.2012 User manual body-jet... - Page 57 Acceptance of changes The selected PULSATION mode and RANGE are only changed and accepted by pushing the “OK” button. This confirmation must be done within 5 seconds; otherwise all changes will be canceled. Human Med AG Doc-No.: 900054 Page 5-3 ®...
-
Page 58: Aspiration
The level of the target vacuum can be adjusted with the buttons "–" and "+" (in steps of approx. 50 mbar). The target vacuum level is shown in a chart. Page 5-4 Doc-No.: 900054 Human Med AG ® Rev./Date: 1/23.11.2012 User manual body-jet... -
Page 59: Lipocollection
This mode is activated by pushing the “ON/OFF” button in the control panel section „LipoCollection“. The parameters for this mode are only accepted and applied by pushing the “OK” button. This confirmation must be done within 5 seconds; otherwise all set parameters will be canceled. Human Med AG Doc-No.: 900054 Page 5-5 ®... -
Page 60: Fluid
• Lower value (Actual): refers to the current fluid consumption After completion of the venting both values are automatically reset to zero. The consumption display is in ready condition now. Page 5-6 Doc-No.: 900054 Human Med AG ® Rev./Date: 1/23.11.2012 User manual body-jet... - Page 61 This process is terminated by pushing the button „Cancel“. NOTE: All OP functions remain operable during this process. Replacement of the fluid bag Human Med AG Doc-No.: 900054 Page 5-7 ® User manual body-jet...
-
Page 62: Attachment Of A Wal Cannula And Water Jet Test
5-16). Take care to direct the water jet into a suitable container when checking the WAL applicator. Never direct the water jet towards persons! Page 5-8 Doc-No.: 900054 Human Med AG ® Rev./Date: 1/23.11.2012 User manual body-jet... - Page 63 Fig. 5-6: Attach the WAL cannula The water jet coming out of the nozzle now should be flat and fan- shaped (Fig. 5-7). Fig. 5 7: Correct fan-shaped spray jet Human Med AG Doc-No.: 900054 Page 5-9 ® User manual body-jet...
- Page 64 If the WAL applicator is replaced, the quality of the spray jet must be tested again. The water jet test should be done with the selected cannula in preset RANGE 1 and PULSATION mode „SHORT“ (Chapter 5.1.1.1 „Infiltration“ on page 5-2). Page 5-10 Doc-No.: 900054 Human Med AG ® Rev./Date: 1/23.11.2012 User manual body-jet...
- Page 65 Each suction bag is equipped with an integrated overflow protection that interrupts the suction procedure as soon as the suction bag is full. The WAL applicator, therefore, should be changed over to the suction bag in the second suction container in time. Human Med AG Doc-No.: 900054 Page 5-11 ®...
- Page 66 Pull off the angle connector (K) together with the suction tube (M) from the port (C) „PATIENT“ of the (full) suction bag (Fig. 5-10). Fig. 5-10: Suction bag changeover Page 5-12 Doc-No.: 900054 Human Med AG ® Rev./Date: 1/23.11.2012 User manual body-jet...
- Page 67 Close the port (C) „PATIENT“ with the sealing plug (L) (Fig. 5-11). Fig. 5-11: Verschließen des Absaugbeutels Press the corresponding key to select the suction container with the empty suction bag (Fig. 5-12). Fig. 5-12: Suction port changeover Human Med AG Doc-No.: 900054 Page 5-13 ® User manual body-jet...
-
Page 68: End Of Op
You can finish the OP by pushing the „END“ button of the OP screen. NOTE: If the water jet generation and suctioning haven’t been deactivated yet, both will be finished now. Page 5-14 Doc-No.: 900054 Human Med AG ® Rev./Date: 1/23.11.2012 User manual body-jet... -
Page 69: Display Of The Fluid Consumption
The screen „OP end“ shows the total fluid consumption in milliliters Fig. 5-15: Screen „OP End“ and the OP time in minutes. The screen „Fluid consumption“ opens when pushing the „i“ button (Fig. 5-16). Human Med AG Doc-No.: 900054 Page 5-15 ® User manual body-jet... -
Page 70: Removal Of The Infiltration Pump
Close this screen by pushing the “OK“ button. Fig. 5-16: Action screen „Fluid consumption“ 5.1.4.2. Removal of the infiltration pump First, remove the sealing cap. Then push the „Eject“ button. Page 5-16 Doc-No.: 900054 Human Med AG ® Rev./Date: 1/23.11.2012 User manual body-jet... - Page 71 Fig. 5-17: Confirmation screen „Prepare removal“ The screen „Please wait“ appears while the activation process is running (Fig. 5-18). The activation status is shown as a time bar. Fig. 5-18: Action screen „Please wait“ Human Med AG Doc-No.: 900054 Page 5-17 ®...
- Page 72 (Chapter 4.3.2 „Selection of the OP mode“ on page 4-11). If you would not like to perform another OP, push the button „Switch the device off “. Fig. 5-20: Action screen „New OP?“ Page 5-18 Doc-No.: 900054 Human Med AG ® Rev./Date: 1/23.11.2012 User manual body-jet...
- Page 73 By pushing the „Yes“ button you will restart the unlocking process. By pushing the „No“ button you will get back to the action screen „New OP?”. Fig. 5-22: Confirmation screen „Infiltration pump in the socket“ Human Med AG Doc-No.: 900054 Page 5-19 ® User manual body-jet...
-
Page 74: Post-Processing Of The Device
„PATIENT“(C) of the filled suction container (Fig. 5-10). Then close this port (C) with the closing cap (L) (Fig. 5-23). Fig. 5-23: Close the suction bag Page 5-20 Doc-No.: 900054 Human Med AG ® Rev./Date: 1/23.11.2012 User manual body-jet... -
Page 75: Working With The Body-Jet
The OP screen „SUCTION ONLY“ is called up by pushing the button „SUCTION ONLY“ in the start screen (Fig. 5-25). In this screen you can set the vacuum level required for suctioning. Fig. 5-25: OP screen „SUCTION ONLY“ Human Med AG Doc-No.: 900054 Page 5-21 ®... - Page 76 Switch the vacuum pump on by pushing the ON/OFF button. By actuating one of the foot-bellows, the suctioning is activated or deactivated. Durch Betätigen eines Fußbalges wird der Absaugvorgang aktiviert oder deaktiviert. Page 5-22 Doc-No.: 900054 Human Med AG ® Rev./Date: 1/23.11.2012 User manual body-jet...
- Page 77 By pushing the „Yes“ button, you will call up the start screen. By pushing the „No“ button, you will call up the OP screen „Suction Only“ again to continue the OP. Fig. 5-26: Confirmation screen „Finish Suction only“ Human Med AG Doc-No.: 900054 Page 5-23 ®...
- Page 78 Chapter 5 - Working with the body-jet® evo Page 5-24 Doc-No.: 900054 Human Med AG ® Rev./Date: 1/23.11.2012 User manual body-jet...
- Page 79 Faults of suctioning and infiltration flow ............................2 6.2. Applicator coding ................................... 5 6.3. Error messages ..................................... 6 6.4. Detection of an infiltration pump in the socket ..........................9 Human Med AG Doc-No.: 900054 Page 6-1 ® User manual body-jet Rev./Date: 0/29.08.2012...
-
Page 80: Troubleshooting
The list below is provided to help users in localizing and, if possible, eliminating causes of functional faults, as well as to enable them to give more detailed information to the technical service of Human Med. 6.1. Faults of suctioning and infiltration flow... - Page 81 The fluid bag has not been connected. Prick the pricking pin of the transfer tubing into the liquid bag (Chapter 4.3.3.2 „Connection of the WAL applicator“ on page 4-18). Human Med AG Doc-No.: 900054 Page 6-3 ® User manual body-jet...
- Page 82 5-8). If the water jet pattern is not ok, replace the WAL applicator; If the water jet pattern is ok, use a new WAL cannula. Page 6-4 Doc-No.: 900054 Human Med AG ® Rev./Date: 0/29.08.2012 User manual body-jet...
-
Page 83: Applicator Coding
OP mode replaced. After pushing the “Yes” button the OP can be started. “WAL”. The same applicator can be used only three times; then an error screen (761) will pop Human Med AG Doc-No.: 900054 Page 6-5 ® User manual body-jet... -
Page 84: Error Messages
Applicator fault (e.g. blockage) Remove the applicator after pushing the „OK“ button (Chapter 5.1.4.2 „ Removal of the infiltration pump “ on page 5-16). Install a new WAL applicator. Page 6-6 Doc-No.: 900054 Human Med AG ® Rev./Date: 0/29.08.2012 User manual body-jet... - Page 85 Contact the technical service. You can still carry out a suction procedure. For this, push 421, 441, 461 the button "SUCTION ONLY". The WAL Applicator cannot be removed. Human Med AG Doc-No.: 900054 Page 6-7 ® User manual body-jet Rev./Date: 0/29.08.2012...
- Page 86 (Chapter 5.1.4.2 „ Removal of the infiltration pump“ on page 5-16) and install a new one. You can restart the venting process by pushing the „No“ button. Page 6-8 Doc-No.: 900054 Human Med AG ® Rev./Date: 0/29.08.2012 User manual body-jet...
-
Page 87: Detection Of An Infiltration Pump In The Socket
You will find the detailed description of the procedure how to remove an used applicator in Chapter 5.1.4.2 „Removal of the infiltration pump“ on page 5-16. Fig. 6-1: Detection of an infiltration pump Human Med AG Doc-No.: 900054 Page 6-9 ®... - Page 88 You will find the detailed description of the procedure how to remove an used applicator in Chapter 5.1.4.2 „Removal of the infiltration pump“ on page 5-16. Fig. 6-2: Detection of an infiltration pump Page 6-10 Doc-No.: 900054 Human Med AG ® Rev./Date: 0/29.08.2012 User manual body-jet...
- Page 89 Storage and transport ..................................5 7.2.1. Storage and transport inside the medical clinic/ practice ......................5 7.2.2. Storage and transport outside the medical clinic/ practice ......................6 Human Med AG Doc-No.: 900054 Page 7-1 ® User manual body-jet Rev./Date: 0/29.08.2012...
-
Page 90: Before Cleaning And Disinfection
Moisture must not penetrate the equipment. Let any liquid entered immediately drain off. The device is only to be used again when the liquid has evaporated completely. Page 7-2 Doc-No.: 900054 Human Med AG ® Rev./Date: 0/29.08.2012 User manual body-jet... - Page 91 PC plastics. Never use rinse agents, because they cause stress cracks in the suction container and can shorten its service life. The suction container has been successfully tested for a thirty-time (30) reprocessing using the above described automated Human Med AG Doc-No.: 900054 Page 7-3 ®...
-
Page 92: After Cleaning And Disinfection
Thoroughly check the device and its components (e.g. removable parts such as cords/ cables and foot-bellows) for damage before and after each use. Replace defective equipment. In case of damage to the device, please contact the responsible technical service. Page 7-4 Doc-No.: 900054 Human Med AG ® Rev./Date: 0/29.08.2012 User manual body-jet... -
Page 93: Storage And Transport
Do not use a damaged device or damaged components. For your own safety and that of your patients, never attempt to repair by yourself. Any modification will exempt Human Med from liability. 7.2. Storage and transport 7.2.1. Storage and transport inside the medical clinic/ practice ®... -
Page 94: Storage And Transport Outside The Medical Clinic/ Practice
(Fig. 7-3) order to prevent it from damage. Transport lock plate Borehole of the transport lock plate Wing screw Fig. 7-3: Transport lock Page 7-6 Doc-No.: 900054 Human Med AG ® Rev./Date: 0/29.08.2012 User manual body-jet... - Page 95 Fig. 7-4: Mount the transport lock The transport lock is fastened to the air guide plate (4) using the wing screw (3) in Fig. 7-5. Fig. 7-5: Fasten the transport lock Human Med AG Doc-No.: 900054 Page 7-7 ® User manual body-jet...
- Page 96 Demount the transportation lock by unfastening the wing screw (3). NOTE: Please find details on the ambient conditions for storage and transportation in chapter 8 „Technical data“ on page 8-3. Page 7-8 Doc-No.: 900054 Human Med AG ® Rev./Date: 0/29.08.2012 User manual body-jet...
- Page 97 Chapter 8 – Technical data Contents Technical data ....................................2 Human Med AG Doc-No.: 900054 Page 8-1 ® User manual body-jet Rev./Date: 0/29.08.2012...
- Page 98 Adjustable from 0 to -850 mbar (at 0 m above sea level) over touch screen in 50 mbar steps (precision ± 50 mbar Vacuum at different altitudes: Page 8-2 Doc-No.: 900054 Human Med AG ® Rev./Date: 0/29.08.2012 User manual body-jet...
- Page 99 Temperature -20° C to +50° C, Relative humidity 10% to 95% Ambient conditions for operation: Temperature +10 ° C to +40 ° C, Relative humidity 30 % to 75 %, no condensation Human Med AG Doc-No.: 900054 Page 8-3 ® User manual body-jet...
- Page 100 Chapter 8 – Technical data Page 8-4 Doc-No.: 900054 Human Med AG ® Rev./Date: 0/29.08.2012 User manual body-jet...
- Page 101 Safety inspections ..................................2 9.1.3. Modifications and replacement of components .......................... 3 9.1.4. Periodic maintenance ................................. 3 9.2. Warranty ......................................3 9.3. Disposal ......................................4 9.4. Customer service ................................... 4 Human Med AG Doc-No.: 900054 Page 9-1 ® User manual body-jet Rev./Date: 0/03.12.2012...
- Page 102 9.1. Maintenance 9.1.1. Authorized persons Safety inspections, modifications and replacement of components must only be carried out by Human Med or by persons expressly authorized by Human Med. In case un-authorized persons carry out modifications or replace device components, Human Med doesn’t assume any liability; and claims under warranty become void.
- Page 103 Further claims, particularly claims for damages are excluded. Periodic maintenance must be performed to sustain the warranty. We recommend concluding a maintenance contract. Safety inspections, modifications and the replacement of components must only be carried out by Human Med or by persons Human Med AG Doc-No.: 900054...
- Page 104 Council Directive 2002/96/EC of 27 January 2003 on waste electrical and electronic equipment (WEEE). In all other countries, the device is to be disposed of according to the local/ national regulations. It can also be returned to Human Med for proper disposal.
Need help?
Do you have a question about the Body-Jet Evo and is the answer not in the manual?
Questions and answers