Advertisement
Advertisement
Table of Contents

Subscribe to Our Youtube Channel
Related Manuals for Pyle PYD1964B


Summary of Contents for Pyle PYD1964B
- Page 1 PYD1964B 6-Channel Bluetooth DJ Mixer...
- Page 2 Safety Precaution Read all documentations carefully before operating the equipment. Retain this manual for future reference. Follow all instructions printed on unit for proper operation. Do not opern cover (or back cover) to reduce the risk of electric shock or fire. There are no User serviceable parts inside.
- Page 3 IMPORTANT: For Your Attention 1) Read manual --- Please read through safety and operating instruction carefully before using this unit. 2) Keep manual --- Please keep this manual for future reference. 3) Please heed important warnings --- Please operate unit according warning and note of manual. 4) Operate according what the manual indicates --- Operate according to instruction of manual.
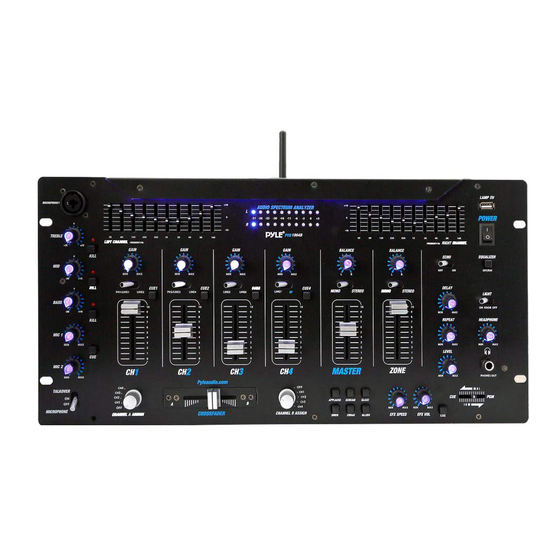
- Page 4 Control & Layout Configuration 1) MIC INPUT Microphone with balanced connector or 1/4” connector can be connected to thest inputs 2) MIC HIGH This knob adjusts the high tone of the microphone 3) MIC MIDDLE This knob adjusts the middle tone of the microphone 4) MIC BASS This knob adjusts the bass tone of the microphone 5) MIC 1 LEVEL CONTROL...
- Page 5 8) MIC frequency kill switches Allows you to kill the selected frequency range instantly for interesting effects. LED lights to indicate kill is activated. 9) MIC CUE Use it to monitor the microphone input source 10) 10 BAND EQUALIZER Allows you to tailor the mixer output to suit your taste or performance enviroment. Each frequency range can be cut or boost by up to 10dB.
- Page 6 29) POWER SWITCH Press this button to turn on the unit after all input devices are already connected to prevent Damage to you equipment. Turn the mixer on before you turn on the amplifier and turn off Amplifiers before you turn off the mixer. 30) EQUALIZER ON/OFF SWITCH Allow you to select the equalizer working situation 31) LED LIGHT CONTROL...
Need help?
Do you have a question about the PYD1964B and is the answer not in the manual?
Questions and answers
Using the Bluetooth to connect an external source, how and where do you control the volume etc on the mixer?
To control the volume on the Pyle PYD1964B mixer when connected via Bluetooth, use the mixer’s channel controls and main volume fader. The Bluetooth signal is treated like any other input source, so adjust its channel volume and overall mix using the mixer’s built-in controls.
This answer is automatically generated