Advertisement
4' to 8' Aromatic Cedar Closet
Model # 801
ITEM
1
Tools Required:
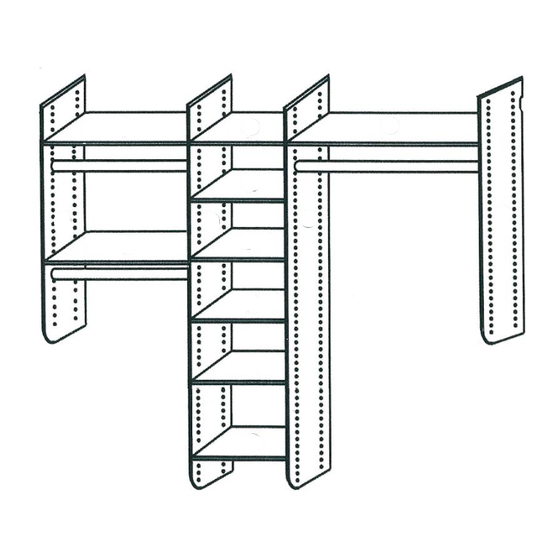
Panel & Shelf Identification
DESCRIPTION
Wall Panel
Tower Panel
24" Shelf with Rafix
18" Tower Shelf with Rafix
18" Tower Shelf
51" Max Adjustable Shelf (33"~51")
1
PLEASE READ INSTALLATION
INSTRUCTIONS BEFORE ASSEMBLING
IF YOU ARE MISSING PARTS OR HAVE
QUESTIONS PLEASE CONTACT:
customerservice@ cedargreen .net
QTY
2
2
2
3
3
1
Rev. C
Advertisement
Table of Contents

Summary of Contents for CEDAR GREEN 801
- Page 1 PLEASE READ INSTALLATION INSTRUCTIONS BEFORE ASSEMBLING Rev. C IF YOU ARE MISSING PARTS OR HAVE 4’ to 8’ Aromatic Cedar Closet QUESTIONS PLEASE CONTACT: Model # 801 customerservice@ cedargreen .net Tools Required: Panel & Shelf Identification ITEM DESCRIPTION Wall Panel ...
- Page 2 Hardware Identification Sheet ITEM PICTURE DESCRIPTION Rafix Connector Bolt Wardrobe Tube 3 pairs Support Dry Wall Anchor Flathead Phillips Screw #6 x 1/2" Panhead Phillips Screw #8 x 1" Flathead Phillips Screw #8 x 3/4" Wall Rail 44" Wall Rail 18" Wall Rail Covering Strip 43"...
- Page 3 Installation Steps Using a level draw a horizontal line across back of closet, 74” above floor. Locate studs using a stud finder, lightly mark wall 1/2” below horizontal line to reference stud locations. Mark vertical panel locations, using left wall as starting point. Mark V at 25” for left Tower Panel (2).
- Page 4 Mount Wall Rail (G) from left to right on top of horizontal line. Using Panhead Phillips Screw (E) and Dry Wall Anchor (C) when necessary. For mounting holes on top of stud reference marks, drill a pilot hole using a 1/8” drill bit. ...
- Page 5 Add Panel Bracket (M) onto bottom of Wall and Tower Panels (1 & 2), using Flathead Phillips Screws (F). Using Flathead Phillips Screws (F) attach Left Panel Hanger (O) onto Wall Panel (1) and Tower Panel (2). Using Flathead Phillips Screws (F) attach Right Panel Hanger (P) onto Wall Panel (1) and Tower Panel (2).
- Page 6 Insert Rafix Connector (Q) into shelf holes with the openings facing outward. Mount Rafix Connector Bolt (A) 9 holes down from top on left Wall Panel (1) and Tower Panel (2). Set 24” Shelf (3) on to Rafix Connector Bolts (A). Set 18”...
- Page 7 Mount Wardrobe Tube Support (B) in left wardrobe section two hole down from both 24” shelf (3). A Flathead Phillips Screw (D) can be mounted into Wardrobe Tube Support (B). Set both Wardrobe Tube 24” (K). Mount Wardrobe Tube Support (B) in right wardrobe section 2 holes down from Adjustable Shelf (6).
- Page 8 Be creative with your Cedar Closet System, suggested combinations:...
Need help?
Do you have a question about the 801 and is the answer not in the manual?
Questions and answers