Table of Contents
Advertisement
Quick Links
Advertisement
Table of Contents

Summary of Contents for ARxIUM FastPak EXP
- Page 1 FastPak ™ Operating Manual v6.3...
- Page 2 1400 Busch Parkway Buffalo Grove, Illinois 60089 (888) 537-3102 AutoMed ® is a registered trademark of AutoMed Technologies, Inc., a wholly-owned subsidiary of ARxIUM. All other trademarks, service marks and copyrights are the property of their respective owners. Confidential and Proprietary...
- Page 3 "CAUTION!" A warning indicates a potentially hazardous situation which, if not avoided, could result in death or serious injury. A warning is noted by an exclamation point inside an orange triangle, and the word "WARNING!" FastPak EXP Operating Manual...
- Page 4 Safety Conventions This manual explains the correct way to use your ARxIUM System. Failure to follow the instructions in this manual may result in delivery of incorrect WARNING medication or in missing medication, which could cause serious injury or death. Read...
- Page 5 Pulling the cord may result in electric shock or fire due to a short CAUTION circuit. Do not touch any electrical parts such as the power supply plug or any switches with a wet hand. This may cause electric shock. CAUTION FastPak EXP Operating Manual...
- Page 6 Do not use force when opening or closing the medication drawers. Excessive force may cause machine failure. CAUTION Do not place fingers or hands inside a medication drawer when closing the drawer, to avoid injury. CAUTION FastPak EXP Operating Manual...
- Page 7 Exit button on the computer screen. italic Times New Roman Book titles appear in an italic Times New Roman font. For example, refer to the FastPak EXP System Software Manual. SMALL CAPS Directories, paths, and file names appear in small caps.
- Page 8 ARxIUM makes no warranty or representation, express or implied, as to the accuracy or correctness of the images/database, which images/database is provided to customer “as is”. ARxIUM specifically disclaims the implied warranty of merchantability and fitness for a particular purpose.
-
Page 9: Table Of Contents
Setup ..........15 Connecting the FastPak EXP to the ARxIUM Computer Installing the Touchscreen . - Page 10 ....66 FastPak EXP Status Icons ......67 Viewing Batch Status .
- Page 11 Error Messages ........157 FastPak EXP Operating Manual...
- Page 12 Specifications ........161 FastPak EXP Operating Manual...
-
Page 13: Features And Function
1 Features and Function This chapter provides an overview of the features and functions of your ARxIUM FastPak EXP hardware. This chapter covers the following topics: • Introducing the FastPak EXP • Operating Guidelines • How the FastPak EXP Works •... -
Page 14: Introducing The Fastpak Exp
The FastPak EXP System is comprised of the following items: • The FastPak EXP pill dispensing and pack-... -
Page 15: Operating Guidelines
Operating Guidelines Operating Guidelines The FastPak EXP device must be operated in a temperature range of 59-82 F (15-28 C) with a relative humidity less than 60%. Using this equipment in any manner not specified by the manufacturer may result in the device protections being impaired. - Page 16 Canister calibration occurs at ARxIUM. In addition to standard medication canisters, the FastPak EXP uses optional Smart Canisters. An optical reader reads a special label inside the canister base. Each medication has a unique ID; therefore, even when a Smart Canister is moved to another...
-
Page 17: The Cabinet
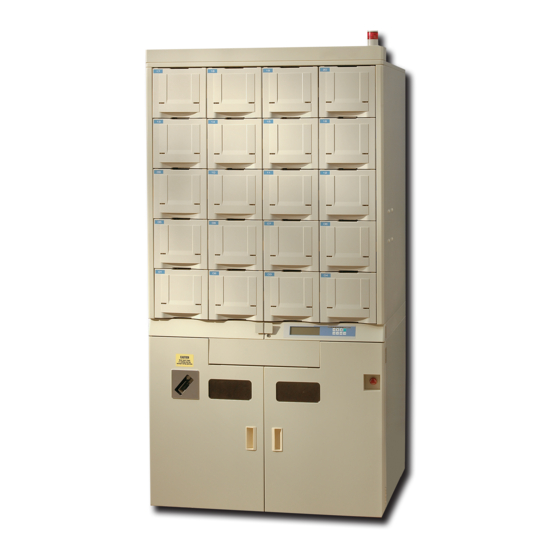
The Cabinet The Cabinet The FastPak EXP cabinet is shown below. Medication drawers Canister empty lights Front upper panel doors Status panel (LCD) Keypad UTC tray Bag exit chute Emergency stop (conveyor) button Front access doors Note: The FastPak EXP... -
Page 18: Interior Components
Never insert fingers or anything else into conveyor during CAUTION operation. Interior Components The FastPak EXP is comprised of 20 drawers; each drawer holds 16 canisters. Medication canister Canister motor base Figure 1-2 Drawer interior You can open only one drawer in any column of drawers at a time. - Page 19 64 infrequently- used, partial, or irregularly-shaped medications. Upper/First shutters This entire area is the UTC and first shutter drawer UTC tray Figure 1-3 UTC tray in the UTC and first shutter drawer FastPak EXP Operating Manual...
-
Page 20: Removing And Installing The Lower Assemblies
For example, if you are dispensing the 60 mm unit-dose pouches, and want to package the 80 mm multi-dose pouches, you must change the lower assembly. FastPak EXP Operating Manual... - Page 21 Figure 1-5 Location of locking mechanism Then push in the release button, as shown below. Locking mechanism in open position Figure 1-6 Location of release button Pull gently on the lower assembly to roll it out of the device. FastPak EXP Operating Manual...
- Page 22 Figure 1-7 Replacement LPU on the cart Install the replacement by rolling it gently into place inside the FastPak EXP. The replacement will be in place when the connection at the rear of the assembly is seated.
-
Page 23: Drawer Lock
Drawer Lock The drawer lock is located on the right, inside the front upper panel doors, as shown below. Figure 1-9 Drawer lock FastPak EXP Operating Manual... -
Page 24: Keypad And Lcd Panel
Keypad and LCD Panel The keypad and LCD panel are located on the front of the FastPak EXP, as shown in Figure 1-1. The LCD panel is capable of displaying 8 lines of text, with 30 characters per line. Typical messages on the LCD include machine status and machine errors or alarms. - Page 25 Dispense application is running. STOP Use to stop dispensing. PAPER SUPPLY When the paper supply is full, all four lights are lit. The lights extinguish one by one as the supply is depleted. FastPak EXP Operating Manual...
-
Page 26: Emergency Stop Button
Emergency Stop Button The Emergency Stop button is located on the lower right portion of the FastPak EXP, as shown in Figure 1-1. If an emergency arises while the FastPak EXP is on, push the Emergency Stop button in to cancel dispensing and cut power to the FastPak EXP. -
Page 27: Setup
2 Setup This chapter details the hardware setup for the FastPak EXP, and includes the following topics: • Connecting the FastPak EXP to the ARxIUM Computer • Installing the Touchscreen • Connecting PC Components • Connecting to a Power Source •... -
Page 28: Connecting The Fastpak Exp To The Arxium Computer
1. Locate the 9-pin-to-9-pin RS-232 serial cable provided with the device. 2. Plug one end of the cable into the communica- tion port on the back of the FastPak EXP. 3. Plug the other end of the cable into COM 1 of the ARxIUM computer. - Page 29 Installing the Touchscreen 2. Secure the touchscreen mounting bracket to the set of mounting holes you have chosen using the mounting hardware provided. Figure 2-1 Attaching the mounting bracket FastPak EXP Operating Manual...
- Page 30 Figure 2-2. Figure 2-2 Securing the touchscreen support arm to the mounting bracket 4. Secure the touchscreen to the mounting hardware using the hardware provided, as shown in Figure 2-3. FastPak EXP Operating Manual...
-
Page 31: Connecting Pc Components
5. Connect the touchscreen to the computer and power source as detailed in the section below. Connecting PC Components Connect the FastPak EXP to the ARxIUM computer as follows: 1. Connect the 9-pin cable from the touchscreen into COM 2 of the PC. -
Page 32: Connecting To A Power Source
Plug the PC and touchscreen into an uninterruptible power supply (UPS) rated for a minimum of 650 watts. Plug the uninterruptible power supply (UPS) and the FastPak EXP power cord into a three-prong grounded (earthed) electrical outlet (wall socket) that is easily accessible from the intended operating location. -
Page 33: Powering Up The Devices
If an appropriate electrical outlet is not available, contact a licensed electrical contractor for assistance. Powering Up the Devices To power up the FastPak EXP after all connections have been made, locate the power switch inside the right front door of the lower cabinet, as shown in Figure 2-4. -
Page 34: Starting The Fastpak Exp System
Starting the FastPak EXP System Starting the FastPak EXP System Follow the steps below to start the FastPak EXP. 1. Power on the server. 2. Power on the client computer. 3. Turn on the FastPak EXP. The on/off switch is located inside the right front access door. -
Page 35: Emergency Shutdown Procedure
In order to shut down the machine in an emergency situation, the operator must push in the emergency stop button to cancel dispensing and cut power to the FastPak EXP. In order to completely disconnect all electrical power from the unit, disconnect the power cord from the wall socket. - Page 36 Emergency Shutdown Procedure Notes: FastPak EXP Operating Manual...
-
Page 37: Canisters
3 Canisters Chapter 3 provides information on the medication canisters in your ARxIUM FastPak EXP system, covering the following topics: • Anatomy of a FastPak EXP Canister • Smart Canisters • Filling Canisters • Installing Canisters • Installing Smart Canisters... - Page 38 Anatomy of a FastPak EXP Canister The illustration below shows the main parts of a FastPak EXP canister. Example pill Medication information and canister number Desiccant compartment Canister top Canister bottom Separator Brush Canister pins Alignment slot Figure 3-1 Medication canister...
- Page 39 FastPak EXP. For example, canister 106, shown here in the correct location inside the FastPak EXP, has been pinned correctly. #1 pin removed to represent 100 #0 pin removed to...
-
Page 40: Smart Canisters
EXP until a batch calls for the infrequently-dispensed medication. The Smart Canister is then placed on one of the Smart Canister motor bases, and returned to the previous storage location after the batch has been dispensed. FastPak EXP Operating Manual... -
Page 41: Filling Canisters
1. An alarm sounds, a canister empty light illuminates, and the LCD panel on the front of the FastPak EXP displays an error message containing the number of the canister which needs to be refilled. 2. Open the appropriate canister drawer and locate the empty canister. - Page 42 6. Open the canister lid and pour medication into the canister, as shown in Figure 3-3. Fill the canister to the level of an imaginary line level with the top of the canister label. Figure 3-3 Pouring medication into a canister FastPak EXP Operating Manual...
- Page 43 ¼" (12mm) below the top of the canister. CAUTION Make sure the medication you are adding matches the sample inside the canister lid and the information shown on the canister label. WARNING FastPak EXP Operating Manual...
-
Page 44: Installing Canisters
CAUTION Installing Canisters To install FastPak EXP canisters, do the following: 1. Identify the assigned position for each canister. Canister locations are marked on the front of each medication drawer and on the top and front labels of the canister. -
Page 45: Utc
• Opening the UTC Drawer • Filling the UTC Tray Opening the UTC Drawer The UTC drawer, located on the front of the FastPak EXP, is opened via the software on the ARxIUM client computer. FastPak EXP Operating Manual... - Page 46 Note You may also open the UTC drawer via the FastPak EXP diagnostic mode. Follow the steps below to enter diagnostic mode. 1. Press MODE for two seconds when the LCD panel displays “SYSTEM IS WAITING”. FastPak EXP Operating Manual...
- Page 47 “SYSTEM IS WAITING” message MODE key Figure 4-2 System is Waiting window and Mode key location 2. The LCD panel then displays “PRINTER DATA DOWNLOAD MODE. SEND DATA” as shown in Figure 4-3. Figure 4-3 LCD panel display FastPak EXP Operating Manual...
-
Page 48: Filling The Utc Tray
8. Select START on the keypad; the drawer opens. Filling the UTC Tray The operator manually fills the UTC tray. When the Tray Fill List window appears and indicates a UTC medication is needed to complete a batch, the UTC drawer opens. FastPak EXP Operating Manual... - Page 49 Filling the UTC Tray Select a medication from the tray fill list and lights appear on the UTC tray. Fill the corresponding UTC cells. Illuminated lights indicate which cells to fill with the selected medication. Figure 4-5 UTC tray FastPak EXP Operating Manual...
- Page 50 Filling the UTC Tray Place the desired medication in the holding cell(s). Figure 4-6 Filling the UTC tray FastPak EXP Operating Manual...
- Page 51 UTC drawer by pushing it gently into place. Place only solid medication (pills or capsules) into the UTC tray. Do not put other medications (such as powders) into the UTC tray to avoid machine failure. CAUTION FastPak EXP Operating Manual...
-
Page 52: Using The Prefill Utc Tray
Use the Tray Fill report to fill the prefill tray. Then place the filled tray over the UTC Open the slots to allow the medication to fill the UTC tray beneath the prefill tray. Refer to page 88 for details on using the prefill trays. FastPak EXP Operating Manual... -
Page 53: Med-Paper
Locating the Med-Paper • Replacing the Med-Paper • Replacing the Cutter Blade • Ordering Consumables Locating the Med-Paper Open the front access doors and pull out the printing and packaging assembly, as shown in Figure 5-1. FastPak EXP Operating Manual... - Page 54 Locating the Med-Paper Figure 5-1 Pulling out the lower assembly FastPak EXP Operating Manual...
-
Page 55: Replacing The Med-Paper
1. When the alarm sounds and an error message announces that the paper supply is depleted, open the front access doors and pull out the lower assembly, as shown above. 2. Remove the nearly empty paper supply roll, pulling the core off the spool. FastPak EXP Operating Manual... - Page 56 Ensure that the new roll rotates in a clockwise direction. Figure 5-3 Installing new med-paper roll 6. Insert the end of the new med-paper into the end of the old med-paper. FastPak EXP Operating Manual...
- Page 57 Replacing the Med-Paper 7. Tape the open ends, front and back. Note: Do not place tape on the outer edges of the med-paper. Figure 5-4 Taping the paper FastPak EXP Operating Manual...
- Page 58 9. Push the lower assemblies back into place inside the lower cabinet. 10. Close the front access doors. 11. Select Continue on the error message window on the ARxIUM computer. 12. Resume packaging medications, watching for and removing the spliced pouch. FastPak EXP Operating Manual...
-
Page 59: Replacing The Cutter Blade
Replacing the Cutter Blade Only those disposable materials authorized by ARxIUM shall be used in the System. Any use or attempted use of non-authorized WARNING disposables shall automatically end and terminate all further obligations and duties (with regard to warranty and service) - Page 60 Replacing the Cutter Blade To change the cutter blade, do the following: 1. Turn off the power to the FastPak EXP. 2. Open the front door, locate the cutter blade assembly, and remove the blade guide by lifting it off the cutter blade assembly.
-
Page 61: Ordering Consumables
5. Remove the blade. 6. Insert the new blade. 7. Replace the thumbscrew. 8. Replace the blade assembly. 9. Replace the blade guide. Ordering Consumables Call ARxIUM at 1-888-537-3102; then press 3 to order ARxIUM consumables. FastPak EXP Operating Manual... - Page 62 Ordering Consumables Notes: FastPak EXP Operating Manual...
-
Page 63: Printer Ribbon
• Locating the Printer Ribbon • Replacing the Printer Ribbon Locating the Printer Ribbon Open the front access doors and pull out the printing and packaging assembly, as shown in Figure 6-1. FastPak EXP Operating Manual... - Page 64 Locating the Printer Ribbon Figure 6-1 Pulling out the lower assembly FastPak EXP Operating Manual...
- Page 65 The printer ribbon is located inside this box. Figure 6-2 Printer ribbon box Open the printer ribbon box by pressing downward on the latch on the front of the box. The box will spring forward. FastPak EXP Operating Manual...
- Page 66 Locating the Printer Ribbon The front latch Figure 6-3 Pressing on the latch Raise the box lid by pulling upwards on the handle, as shown below. Figure 6-4 Opening the printer ribbon box FastPak EXP Operating Manual...
-
Page 67: Replacing The Printer Ribbon
1. When the alarm sounds and an error message announces a printer error, open the front access doors and pull out the lower assemblies, as shown in Figure 6-1. 2. Unlatch and open the printer ribbon box, as shown in Figures 6-3 and 6-4. FastPak EXP Operating Manual... - Page 68 Replacing the Printer Ribbon 3. Remove the near empty ribbon supply spool and the full ribbon take-up spool. Empty supply spool Figure 6-6 Removing the empty supply spool FastPak EXP Operating Manual...
- Page 69 Replacing the Printer Ribbon 4. Place the empty supply spool on the take-up spindle. See the figure below. Figure 6-7 Empty supply spool FastPak EXP Operating Manual...
- Page 70 Figure 6-8 Placing the new ribbon onto the spindle Note When replacing the ribbon used for printing on the narrow pouches, be sure to insert a spacer on the supply spindle and on the take-up spindle before placing the new ribbon supply. FastPak EXP Operating Manual...
- Page 71 Figure 6-9 Threading the ribbon 7. Wrap the sticky leader onto the take-up spool, and manually advance the ribbon through the rollers until it reaches the take-up spool. FastPak EXP Operating Manual...
- Page 72 11. Slide the printer and paper assembly back inside the lower cabinet. 12. Close the front access doors. 13. Select Continue on the ARxIUM computer screen to resume dispensing. FastPak EXP Operating Manual...
-
Page 73: Ordering Consumables
To avoid injury, do not touch the heater. CAUTION Ordering Consumables Call ARxIUM at 1-888-537-3102; then press 3 to order ARxIUM consumables. FastPak EXP Operating Manual... - Page 74 Ordering Consumables Notes: FastPak EXP Operating Manual...
-
Page 75: Dispense
This chapter covers the following topics: • Dispense Application Overview • Getting Started • Overview of the Dispensing Process • FastPak EXP Status Icons • Viewing Batch Status • Dispensing Batches • Deleting Batches • Viewing Batch Statistics •... -
Page 76: Dispense Application Overview
Exiting Dispense Dispense Application Overview Dispense is the software application that takes processed orders and sends them to the FastPak EXP for dispensing. Dispense also allows you to create repack and manual orders for processing, allows you to cancel prescriptions, displays prescription history, and other assorted dispensing-related functions. - Page 77 A skip batch includes medications that were skipped A Prefill Tray but- Date and time the ton may batch was created appear here, depending on the options you chose during setup. Figure 7-1 FastPak EXP Main window FastPak EXP Operating Manual...
-
Page 78: Overview Of The Dispensing Process
These medications can be in a canister or UTC (universal tablet counter) tray, or they may be “exception” medications that are not in the FastPak EXP, but for which an empty bag is created. The process for dispensing batches containing tray... -
Page 79: Fastpak Exp Status Icons
Meaning The paper supply has been depleted. The ribbon supply has been depleted. The canister is empty or jammed. The FastPak EXP has a hardware fault. Communication between the ARxIUM computer and the FastPak EXP has failed. FastPak The bag sealing element is heating. -
Page 80: Viewing Batch Status
Batch has been dispensed at least once Canceling The batch is being canceled Canceled The batch has been canceled I = Batch incomplete x = number of the last command completed before batch stopped Table 7-2 Batch Status indicators FastPak EXP Operating Manual... -
Page 81: Dispensing Batches
Dispense windows of all the other FastPak EXPs within the setup. At the same time, the name of the specific FastPak EXP dispensing the batch is identified by name/number in the right-most column Figure 7-2 Dispense window... - Page 82 Dispense window: Batch Options, Batch Preview, Med List, Tray Fill List, and Exceptions. Batch Options Tab Cut Options The cut option you select will determine when (or if) the strip of medication pouches is cut. The cut options include: FastPak EXP Operating Manual...
- Page 83 View Med List window in blue (will expire). Other low count medications will appear in yellow (low count). FastPak EXP Operating Manual...
- Page 84 The name of the current label is shown on the Dispense window (Figure 7-3). If you want to change labels, click Change Label. A window like that shown here appears. Figure 7-4 Change Label window Click on a label, and then click OK. FastPak EXP Operating Manual...
- Page 85 Or, highlight a field in the Sort Field list, then select a new field from the Field Name list followed by Insert. The selected field will appear just above the highlighted field in the Sort Field list. FastPak EXP Operating Manual...
- Page 86 The up arrow indicates ascending order. Highlight a sort field, Current sort fields and the then select Desc/Asc to the order in which they are change to descending prioritized order. Figure 7-6 Choose Sort for Batch window FastPak EXP Operating Manual...
- Page 87 Choose a sort group to use from among those listed. Clear the sort display Clear All Select Cancel the batch Select Cancel Batch Table 7-3 Choose Sort Options When all sorting options have been set, select OK. FastPak EXP Operating Manual...
- Page 88 Use the information on the Batch Preview tab to select either the range of consecutive bags you want to dispense, or the specific portion of the batch you want to dispense (non-consecutive bags) by applying filters. FastPak EXP Operating Manual...
- Page 89 Then click Apply. See more about range selection on page 78. Wait for the Dispense window to reappear, then click Dispense. Figure 7-8 Batch Preview window FastPak EXP Operating Manual...
- Page 90 20-40, 50-55, 3, 10, 60-62. 6. Click Apply. 7. Click Dispense. The FastPak EXP will dispense only the bags within the range(s) you selected. Adding Filters Click Add Filters (on the Batch Preview tab) to specify which bags in the batch you want to dispense.
- Page 91 The number in The selected filter parenthesis indicates moves to the window the number of filters on the right. within the category. Click Apply All Filters. Figure 7-9 Applying filters FastPak EXP Operating Manual...
- Page 92 Note You can filter patient-specific and cabinet replenishment batches. You cannot filter repack batches. After you click Apply All Filters, the Batch Preview tab returns. Next, you can set up a notification bag type. FastPak EXP Operating Manual...
- Page 93 Click Notification Bag Config (on the Batch Preview tab) to set up notification bags. Refer to the figure below for details. Click Notification Bag Config to see this window. Choose a notification type from the drop-down list to see a corresponding window. FastPak EXP Operating Manual...
- Page 94 Choose the manual notification bag, for example, if you want to notify the user that upon reaching a specific bag, it is time to reorder. This notification type is most frequently used in an alternate care FastPak EXP Operating Manual...
- Page 95 Delete. Delete all the notification types by clicking Delete All. Med List Tab Click the Med List tab to view a window similar to that shown in Figure 7-10. FastPak EXP Operating Manual...
- Page 96 Low count medications are those that are about to be depleted. That is, there is only a small amount in canisters inside the FastPak EXP. Review the Have column to see the quantity remaining in the canister, in order to verify you have enough for the batch. If...
- Page 97 When you dispense batches that require dispensing from the UTC, the FastPak EXP software will prompt you to select the Tray Fill List tab. If you use prefill trays, the process of dispensing from the UTC differs from an environment in which prefill trays are not used.
- Page 98 You can do this by scanning the bulk bottle barcode. The display will highlight the matching medication, and the barcode you scanned will appear in the Scan Barcode text field at the bottom of the FastPak EXP Operating Manual...
- Page 99 2. Click Print to print the tray fill report. 3. Click Dispense. The UTC opens. 4. Fill the UTC. LCD lights illuminate next to the UTC cells into which the medication must be placed for the batch. 5. Close the UTC. FastPak EXP Operating Manual...
- Page 100 Note If the FastPak EXP hardware does not respond, check the front panel. Press Start if the display reads “System Stop”; the device will then start dispensing. If it says “Heater Alarm”...
- Page 101 14. Scan the barcode on the prefill tray to verify. 15. When verified, chick OK. The FastPak displays this message: “This tray is now verified. OK to continue. 16. Put the tray into the UTC drawer. 17. Click OK. 18. Click Continue. FastPak EXP Operating Manual...
- Page 102 A common cause of an invalid drug is a typographical error in the drug ID. Invalid medications must be fixed or ignored before proceeding with the batch. FastPak EXP Operating Manual...
- Page 103 Invalid Medications tab within the Dispense application. If this option is unchecked, the user will not have access to the Ignore All Meds button. Refer to the FastPak EXP System Software Manual for more details. Click Print to print an Invalid Report, Inactive Report, External Report, or All Exception Report, and the following window appears.
- Page 104 Click this box to activate the medication on the client computer and in the medication database. Figure 7-15 Inactive Medication window After activating a canister, a window similar to that shown here appears. Figure 7-16 Update Canister Active Setting window FastPak EXP Operating Manual...
-
Page 105: Deleting Batches
Bags will not print for ignored medications. Deleting Batches Highlight the batch you want to delete from the list on the Main window (Figure 7-1). Select Delete. A confirmation window appears. Figure 7-17 Delete Batch? window FastPak EXP Operating Manual... -
Page 106: Viewing Batch Statistics
Viewing Batch Statistics To see detailed statistics for a specific dispensed batch, highlight the batch in the Main window shown in Figure 7-1 and select Batch Statistics. The window shown below displays. Figure 7-18 Batch Statistics window FastPak EXP Operating Manual... - Page 107 Last event in batch • Total number of trays used by batch • Details of any events that occurred during dispensing Click Print to print the batch statistics. A sample report is shown here. Figure 7-19 Sample report FastPak EXP Operating Manual...
-
Page 108: Batch Management
Figure 7-20 Batch Management window Saving a Batch Click on a batch in the Main window (Figure 7-1), then click Batch Management. When the Batch Management window opens, click Save. The batch is added to the saved batches. FastPak EXP Operating Manual... -
Page 109: Cabinet Replenishment
Cabinet Replenishment Click Cabinet Replenishment (on the Main window shown in Figure 7-1) to view the Cabinet Replenishment window. This window applies to a Med- Select cabinet, and may differ from that shown with your setup. FastPak EXP Operating Manual... -
Page 110: Unlocking The Device
Autolink application to process and create a batch which appears on the Dispense window. Note that the categories of groups and stations originate from either MedSelect or Pyxis, not ARxIUM. Any changes in these categories must be requested from your cabinet vendor. -
Page 111: Skip Med Report
Figure 7-21 Sample Skip Med report The report includes the medication name and quantity, the patient name, and the administration time. Use this report to monitor skipped medications. FastPak EXP Operating Manual... -
Page 112: Batch Verify Report
Figure 7-22 Sample Batch Verify report Click the printer icon at the top of the report if you want to print the report. FastPak EXP Operating Manual... -
Page 113: Canceling A Batch
UTC. Creating New Batches Repack Batches Repack batches contain medications that are not assigned to specific patients. To create repack batches from the Main window shown in Figure 7-1, do the following: FastPak EXP Operating Manual... - Page 114 Figure 7-23 Repack window 2. Highlight the medication you want to add. The window in Figure 7-24 appears. Note: You may also scan the medication bulk bottle, or the canister that contains the medication you want to repack. FastPak EXP Operating Manual...
- Page 115 Whole or partial tablet (if partial, select size) • Package number to start at • Dispensing order (ascending or descending) 3. When these options have been chosen, select OK. The Repack window redisplays, showing the new repack batch. FastPak EXP Operating Manual...
- Page 116 5. Select Process Order on the Repack window. 6. Select OK to exit the Repack window. Manual Batches Manual batches contain orders for specific patients. To create manual batches, do the following: 1. From the Main window shown in Figure 7-1, click Manual. FastPak EXP Operating Manual...
- Page 117 2. Select any field in the Manual Order Entry window and a touch-sensitive keypad displays. 3. Touch the alphanumeric keys in the keypad to provide requested information. 4. To add a new medication, select New. The Medication window shown in Figure 7-27 displays. FastPak EXP Operating Manual...
- Page 118 8. Select the Duration field and use the keypad to enter duration information. 9. Select Hours, Days, Weeks, Months or Doses. 10. Select Whole or Partial tablet. 1. A SIG code provides prescription administration frequency information, such as twice daily, every four hours, etc. FastPak EXP Operating Manual...
-
Page 119: Processing Newly-Created Batches
1. In the Main window shown in Figure 7-1, highlight the new batch. 2. Click Dispense. 3. The Dispense window shown in Figure 7-3 displays. Click the tabs and review the batch information, as described in “Dispensing Batches” on page 69. FastPak EXP Operating Manual... -
Page 120: Changing Dispense Settings
To change Dispense settings, from the Main window shown in Figure 7-1, do the following: 1. Click Settings. The Dispense Settings window shown below displays. Figure 7-28 Dispense Settings window FastPak EXP Operating Manual... - Page 121 CheckStation. Refill Password Prompt When this option is checked, the user must logon to replenish canisters. Tray Med Update Choose this option to require users to log Password Prompt on before updating tray information. FastPak EXP Operating Manual...
- Page 122 Choose this option to sort a patient batch Package Number in descending order. For example, the Descending notation on a strip of bags will print “4 of 4, 3 of 4, 2 of 4, 1 of 4.” FastPak EXP Operating Manual...
- Page 123 Repack Default Label Select default labels for both repack and patient-specific labels. The user will not be prompted to choose a label during dispense if default labels are selected. Click Preview to see a preview of your selection. FastPak EXP Operating Manual...
- Page 124 Use this option only if your setup includes Smart Canisters. When you click Configure, a lightning bolt appears on the representation of the FastPak EXP configuration, to indicate which drawers contain Smart Canisters. Touch a drawer in the representation, and a lightning bolt appears.
- Page 125 Information). Note: you must restart the Dispense application after changing the inactivity timeout settings in order to activate your new selection. Table 7-4 Dispense Settings 2. When all settings are chosen, select OK to implement them. FastPak EXP Operating Manual...
-
Page 126: Filling Canisters
Canisters in your canister ID, but which setup. are not physically in the FastPak EXP show “0” in this column. Figure 7-29 Canister Update window 2. If the medication you are looking for does not appear on this screen, type the first few letters of the medication name in the Search field. - Page 127 3. Highlight the canister you wish to refill and select Update. A window similar to that shown below appears. The scanning windows only appear during replenishment if you selected the scan verification options in dispense settings. Figure 7-30 Barcode Confirmation window FastPak EXP Operating Manual...
- Page 128 Maintenance. 5. Scan the medication bottle. 6. If you are using the AutoScale, a window like that shown here appears. Place the empty canister on the scale and press Next. FastPak EXP Operating Manual...
- Page 129 Filling Canisters 7. Follow the screen prompts. 8. When the Canister Update window appears, type a new lot number and expiration date, if necessary. 9. Click OK. “Yes” indicates the canister has been filled. FastPak EXP Operating Manual...
- Page 130 Figure 7-31 appears. Figure 7-31 Scan Verify Error window Click OK if you wish to override the mismatch, then follow the instructions on the subsequent windows. FastPak EXP Operating Manual...
- Page 131 3. Select Override Only - to skip this check this time only and continue the dispense process. No database changes will occur. Note Users will only be able to access these options if granted the corresponding privileges in the Maintenance application (under Users). FastPak EXP Operating Manual...
-
Page 132: Getting Help
Getting Help Getting Help The FastPak EXP provides on-screen help for situations that may occur when dispensing. To access this help, select the following button from the lower portion of the Dispense window shown in Figure 7-1. A window resembling the one shown below displays. -
Page 133: Exiting Dispense
Select Whole Event to see a video of the entire procedure. Click here to exit Help. Figure 7-34 Online Help Screen Exiting Dispense Close Dispense by selecting Exit from the Main window shown in Figure 7-1. FastPak EXP Operating Manual... - Page 134 Exiting Dispense Notes: FastPak EXP Operating Manual...
-
Page 135: Cleaning And Maintenance
8 Cleaning and Maintenance Chapter 8 presents information on cleaning the FastPak EXP hardware and basic maintenance, including: • Exterior Surfaces • Touchscreen • Barcode Scanner • Canisters • Medication Drawers • • UTC Tray Sensor • Interior Surfaces •... -
Page 136: Tool Kit
When vacuuming, use caution to avoid blowing the pill dust. Tool Kit A FastPak EXP tool kit comes with your FastPak EXP. The tool kit contains calipers, metric tools, spare cutter blades, alcohol swabs, plastic pins, and other essentials for cleaning and maintaining the FastPak EXP. -
Page 137: Cleaning Order
Cleaning Order Cleaning Order In general, you should clean the FastPak EXP starting at the top of the device and moving toward the bottom. Exterior Surfaces Clean the metal exterior surfaces of your ARxIUM FastPak EXP with a mild solution of isopropyl alcohol and water, using a clean, lint-free, non- abrasive cloth. -
Page 138: Fingerprint Reader
Repeat as necessary until the reader window is clean. Canisters Clean the FastPak EXP canisters monthly, or more often as needed. To clean the canisters, do the following: 1. Remove a canister from the cabinet. -
Page 139: Medication Drawers
CAUTION Medication Drawers Open each medication drawer, one at a time, beginning at the top of the FastPak EXP. Clean the pill path at the center of the drawer with a clean, dry, lint-free cloth. FastPak EXP Operating Manual... - Page 140 Medication Drawers Figure 8-1 Cleaning the pill path FastPak EXP Operating Manual...
- Page 141 CAUTION Always wear a protective mask and gloves when cleaning to avoid inhaling pill dust and to avoid skin contact with pill dust. When vacuuming, use caution to avoid blowing the pill dust. FastPak EXP Operating Manual...
-
Page 142: Utc
Vacuum the UTC to remove any accumulated pill dust. Then wipe the holding cells and tray top each day with a clean, dry, lint-free cloth to remove any dust or pill residue. Figure 8-3 Cleaning the UTC FastPak EXP Operating Manual... -
Page 143: Utc Tray Sensor
The UTC tray sensor is located on the back of the UTC & first shutter drawer, as shown here. Sensor Enlarged view Figure 8-4 UTC tray sensor Wipe the UTC tray sensor with a clean, dry, lint-free cloth to remove any accumulated dust. FastPak EXP Operating Manual... -
Page 144: Interior Surfaces
Vacuum the interior surfaces to remove pill dust. Wear a protective mask and gloves to avoid inhaling pill dust and to avoid skin contact with pill dust. Use caution to avoid blowing the pill dust. Figure 8-5 Vacuuming the interior FastPak EXP Operating Manual... -
Page 145: Heat Sealer
ScotchBrite™-type cleaning pad when the device has cooled. Use caution when cleaning because of the high temperature of the heat sealer. Heat sealer (metal surface) Removing the buildup CAUTION! HIGH TEMPERATURE Figure 8-6 Cleaning the heat sealer FastPak EXP Operating Manual... - Page 146 Clean the anvil pad on the opposing surface of the heat seal with a clean, dry, lint-free cloth. To access the anvil pad, grab the handle and press downward, as shown below. Anvil pad (back side) Handle Anvil pad Figure 8-7 Heat seal assembly FastPak EXP Operating Manual...
-
Page 147: Sub-Hoppers
Sub-Hoppers Sub-Hoppers The four sub-hoppers are located just under the medication drawers, inside the front upper panel doors, as shown below. Figure 8-8 Locating the sub-hoppers FastPak EXP Operating Manual... - Page 148 Sub-Hoppers Slide out each sub-hopper and vacuum daily or wipe out any dust or residue with a clean, dry, lint-free cloth, wearing protective gloves to avoid skin contact with pill dust. Figure 8-9 Cleaning the sub-hopper FastPak EXP Operating Manual...
-
Page 149: Sub-Hopper Sensors
Sub-hopper sensor in place and removed from the device Figure 8-10 Sub-hopper sensor Clean these sensors monthly, using a clean, lint-free cloth (or Q-tip) or a soft-bristled brush (such as a toothbrush) to wipe away any dust. FastPak EXP Operating Manual... -
Page 150: Upper Shutter
UTC tray, in the UTC & first shutter drawer. Open the front access doors, turn off the power switch, and, using both hands, gently pull out the drawer. Figure 8-11 Pulling out the UTC & first shutter drawer FastPak EXP Operating Manual... - Page 151 When you have finished cleaning, replace the shutter curtain, slide the drawer back into place, and close the front access doors. Handle the upper shutter carefully. Do not use excessive force when cleaning to avoid shutter operation failure. CAUTION FastPak EXP Operating Manual...
-
Page 152: Hopper And Hopper Sensor
Pins Figure 8-13 Pulling out the hopper Pull the hopper out slowly. Support the bottom of the hopper if you intend to pull it completely out of the machine. CAUTION FastPak EXP Operating Manual... - Page 153 124. Depending on the manufacturing date of your packager, the hopper may have curtains, as shown in the top image here. Refer to page 143 for more information on the curtains. Figure 8-14 Cleaning the hopper FastPak EXP Operating Manual...
- Page 154 CAUTION When you have finished cleaning, slide the hopper back into place, push in the pins which lock the hopper into place, and close the front access doors. FastPak EXP Operating Manual...
- Page 155 Hopper and Hopper Sensor Note Ensure the curtain passes through all the hopper slits (as shown in the pictures below), to maximize dispensing efficiency. Curtain Figure 8-16 Curtain location FastPak EXP Operating Manual...
-
Page 156: Lower Shutter
Remove the plastic top weekly for cleaning. Gently lift off the plastic top to access the lower shutter. Vacuum or wipe off the plastic top and interior surfaces of the lower shutter with a clean, dry, lint- free cloth. FastPak EXP Operating Manual... -
Page 157: Perforation Blade Assembly
Perforation Blade Assembly Figure 8-18 Cleaning the lower shutter Perforation Blade Assembly Cleaning the Perforation Blade ARxIUM does not recommend cleaning the perforation blade, due to the inaccessibility of the blade and risk of personal injury. FastPak EXP Operating Manual... - Page 158 Perforation Blade Assembly Replace the blade when it becomes dull. Figure 8-19 Perforation blade location FastPak EXP Operating Manual...
- Page 159 Perforation Blade Assembly Adjusting the Perforation Blade Always turn off the power to the FastPak EXP System when cleaning or performing preventive maintenance. WARNING Handle the perforation blade carefully to avoid injury. WARNING FastPak EXP Operating Manual...
- Page 160 Figure 8-20 Removing the perforation blade assembly 2. Loosen the adjustment screw indicated in the image below, with an Allen wrench, to adjust the position of the perforation blade. Retighten when you have repositioned the blade to your satisfaction. FastPak EXP Operating Manual...
- Page 161 Figure 8-21 Thumb screw location 4. Stop the adjustment when the perforation blade reaches the desired position. 5. Test the new perforation blade position by selecting Cut on the control panel and observing the resultant cut. FastPak EXP Operating Manual...
-
Page 162: Cutter Blade
Cutter Blade Cleaning the Cutter Blade ARxIUM does not recommend cleaning the cutter blade, due to the risk of personal injury. Replace the blade when it becomes dull. Changing the Cutter Blade... - Page 163 6. Insert the new blade. 7. Replace the thumbscrew. 8. Replace the blade assembly. 9. Replace the blade guide. Note Use only ARxIUM-authorized disposables, including cutter blade # 624-199-2425. Cutter blade assembly Figure 8-22 The cutter blade assembly location FastPak EXP Operating Manual...
- Page 164 Cutter Blade Adjusting the Cutter Blade Always turn off the power to the FastPak EXP System when cleaning or performing preventive maintenance. WARNING Handle the cutter blade carefully to avoid injury. WARNING To adjust the cutter blade, do the following: 1.
-
Page 165: Cleaning Schedule
Upper Shutter Daily Hopper Daily Hopper Sensor Monthly Lower Shutter Daily Anvil Pad Daily a. “Daily” indicates once per 24-hour period, or more often if necessary b. “Monthly” indicates once per month, or more often if necessary FastPak EXP Operating Manual... -
Page 166: Before Calling For Service
4. Determine whether the computer is responding to keyboard and/or mouse input. If it does not, check to make sure that cables leading from the keyboard and monitor are securely connected. 5. Determine whether there are any alarms on the status display. FastPak EXP Operating Manual... - Page 167 Before Calling for Service 6. Power down the PC and restart it. Observe how the PC responds during the power-up sequence and make note of any unusual behavior or FastPak EXP Operating Manual...
- Page 168 Before Calling for Service Notes: FastPak EXP Operating Manual...
-
Page 169: Error Messages
Wait until the heater reaches the reach the set set temperature (approximately temperature. 10 minutes). Heater Alarm 2 The heater is Contact ARxIUM Service if the disconnected. alarm persists. Refill the canister or eliminate the blockage. Canister xxx is empty or Canister Empty jammed. -
Page 170: Messages And Resolutions
The UTC tray is not Correctly install the UTC tray; press UTC Alarm properly installed, or Start. Contact ARxIUM Service if tray rotation has failed. the alarm persists. The ribbon is broken, Examine the ribbon. Re-thread the Change Ribbon not installed correctly, or ribbon, or install a replacement. - Page 171 Alarm Cause Remedy Clean the canister and motor base. A pill not specified has Mixed Drugs Contact ARxIUM Service if the been dispensed. alarm persists. Clean the canister and motor base. The pill detecting Sensor Trouble Contact ARxIUM Service if the sensor has failed.
-
Page 172: Troubleshooting
Do not place fingers or hands inside a medication drawer when closing the drawer, to avoid injury. CAUTION Contacting ARxIUM Call ARxIUM at 1-888-537-3102; then press 2 for product service. Call ARxIUM at 1-888-537-3102; then press 3 to order ARxIUM consumables. FastPak EXP Operating Manual... -
Page 173: Specifications
10’ three-pronged, grounded electrical cord to a dedicated 20 amp 120 VAC single phase network Powered from with a neutral and ground connection receptacle. 3.8 A Max. 437 W, outlet max. 300 W Input current operating amperage Number of canisters FastPak EXP Operating Manual... - Page 174 PC and EXP software via RS-232 cable Interface method Barcode or touchscreen data entry available Data entry interfaces 6 months Limited warranty 24-hour toll-free number On-site preventative maintenance Service program On-site repair FastPak EXP Operating Manual...
- Page 175 Speed variators, whatever their origin, generate harmonic current which may feed back into the network or be otherwise radiated. They may cause interference that can affect the environment. a. These fuses may only be replaced by ARxIUM service personnel. FastPak EXP Operating Manual...
- Page 176 Notes: FastPak EXP Operating Manual...
- Page 177 See canister manual cautions operator name changing processing dispense settings repack changing batch sort saving changing the cutter blade 48, 150 sorting check expiration date option sorting options cleaning FastPak EXP Operating Manual...
- Page 178 Dispense exiting overview starting icon dispense options bag sealing element is heating dispense settings canister is empty FastPak EXP Operating Manual...
- Page 179 FastPak EXP Operating Manual...
- Page 180 16, 17 second shutter. See lower shutter. mounting hardware serial cable support arm shutdown procedure tray fill list tab shutter trays used in batch alarms FastPak EXP Operating Manual...
- Page 181 (UPS) unlocking the device upper shutter fill lights filling prefill tray tray fill list UTC alarm UTC drawer opening UTC tray sensor verification verification during replenishment viewing device status visual keyboard warnings weight FastPak EXP Operating Manual...
- Page 182 Notes: FastPak EXP Operating Manual...
- Page 184 1400 Busch Parkway Buffalo Grove, Illinois USA 60089 1-888-537-3102 Part number WT00075 v6.3 rev B 5/15...
Need help?
Do you have a question about the FastPak EXP and is the answer not in the manual?
Questions and answers