Table of Contents

Summary of Contents for Bristan WavePlus Dual Outlet Touchpad
- Page 1 Installation Instructions and User Guide WavePlus Dual Outlet Touchpad Models Covered: All WavePlus Showers Please keep this booklet for future reference. Installer, when you have read these instructions please ensure you leave them with the user.
-
Page 2: Table Of Contents
Welcome to your new Bristan Digital Electronic Mixer Shower, featuring a contemporary design, wired electronic controller and digital mixing unit. Bristan’s Digital Electronic Mixer Shower has been designed to be easy to install and use. It has also been designed and tested in the UK to all of the relevant British Standards. -
Page 3: Important Safety Information
Digital Electronic Mixer Shower it is essential that you • All products manufactured and thoroughly flush through the supplied by Bristan are safe provided pipe work in order to remove any they are installed, used correctly remaining swarf, solder, etc. -
Page 4: Specifications
Specifications Specifications Inlet Connection Inlet Water Temperature 1/2” BSP Male Threaded Working Pressures Hot Water Cold Water Supply Supply Min: 0.1 MPa Max: 0.6 MPa ( 1 bar) (6.0 bar) 65°C Outlet Connection 28°C 1/2” BSP 48°C 10.0 5°C Male Threaded Pressure Pressure Maximum Static Pressure:... -
Page 5: Water Requirements
Water Requirements This fitting needs to be installed in accordance with the following Installation Requirements and Notes (IRN) to ensure they meet the requirements of the Water Supply (Water Fittings) Regulations 1999 and the Scottish Byelaws 2014. The fitting shall be installed so that its outlet discharges above the spill-over level of any fixed Hose appliance as indicted on the illustration to the... -
Page 6: Water Connections
It is possible to use a pump to boost a low pressure system to meet the inlet requirements. Note: The pump must be a Bristan Twin-End Negative Head Pump - ST NHPUMP 18TN. Pump installation must be in accordance with the Fitting Instructions supplied with the pump. -
Page 7: Electrical Requirements
The Electrical Installation and Circuit Protection of this shower must comply with current I.E.E Wiring Regulations (BS 7671) and Building Regulations (Part P). All products manufactured and supplied by Bristan are safe provided they are installed, used correctly and receive regular maintenance in accordance with these instructions. -
Page 8: Installation - Mixer Unit
Installation - Mixer Unit Mounting Insert the filters & Insert the filters & connect the water connect the water supplies. supplies. Find a suitable place for the mixer Find a suitable place for the mixer unit. It must be no further than 1.2m unit. -
Page 9: Installation - Wall Outlet
Installation - Wall Outlet Fitting a 1/2” female connection at the hole in the wall Choose the location for the wall (not supplied). outlet and create a 25-30mm hole in the wall. Ensure your shower accessories have enough reach from that position. -
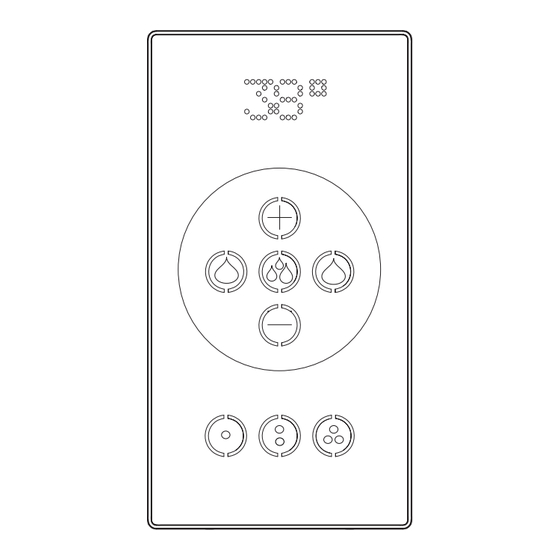
Page 10: Operating The Shower
Operating the Shower On Mode Pause/Memory Setting - Press once to pause for 5 minutes, for memory setting press and hold. Increase Flow Rate - To increase the flow rate by 1lpm press once, to continuously increase the flow rate press and hold. Decrease Flow Rate - To decrease the flow rate by 1lpm press once, to continuously decrease the flow rate press and hold. - Page 11 Operating the Shower Standby Mode (User Setting Memory/Cleaning) Start/Warm Up Mode/Main User - Press once, for start up with current supply temperatures. Press and hold to allow the shower to warm up to preset Master temperature. Press the button again for the shower to start. Factory Reset - Press and hold to return memory functions to factory settings.
-
Page 12: System Set Up
System Set Up During the process, the During the process, the Start button will flash Start button will flash as different as different outlets are enabled. outlets are enabled. Once finished, the Once finished, the Start button will stay Start button will stay lit. -
Page 13: General Cleaning
System - Misc Reset Factory Presets User Temperature Flow Rate Master 38°C 12lpm Cold Water 12lpm 36°C 12lpm The control keys will light up to The control keys will light up to Whilst on Standby mode, press Whilst on Standby mode, press 40°C 12lpm confirm that the control panel has... -
Page 14: Maintenance
Maintenance Monthly Cleaning Program During the process, the Start button During the process, the Start button will flash whilst the cold button will flash whilst the cold button Whilst on Standby Whilst on Standby is illuminated. is illuminated. mode, mode, press and press and hold the middle user hold the middle user... -
Page 15: Alarms
Alarms Error Message Cause Recommended Action AL1 displayed Cold water leakage. Run the Monthly Cleaning and Thermal Disinfection Programs. If problem persists, replace device. AL2 displayed Hot water leakage. Check pipe work for any blockages and that water is AL3 displayed Cold water supply failure. -
Page 16: Guarantee
WVP DVO BC Guarantee At Bristan, we want to make things as easy as possible for our customers. That’s why we offer solid guarantees on all our products, effective from the date of purchase, to give you peace of mind.
Need help?
Do you have a question about the WavePlus Dual Outlet Touchpad and is the answer not in the manual?
Questions and answers