Advertisement
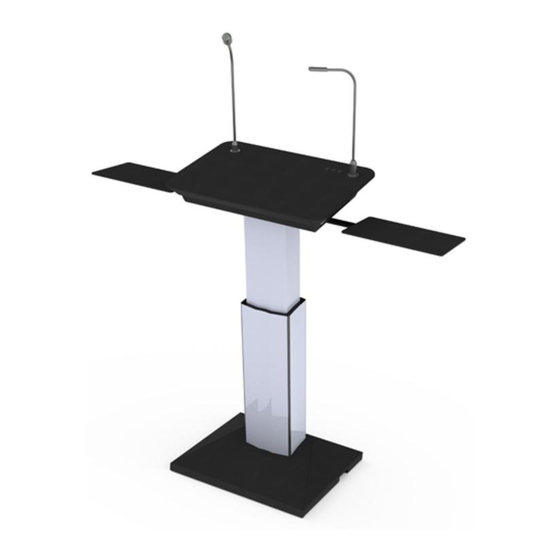
ILS11A mini-height-adjustable lectern
The pillar/lift is specially
produced for ILS,
compared to the standard
pillar, the ILS version has
no external power hook up
on the top nor external
hooks for the height
adjustment. All hooks are
internal to the tube.
Stickers such as CE are not
attached to the pillar but
found on the manual. The
installer is free to affix
these stickers on the pillar
Place your specified or choice microphone here and LED or other reading
light on XLR socket on top. Adapt wiring when needed.
Notebook connectivity panel (universal power socket is found under the top,
Note: the universal power socket does not provide grounding to an external device
when Euro plugs are used), all wiring runs from the top IO bay to the floor module.
The power cables go up to connect to the lift electronics in the top and to the top
connection bay, inside, it is connected to the universal power socket.
Other connections: the DIN to Phoenix plug is for the up – down buttons for the lift
The Phoenix 2-pin socket is for connecting low voltage power to the reading light,
this needs to be wired according the type of light installed.
The XLR connection loops through to the shock-mount socket
PC connectivity VGA/LAN/audio is looping through to the bottom.
All cables going up through the lift are attached to a pin attached to the bottom going up
and a pin attached to the top of the pillar going down.
Assure cables have adequate length to have slack when the lift is in its highest position.
The cable guides keep the cables away from the electronics in the top and from the motor
In the bottom of the pillar . See
for instructions about how to wire the pillar.
Plug cables into a floor box or extend cables here to reach the wall sockets.
http://www.intelligentlecterns.com/pdfs/ils_pedestal.pdf
Advertisement
Table of Contents

Related Manuals for Intelligent Lecterns ILS11A

Summary of Contents for Intelligent Lecterns ILS11A
- Page 1 ILS11A mini-height-adjustable lectern Place your specified or choice microphone here and LED or other reading light on XLR socket on top. Adapt wiring when needed. Notebook connectivity panel (universal power socket is found under the top, Note: the universal power socket does not provide grounding to an external device when Euro plugs are used), all wiring runs from the top IO bay to the floor module.
- Page 2 Microphone, Reading light and up/down switch. The light switch and lamp can be properly wired for the lamp type, the use of the microphone switch is determined by the type of microphone; use it for microphone with preamp or simple microphone, condenser cartridge microphones are not recommended to use this to avoid the dunk-noise when switching!
- Page 3 Remove these screws and remove this fitted panel, Mount it on the pillar [with its cross bar for the Side tables), later you can attach this housing after connecting all cables. Remove these screws and remove the top of the housing carefully when you wish to change the reading light or microphone wiring.
Need help?
Do you have a question about the ILS11A and is the answer not in the manual?
Questions and answers