Table of Contents
Advertisement
Available languages
Available languages
Quick Links
Advertisement
Table of Contents

Related Manuals for Byron BAY PILATES Pilates Studio Reformer


Summary of Contents for Byron BAY PILATES Pilates Studio Reformer
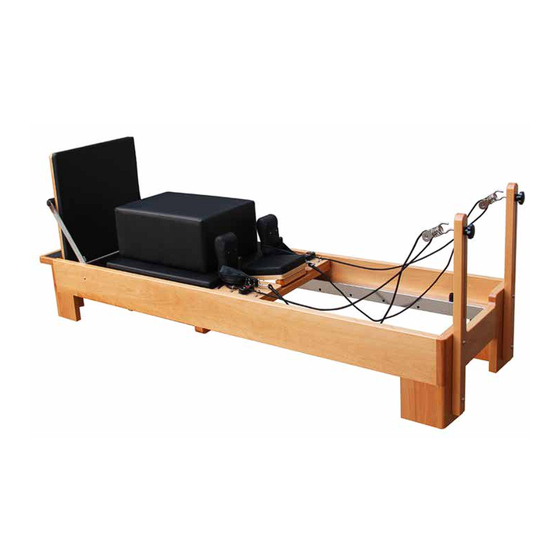
- Page 1 Pilates Studio Reformer Assembly Instruction Manual...
- Page 3 Pilates Studio Reformer Assembly Instruction Manual ENGLISH FRANÇAIS IT ALIANO DEUTSCH ESPAÑOL...
- Page 5 Pilates Studio Reformer Assembly Instruction Manual Important: This manual contains important safety and usage information. Please read thoroughly.
-
Page 6: Recommended Use
RECOMMENDED USE Byron Bay Pi l ates Co. recommends consulting a physician for a complete medical exam before beginning any exercise program. Having a complete medical exam is particularly i m portant if the user has a history of high blood pressure, has heart disease, is over the age of 45, smokes, has high cholesterol, is obese or has not exercised regularly in the past year. - Page 7 PARTS Part Quantity Item Reformer frame Reformer Foot Aluminium Bar Side Bar Screw Adjust Bar Foot Board Spring Cart Shoulder Rest String Anchor Spring Support Roller Wheel Rubber Stopper Pulley Elavator (R) M8*75 Screw Elevator (L) Spring Hook...
-
Page 8: Installation
INST ALLA TION 1. Lift the frame and remove i t from the main box. 2. Remove the protective cardboard and take out the carton containing the upholstery. 3. Inside the carton, you wi l l find the tools necessary to complete the installation of the Pi l ates Studio Reformer. - Page 9 8. The footbar is already assembled when the reformer arrives. Si m ply pick i t up and adjust i t to the level you would li k e. 9. The jump board slots into the metal bracket at the end of the reformer, and should be screwed in securely when you are using i t .
- Page 10 10. The toolki t contains two wooden poles wi t h pulleys and black knobs attached to them. 10. Install the poles by screwing them into the reformer frame as per the picture below. Secure the screws wi t h washers and tighten the inside bolt wi t h a wrench. 12.
-
Page 11: Warranty
Do not return to place of purchase other than Vitality 4 Life. Vitality 4 Life warrant this Byron Bay Pilates Co. Pilates Studio Reformer to be free from defects in materials and workmanship for a Lifetime on Wood and Three Years on Parts while in normal domestic use / One Year on Parts in commercial use, from the original date of purchase. - Page 12 Studio Reformer Pilates Manuel de Montage Important: Ce manuel contient des informations importantes de sécurité et d’utilisation. Prière de le lire intégralement.
-
Page 13: Recommanda Tions D'utilisa Tion
RECOMMANDA TIONS D’UTILISA TION Byron Bay Pi l ates Co. recommande de consulter un médecin et d’effectuer un examen médical complet avant de commencer tout programme d’exercice physique. Cet examen médical complet est d’autant plus i m portant si l’uti l isateur a des antécédents d’hypertension artérielle, de maladie cardiaque, a plus de 45 ans, est fumeur, a un taux élevé... - Page 14 PIÈCES Pièces Quantité Article Cadre du Reformer Pieds du Reformer Barre aluminium Barre latérale Barre réglable Planche de pied Ressort Chariot Appui d‘épaules Cordon Point d‘ancrage Support de ressort Roue du Roller Arrêt en caoutchouc Poulie Elévateur (D) Vis M8*75 Elévateur (G) Crochet de ressort...
- Page 15 INST ALLA TION 1. Soulevez le cadre et sortez-le de l’emballage princi p al. 2. Enlevez le carton de protection et sortez l’emballage contenant la sellerie. 3. A l’intérieur du carton, vous trouverez les outi l s nécessai r es pour effectuer l’installation du Pi l ates Studio Reformer.
- Page 16 8. La barre de pieds est déjà assemblée quand le reformer vous est livré. Prenez-la et réglez-la au niveau qui vous convient. 9. La planche de saut se fixe dans la patte métallique à l’extrémi t é du reformer, et doi t être vissée fermement quand vous l’uti l isez.
- Page 17 10. Le ki t d’outi l s contient deux barres en bois avec des poulies et des boutons de serrage noi r s qui y sont attachés. 11. Installez les barres en les vissant dans le cadre du reformer comme dans l’i m age ci-dessous. Bloquez les vis avec des rondelles et serrez le boulon intérieur avec une clé.
- Page 18 GARANTIE Vitality 4 Life est le fournisseur de la garantie pour les produits Byron Bay Pilates Co. Pour activer votre garantie, prière de vous inscrire en ligne sur http://www.vitality4life.fr/enregistrez-votre-garantie/. Ne renvoyez pas le produit au lieu d’achat mais à Vitality 4 Life.
- Page 19 Pilates Studio Reformer Manuale istruzioni di montaggio Importante: Questo manuale contiene importanti informazioni riguardanti la sicurezza e l’utilizzo. Si prega di leggerlo attentamente.
-
Page 20: Raccomandazioni Per L'uso
RACCOMANDAZIONI PER L’USO Byron Bay Pi l ates Co. consiglia di consultare un medico e sottoporsi ad un completo esame medico pri m a d’iniziare qualsiasi programma d’allenamento. Sottoporsi ad un esame medico completo è particolarmente i m portante se l’utente ha una storia di pressione sanguigna elevata, problemi di cuore, ha un età... - Page 21 PARTI Parte Quantità Articolo T elaio del Reformer Piede del Reformer Barra in alluminio Barra laterale Vi t e Barra regolabi l e Barra poggiapiedi Molla Carrello Spalliera Corda Ancora Supporto della molla Rullo a ruota Stopper di gomma Puleggia Elevatore (R) Vi t e M8*75 Elevatore (L)
-
Page 22: Installazione
INST ALLAZIONE 1. Sollevare i l telaio e ri m uoverlo dalla scatola. 2. Ri m uovere i l cartone protettivo ed estrarre la scatola contenente i l rivesti m ento. 3. All’interno del cartone saranno presenti tutti gli strumenti necessari per completare l’installazione del Pi l ates Studio Reformer. - Page 23 8. La barra poggiapiedi è già montata al ricevi m ento del reformer. Ti basterà regolarla al livello che preferisci. 9. Il jump board (tappeto elastico) s’inserisce nella staffa in metallo all’estremi t à del reformer e dovrebbe essere avvi t ato in modo sicuro quando lo si uti l izza.
- Page 24 10. Il set di attrezzi contiene due barre di legno con pulegge e manopole nere attaccate ad essi. 11. Installare le barre avvi t andole al telaio del reformer come mostrato nell’i m magine sottostante. Fissare le vi t i con le rondelle e stringere i l bullone interno con una chiave. 12.
- Page 25 GARANZIA Vitality 4 Life è il fornitore di garanzia per i prodotti di Byron Bay Pilates Co. Per attivare la garanzia, si prega di registrarsi online a vitality4life.com. Non restituire il prodotto ad un punto d’acquisto diverso da Vitality 4 Life. Vitality 4 Life garantisce che questo attrezzo di Byron Bay Pilates Co.
- Page 26 Pilates Reformer Studio Montage- und Gebrauchsanleitung Wichtig: Diese Anleitung enthält wichtige Sicherheits- und Nutzungsinformationen. Bitte lesen Sie sie sich sorgfältig durch.
-
Page 27: Pflege Und Wartung
EMPFOHLENE NUTZUNG Die Byron Bay Pi l ates Co. empfiehlt Ihnen, einen Arzt zu konsultieren und eine umfassende klinische Untersuchung vornehmen zu lassen, bevor Sie mi t dem Training beginnen. Eine umfassende klinische Untersuchung ist besonders wichtig, falls der Benutzer unter Bluthochdruck oder einer Herzkrankhei t leidet, über 45 Jahre alt ist, raucht, einen hohen Cholesterinspiegel hat, fettleibig ist oder i m letzten Jahr nicht regelmäßig trainierte. - Page 28 TEILE Teil Menge Artikel Rahmen des Reformers Fuß des Reformers Aluminiumstange Sei t liche Stange Schraube Verstellbare Stange Fußbrett Feder Schli t ten Schulterpolster Schnur Klemme Federstange Laufrolle Gummi-Stopper Flaschenzug Hebewerk (R) M8 x 75 Schraube Elevator (L) Federhaken...
-
Page 29: Montage
MONT AGE 1. Heben Sie den Rahmen aus dem Paket. 2. Entfernen Sie den schützenden Karton und nehmen Sie den Karton mi t den Polstern aus dem Paket. 3. Im Paket finden Sie alle notwendigen Werkzeuge, um den Pi l ates Studio Reformer zu montieren. 4. - Page 30 8. Die Fußstange wi r d berei t s montiert geliefert. Heben Sie sie einfach an und stellen Sie sie in der gewünschten Höhe ein. 9. Das Jump Board rastet in die Metallhalterung am Ende des Reformers ein und sollte sicher festgeschraubt sein, während Sie es verwenden.
- Page 31 10. Das Werkzeugset enthält zwei Holzstäbe mi t Flaschenzügen und schwarzen Drehknöpfen. 11. Montieren Sie die Stäbe, indem Sie sie wie am nachfolgenden Bi l d gezeigt am Rahmen festschrauben. Versehen Sie die Schrauben mi t Unterlegscheiben und ziehen Sie die innere Schraube mi t einem Schraubenschlüssel fest.
- Page 32 GARANTIE Vitality 4 Life ist der Garantie-Dienstleister für Byron Bay Pilates Co. Produkte. Um Ihre Garantie zu aktivieren, registrieren Sie sich bitte online unter http://www.vitality4life.de/garantie-registrierung/. Bringen Sie das Gerät nicht in das Geschäft zurück, sofern es sich dabei nicht um Vitality 4 Life handelt. Vitality 4 Life garantiert für einen Zeitraum von drei Jahren ab dem Kaufdatum, dass dieser Pilates Reformer Studio von Byron Bay Pilates Co.
- Page 33 Pilates Reformer Studio Manual de Instrucciones Importante: Este manual contiene información importante de seguridad y uso. Por favor, léalo detenidamente.
-
Page 34: Uso Recomendado
USO RECOMENDADO Byron Bay Pi l ates Co. recomienda consultar con un médico para hacerse un examen médico completo antes de empezar cualquier programa de ejercicio. Es especialmente i m portante realizar un examen médico completo si el usuario tiene un historial de hi p ertensión, tiene enfermedad cardíaca, tiene más de 45 años, fuma, tiene el colesterol elevado, es obeso o no ha realizado ejercicio de forma habi t ual en el últi m o año. - Page 35 PIEZAS Pieza Cantidad Artículo Marco de reformer Pie de reformer Barra de aluminio Barra lateral T orni l lo Barra de ajuste Tablero para los pies Muelle Carro Apoyo para los hombros Cuerda Anclaje Soporte de muelle Rueda de rodi l lo Stopper de goma Polea Elevador (D)
-
Page 36: Instalación
INST ALACIÓN 1. Levante el marco y sáquelo de la caja princi p al. 2. Reti r e el cartón protector y saque la caja con la tapicería. 3. Dentro de la caja, encontrará las herramientas necesarias para completar la instalación del Pi l ates Reformer Studio. - Page 37 8. La barra para los pies ya viene montada cuando se recibe el reformer. Senci l lamente ajústela al nivel adecuado. 9. El tablero de salto encaja en el soporte de metal en el extremo del reformer y debe fi j arse fi r memente para uti l izarlo.
- Page 38 10. El ki t de herramientas contiene dos postes de madera con poleas y botones negros. 11. Instale los postes atorni l lándolos al marco de reformer como muestra la i m agen de a continuación. Asegure los torni l los con arandelas y apriete el perno con una llave inglesa. 12.
- Page 39 No realice la devolución de su compra a ningún otra empresa que no sea Vitality 4 Life. Vitality 4 Life garantiza que el Pilates Reformer Studio de Byron Bay Pilates Co. está libre de defectos en los materiales y de mano de obra.
- Page 40 Vitality 4 Life Australia – Head Office and Showroom 5/10 Brigantine Street, Byron Bay, NSW 2481, Australia International Phone: +612-66807444 Toll-Free (within Australia): 1800 802 924 Fax: +612-66807481 Email: support@vitality4life.com Website: www.vitality4life.com Vitality 4 Life – New Zealand Toll-Free (within NZ): 0800 882 924 Email: support@vitality4life.co.nz Website: www.vitality4life.co.nz Vitality 4 Life –...
Need help?
Do you have a question about the Pilates Studio Reformer and is the answer not in the manual?
Questions and answers