Advertisement
Quick Links
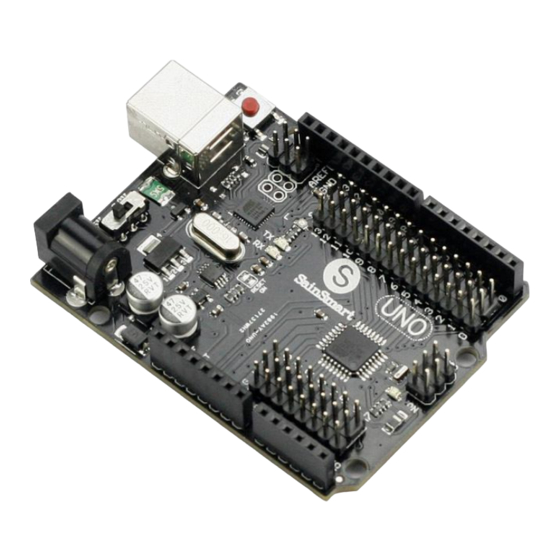
SainSmart UNO R3 Starter Kit
//SainSmart UNO R3
The SainSmart UNO R3 is one of several development boards based on the ATmega328-AU. We
like it mainly because of its extensive support network and its versatility. It has 14 digital
input/output pins (6 of which can be PWM outputs), 6 analog inputs, a 16 MHz crystal oscillator,
a USB connection, a power jack, an ICSP header, and a reset button. Don't worry, you'll learn
about all these later
Access the Internet
In order to get your Arduino up and running, you'll need to download some software first from
www.arduino.cc (it's free!). This software, known as the Arduino IDE, will allow you to program
the Arduino to do exactly what you want. It's like a word processor for writing programs. With an
internet-capable computer, open up your favorite browser and type in the following URL into the
address bar:
www.arduino.cc/en/Main/Software
Advertisement

Related Manuals for SainSmart UNO R3

Summary of Contents for SainSmart UNO R3
- Page 1 SainSmart UNO R3 Starter Kit //SainSmart UNO R3 The SainSmart UNO R3 is one of several development boards based on the ATmega328-AU. We like it mainly because of its extensive support network and its versatility. It has 14 digital input/output pins (6 of which can be PWM outputs), 6 analog inputs, a 16 MHz crystal oscillator, a USB connection, a power jack, an ICSP header, and a reset button.
-
Page 2: Install Drivers
// Connect your SainSmart Uno to your Computer Use the USB cable provided in the SIK kit to connect the UNO R3 to one of your computer’s USB inputs. // Install Drivers Depending on your computer’s operating system, you will need to follow specific instructions. - Page 3 Example 1: Mount the SainSmart 1602 LCD Keypad Shield on top of the SainSmart UNO R3 and connect the headers like this:...
- Page 4 Then connect it to your computer using a USB cable as you normally would. Next, set up your development environment. Go to the Arduino website: www.arduino.cc and click up a software link and download the Arduino software Arduino 023. See the following figure: When finish the download, unzip the “arduino0023.zip”, open the software and this application will pop up like this:...
- Page 5 Then download the document “LCDkeypad.rar” provided by SainSmart, unzip it and put it under the “libraries” file. The path will be like this: \arduino-0023\libraries\LCD4Bit_mod\examples\LCD4Bit_modExample Here we have “LCD4Bit_modExample.pde”, click it and it will show like this:...
- Page 6 Next click up the “upload”, then you will have the software in the SainSmart UNO R3 and we can test the button function on LCD. Press select key, "Select Key OK:”...
- Page 7 Example 2: Mount the SainSmart Graphic LCD4884 Shield on top of the SainSmart UNO R3 and connect the headers. It will look like this:...
- Page 8 Then connect it to your computer using a USB cable as you normally would. Next, set up your development environment. Go to the Arduino website: www.arduino.cc and click up a software link and download the Arduino software Arduino 023. See the following figure:...
- Page 9 When finish the download, unzip the “arduino0023.zip”, open the software and this application will pop up like this...
- Page 10 Then download the document “LCD4884S.rar” provided by Sainsmart , unzip it and put it under the “libraries” file. The path will be like this: Here we have “lcd4884_mene.pde”, click it and it will show like this: Next click up the “upload”, then you will have the software in...
- Page 11 Then press up to go back to the menu table, press down again, it will go to the second choice “CHAR MAP”. See the following figure:...
- Page 13 Example 3: we will have 4 cables to connect. We have GND, VCC, SDA(A4), SCL(A5) on the UNO R3. See the following figure:...
- Page 14 We also have the same four buckled ports on the back of LCD shield. See the following figure: one end of the cable goes to GND, VCC, SDA, SCL, and the other end goes to the corresponding GND, VCC, SDA, SCL on the LCD module. Then connect it to your computer using a USB cable as you normally would.
- Page 15 “LiquidCrystal_I2C.rar”provided by SainSmart , unzip it and put it under the “libraries” file. The path will be like this: Here we have “HelloWorld”, click it and it will show like this:...
- Page 16 “upload”, then you will have the software in the SainSmart UNO R3 and the LCD will be on with the words showing.
- Page 17 Example 4: we will have 4 cables to connect. We have GND, VCC, SDA(A4), SCL(A5) on the UNO R3. See the following figure: We also have the same four buckled ports on the back of LCD shield. See the following figure:...
- Page 18 one end of the cable goes to GND, VCC, SDA, SCL, and the other end goes to the corresponding GND, VCC, SDA, SCL on the LCD module. Then connect it to your computer using a USB cable as you normally would. Next, set up your development environment is to go to the arduino website: www.arduino.cc and click up a software link and download the arduino...
- Page 19 “LiquidCrystal_I2C.rar”provided by SainSmart , unzip it and put it under the “libraries” file. The path will be like this: Here we have “HelloWorld ”, click it and it will show like this:...
- Page 20 “upload”, then you will have the software in the SainSmart UNO R3 and the LCD will be on with the words showing.
- Page 21 Example 5: First of all, connect 7 Dupont Lines, plug one end of the lines in pin 4, 5, 6, 7, 8, G, and V on the UNO R3 ,See the following figure.
- Page 22 Then the one in pin 4 connects to SCL(SCLK) on the 1.8 SPI LCD, pin 5 connects SDA(MOSI), pin 6 connects CS, pin 7 connects DC, pin 8 connects to RES(RST), pin G connects to GND, and pin V connects to VCC(5V). See the following figure:...
- Page 23 Then connect it to your computer using a USB cable as you normally would. Next, set up your development environment. Go to the Arduino website: www.arduino.cc and click up a software link and download the Arduino software Arduino 023. See the following figure:...
- Page 24 When finish the download, unzip the “arduino0023.zip”, open the software and this application will pop up like this: then download the document “TFT18.rar” provided by SainSmart , unzip it and put it under the “libraries” file. The path will be like this:...
- Page 25 Here we have “graphicstest”, click it and it will show like this: next click up the “upload”, then you will have the software in the SainSmart UNO R3 and the LCD will show like this:...
Need help?
Do you have a question about the UNO R3 and is the answer not in the manual?
Questions and answers