Sony ILCE-QX1 How To Use Manual
Interchangeable lens digital camera/digital still camera
Hide thumbs
Also See for ILCE-QX1:
- Instruction manual (347 pages) ,
- Service manual (32 pages) ,
- Quick start manual (2 pages)
Table of Contents
Advertisement
Quick Links
Interchangeable Lens Digital Camera/Digital Still Camera
ILCE-QX1/DSC-QX30
How to use
About this camera
Names of parts
Names of parts (ILCE-QX1) [1]
Names of parts (Lens E PZ 16-50mm F3.5-5.6 OSS) [2]
Names of parts (DSC-QX30) [3]
Before Use
Charging the battery pack
Charging the battery pack [4]
Supplying power
Supplying power [5]
Inserting a memory card
Inserting a memory card [6]
Installing PlayMemories Mobile
Installing to an Android smartphone [7]
Installing to an iPhone [8]
Connecting the camera and the smartphone via Wi-Fi
Advertisement
Table of Contents

Related Manuals for Sony ILCE-QX1


Summary of Contents for Sony ILCE-QX1
- Page 1 Interchangeable Lens Digital Camera/Digital Still Camera ILCE-QX1/DSC-QX30 How to use About this camera Names of parts Names of parts (ILCE-QX1) [1] Names of parts (Lens E PZ 16-50mm F3.5-5.6 OSS) [2] Names of parts (DSC-QX30) [3] Before Use Charging the battery pack...
-
Page 2: Shooting Settings
Shooting still images [16] Shooting continuously [17] Shooting movies [18] Zooming [19] Using flash (ILCE-QX1 only) [20] Adjusting AF (auto focus) with one touch. Shooting an AF adjusted still image with one touch (Touch Shutter) [21] Scene Recognition [22] Shooting settings Self-Timer [23] Cont. - Page 3 Exposure Mode [34] Aperture Priority Shooting [35] Shutter Speed Priority Shooting [36] Grid Line [37] Mirror Mode (Taking self portraits) [38] Focus Mode (ILCE-QX1 only) [39] Lock-on AF [40] Touch Shutter [41] Flash (ILCE-QX1 only) [42] Review Image [43] Save Options [44]...
-
Page 4: Information That Appears On The Screen
About adjusting the date and time [60] On cleaning On cleaning [61] Number of still images Number of still images (ILCE-QX1) [62] Number of still images (DSC-QX30) [63] Recordable time of movies Recordable time of movies (ILCE-QX1) [64] Recordable time of movies (DSC-QX30) [65]... -
Page 5: Specifications
Battery life and number of images that can be recorded (ILCE-QX1) [66] Battery life and number of images that can be recorded (DSC-QX30) [67] Specifications Specifications (ILCE-QX1) [68] Specifications (DSC-QX30) [69] Information Trademarks Trademarks [70] License License [71] Troubleshooting About this camera Power supply Why doesn’t the camera charge? [72]... - Page 6 The model name depends on whether the lens is supplied or not. They are as follows: ILCE-QX1 Supplied Lens: none ILCE-QX1L Supplied lens: E16-50mm The explanations for ILCE-QX1 and ILCE-QX1L are indicated with "ILCE-QX1" unless separate explanations are required for each model.
- Page 7 1. Power/Charge/Movie lamp Green: Power on Orange: Charging Red: Recording a movie 2. Power button 3. Flash (N Mark) Touch the mark when you connect the camera to a smartphone equipped with the NFC function. NFC (Near Field Communication) is an international standard of the short-range wireless communication technology.
- Page 8 13. Lens contacts (*) 14. Mount 15. Battery cover The password and SSID required for Wi-Fi connection are printed on the inside of the camera’s battery cover. 16. Wi-Fi button 17. Attachment part 18. RESET button 19. Multi terminal Supports Micro USB compatible device. 20.
- Page 9 1. Zooming/Focusing ring 2. Zooming lever 3. Mounting index 4. Lens contacts (*) Do not touch this part directly. Attaching the lens 1. Remove the lens caps on the front and rear of the lens and the body cap of the camera. 2.
- Page 10 Names of parts (DSC-QX30) 1. Power button 2. Microphone 3. Lens 4. Removal lever 5. Access lamp 6. Multi terminal Supports Micro USB compatible device. 7. RESET button 8. Memory card slot (N Mark) Touch the mark when you connect the camera to a smartphone equipped with the NFC function. NFC (Near Field Communication) is an international standard of the short-range wireless communication technology.
-
Page 11: Charging The Battery Pack
1. Turn off the power of the camera. 2. Insert the battery pack in the camera. How to open the battery cover of the ILCE-QX1: Slide the lever in the [1] direction and hold it there. Pull the cover in the [2] direction. - Page 12 3. Connect the multi terminal of the camera to a USB port of your computer, using the micro USB cable (supplied). Charge lamp Lit: Charging Off: Charging finished Flashing: Charging error, or charging paused temporarily due to charging outside appropriate...
-
Page 13: Charging Time (Full Charge)
By supplying power from a computer or AC adaptor (sold separately), you can use the camera while saving power. You can shoot while charging when the ILCE-QX1 is supplied with power from the AC-PW20 AC Adaptor (sold separately), or the DSC-QX30 is supplied with power from the AC-UD10 AC Adaptor (sold separately). -
Page 14: Inserting A Memory Card
Inserting a memory card You can shoot images after inserting a memory card in the camera. 1. Open the cover and insert a microSD memory card or Memory Stick Micro (M2) media. ILCE-QX1 microSD memory card Memory Stick Micro media... - Page 15 Memory Stick Micro media A: Printed side B: Terminal side 2. Close the cover. Before removing the memory card, make sure that the access lamp is off, then press the memory card. Note (indicates memory card not inserted) appears on the display panel of the camera, or the power lamp flashes red, the memory card is inserted upside down or the other way around.
- Page 16 Operation methods and display screens for a smartphone or PlayMemories Mobile are subject to change without notice by future upgrades. Hint For more information, refer to the following website. http://www.sony.net/pmm/ [8] How to use Before Use Installing PlayMemories Mobile Installing to an iPhone Install PlayMemories Mobile to an iPhone in order to make a Wi-Fi connection with the camera.
- Page 17 A: Power button 2. Start PlayMemories Mobile on the smartphone. 3. Select the SSID printed on the label on the inside of the camera's battery cover. 4. Input the password, as printed on the same label (first time only).
- Page 18 Note Make sure that the Wi-Fi setting of the camera is set to (Single Connection). [10] How to use Before Use Connecting the camera and the smartphone via Wi-Fi Connecting the camera and an NFC-enabled Android smartphone via Wi-Fi Connects the camera and Android smartphone with one-touch, using NFC functions. 1.
- Page 19 Note Cancel sleep and the screen lock of the smartphone in advance. Make sure that the Wi-Fi setting of the camera is set to (Single Connection). If there is no N mark on the smartphone, refer to the manual of the smartphone. If the camera and a smartphone cannot be connected by NFC, see "Connecting the camera and an Android smartphone via Wi-Fi"...
- Page 20 [11] How to use Before Use Connecting the camera and the smartphone via Wi-Fi Connecting the camera and an iPhone via Wi-Fi Connects the camera and iPhone via Wi-Fi. 1. Turn on the power of the camera. A: Power button 2.
- Page 21 5. Input the password, as printed on the same label (first time only). 6. Confirm the connection to the SSID of the camera. 7. Go back to the Home screen, then start PlayMemories Mobile.
- Page 22 Note Make sure that the Wi-Fi setting of the camera is set to (Single Connection). To terminate the Wi-Fi connection, make sure you do not only terminate PlayMemories Mobile but also turn off the power of the camera. If you terminate PlayMemories Mobile only, the Wi-Fi connection remains. [12] How to use Before Use Connecting the camera and the Live-View Remote (sold...
- Page 23 Registration is complete when the camera emits the connection completion beep. An image is displayed on the Live-View Remote when the connection is established. Note Step 5 is required only when registering the first time. [13] How to use Before Use Connecting the camera and the Live-View Remote (sold separately) via Wi-Fi Connecting the Live-View Remote (sold separately) and...
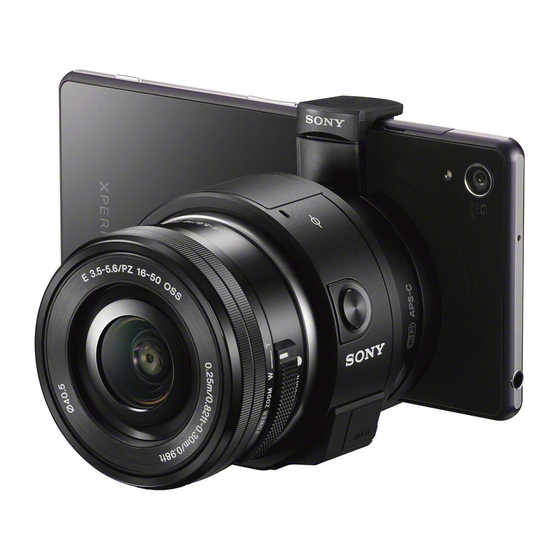
- Page 24 3. Extend the clamps and attach to a smartphone. When attaching the camera to a smartphone, do not hold the smartphone only. The attachment may fall off the smartphone. Hold the camera body and the lens (ILCE-QX1), or hold the camera (DSC-QX30).
- Page 25 Do not swing the camera around with a smartphone attached to it, as the smartphone may slip out of the attachment. Support the camera body and the lens (ILCE-QX1), or support the camera (DSC-QX30) when shooting. The attachment may fall off the smartphone if you hold the smartphone only, especially when a heavy lens is attached to the ILCE-QX1.
-
Page 26: Shooting Still Images
[16] How to use Shooting Basic shooting method Shooting still images Shoots still images. In the default setting, [2M] images are transmitted automatically to the smartphone, and a review screen is displayed on the smartphone. Images are saved in the memory card of the camera in the image size set in [Still Image Size] . - Page 27 thumbnail list, from which you can select and transfer desired still images. 1. Confirm that the memory card is inserted in the camera. 2. Connect the camera and the smartphone via Wi-Fi, then tap (Settings). The setting screen is displayed. 3.
-
Page 28: Shooting Movies
Continuous shooting cannot be performed if no memory card is inserted in the camera. Up to 10 still images can be shot continuously on the DSC-QX30. [18] How to use Shooting Basic shooting method Shooting movies Shoots MP4 movies. 1. Confirm that the memory card is inserted in the camera. 2. - Page 29 DSC-QX30 is 30x. 1. Connect the camera and the smartphone via Wi-Fi. 2. Zoom with the zoom lever of the lens (ILCE-QX1), or zoom with the zoom lever of the camera or the zoom button of the smartphone (DSC-QX30).
- Page 30 Shooting Basic shooting method Using flash (ILCE-QX1 only) In dark environments, use the flash to light up the subject while shooting and to prevent camera-shake. When shooting against the sun, use the flash to lighten the image of the backlit subject.
-
Page 31: Scene Recognition
One-touch AF cannot be used in the following settings: Movie mode [Focus Mode] is set to [MF] (ILCE-QX1 only) When a mount adaptor is used and the [Focus Mode] is set to [Phase detection AF] or [MF] While using one-touch AF, only the shutter button is effective. If you would like to perform other operations, cancel one-touch AF. -
Page 32: Menu Items
The camera automatically recognizes the shooting scene and conditions and makes the appropriate settings for shooting. Icons for recognized scenes and conditions will be displayed on the smartphone. The position of an icon depends on whether the camera recognizes a scene or a condition. If the camera recognizes a scene, one of icons such as (Portrait), (Infant),... -
Page 33: Cont. Shooting Settings
Spd Priority Cont.(ILCE-QX1 only): Shoots images continuously at a faster rate while the shutter button of the camera is pressed or the shutter button of the smartphone is slid to the left. -
Page 34: Zoom Setting
Menu Items Hi (Default setting): Sets the continuous shooting speed to a maximum of approximately 10 frames per second. Low: Sets the continuous shooting speed to a maximum of approximately 2 frames per second. Note You can select the [Continuous Shooting Speed] only when the [Cont. Shooting Settings] is set to a [Cont. - Page 35 The setting screen is displayed. 2. [Still Image Size] desired mode Menu items ILCE-QX1: Image size when [Aspect Ratio] is 3:2 20M 5456×3632 pixels (Default setting) 10M 3872×2576 pixels 5.0M 2736×1824 pixels Image size when [Aspect Ratio] is 16:9 17M 5456×3064 pixels 8.4M 3872×2176 pixels...
-
Page 36: Using Image Data Converter
If images are not to be modified using your computer, we recommend that you record images in JPEG format. Review images of RAW format images recorded with [Quality] set to [RAW & JPEG] cannot be transferred to a smartphone (ILCE-QX1 only). [29] How to use Shooting... -
Page 37: White Balance
[30] How to use Shooting Shooting settings Recording Mode (movie) (DSC-QX30 only) Selects the image size, frame rate, and image quality for movie recording. 1. Connect the camera and the smartphone via Wi-Fi, then tap the still image/movie switching button (A) to switch to movie mode. - Page 38 2. Tap to display the setting screen. 3. Tap the EV value and select a desired value. ILCE-QX1: Adjusts the exposure manually in a range of –3.0 EV to +3.0 EV. DSC-QX30: Adjusts the exposure manually in a range of –2.0 EV to +2.0 EV.
- Page 39 1. Connect the camera and the smartphone via Wi-Fi. 2. Tap to display the setting screen. 3. Tap the ISO value and select a desired value. ILCE-QX1: Auto/100-16000 DSC-QX30: Auto/80-3200 Note You cannot set the ISO value when [Intelligent Auto] or [Superior Auto] is set.
-
Page 40: Exposure Mode
[34] How to use Shooting Shooting settings Exposure Mode You can select the Exposure Mode based on condition and objective. 1. Connect the camera and the smartphone via Wi-Fi, then tap (Exposure Mode). The Exposure Mode selecting screen is displayed. 2. -
Page 41: Shutter Speed Priority Shooting
2. Tap to display the setting screen. 3. Tap the aperture (F value) and select a desired value. ILCE-QX1: Setting a smaller aperture value: The subject is in focus, but objects in front of and beyond the subject are blurred. - Page 42 3. Tap the shutter speed value and select a desired value. Select a shutter speed value from 1/4000 second – 30 seconds (ILCE-QX1). Select a shutter speed value from 1/1600 second – 30 seconds (DSC-QX30). Note This setting is available only when [Exposure Mode] is set to (Shutter Speed Priority Shooting).
- Page 43 Although the image is displayed flipped horizontally, the actual recorded image is not flipped. [39] How to use Shooting Shooting settings Focus Mode (ILCE-QX1 only) Selects the focus method to suit the movement of the subject. 1. Connect the camera and the smartphone via Wi-Fi, then tap (Settings).
-
Page 44: Touch Shutter
Lock-on AF Selects the setting for Lock-on AF By activating Lock-on AF, the camera tracks the touched subject and enables you to keep focusing on it. 1. Connect the camera and the smartphone via Wi-Fi, then tap (Settings). The setting screen is displayed. 2. - Page 45 Flash (ILCE-QX1 only) You can set the flash mode. 1. Connect the camera and the smartphone via Wi-Fi, then tap (Settings). The setting screen is displayed. 2. Press the (Flash pop-up) button to pop up the flash. 3. [Flash] desired mode Menu Items Off: The flash does not operate.
-
Page 46: Save Options
Save Options Selects whether or not to save an image reviewed on the smartphone after the shooting. 1. Connect the camera and the smartphone via Wi-Fi, then tap (Settings). The setting screen is displayed. 2. [Save Options] desired mode Menu items On (Default setting): Saves images reviewed on the smartphone. - Page 47 Menu Items Single Connection (Default setting): Operates one camera using the Live-View Remote or a smartphone. Multi Connection: Operates two or more cameras using the Live-View Remote. Wi-Fi Off (No indication): Does not use the Live-View Remote or a smartphone to operate the camera.
- Page 48 If you want to change the image size, tap or [Copy Image Size] and select the desired image size. 4. Tap and select [Select Items to copy] from the displayed menu, then tap images you want to copy to display a mark on them.
-
Page 49: Operations Available During Playback
5. Tap [Copy]. Hint to return to shooting standby. [49] How to use Transferring images taken with the camera Playing a movie on a smartphone Playing a movie on a smartphone Recorded movies can be played back on a smartphone. 1. - Page 50 You can select and delete unnecessary images. 1. Connect the camera and the smartphone via Wi-Fi, then tap (Settings). The setting screen is displayed. 2. Select [See In-Camera Images]. 3. Select the date of the image(s) you want to delete. 4.
-
Page 51: Initializing The Settings
When the camera is connected in Mass Storage mode, you cannot connect via Wi-Fi. Hint For details on PlayMemories Home functions, see the Help of PlayMemories Home. Download the image management software PlayMemories Home from the following URL. http://www.sony.net/pm/ [52] How to use Initializing/Formatting Initializing the settings Initializing the settings You can initialize the settings to the default setting. -
Page 52: Formatting A Memory Card
Note The camera restarts when the RESET button is pressed. [53] How to use Initializing/Formatting Formatting a memory card Formatting a memory card Formats the memory card in the camera. 1. Connect the camera and the smartphone via Wi-Fi, then tap (Settings). - Page 53 1. Memory card warning Memory card is not inserted (lit) Memory card full capacity (lit) Memory card error (flashing): A memory card which cannot be used in the camera is inserted. The terminals of the memory card are dirty. The memory card is damaged. The memory card is inserted in the wrong direction.
- Page 54 1. Switching exposure modes 2. Scene Recognition 3. White Balance 4. Focus Mode 5. Memory Card 6. Number of recordable images 7. Still image size 8. Self-Timer 9. Flash 10. One-touch AF 11. Mirror Mode 12. Review Image 13. Exposure setting button 14.
- Page 55 On a genuine Sony accessories If you use accessories other than genuine Sony products, it may cause a malfunction. Note on disposal/transfer of the camera To protect personal data, perform the following when disposing of or transferring the camera.
-
Page 56: Battery Pack
The camera conforms with DCF (Design rule for Camera File system) universal standards established by JEITA (Japan Electronics and Information Technology Industries Association). Sony does not guarantee that other equipment will play back images recorded with the camera. Notes on the lens Exposing the lens to direct sunlight for long periods may cause a malfunction. - Page 57 The ILCE-QX1 can use the NP-FW50 (supplied) battery pack. The DSC-QX30 can use the NP-BN (supplied) and NP-BN1 (sold separately) battery packs. On charging the battery pack Charge the battery pack (supplied) before using the camera for the first time.
-
Page 58: Memory Card
again, this may indicate a battery error or that a battery pack other than the specified type has been inserted. Check that the battery pack is the specified type. If the battery pack is the specified type, remove the battery pack, replace it with a new or different one and check that the battery is charged correctly. -
Page 59: Memory Stick Media
Do not strike, bend or drop the memory card. Do not disassemble or modify the memory card. Do not expose the memory card to water. Do not leave the memory card within the reach of small children. They might accidentally swallow it. Insert a memory card that fits the memory card slot size. - Page 60 Wipe the flash surface with a soft cloth to remove dirt, dust, etc. Cleaning the inside of the E-mount (ILCE-QX1) Do not touch the parts of the product inside the lens mount, such as a lens signal contact. To clean inside the lens mount, use a commercially-available blower* to blow any dust off.
- Page 61 [64] How to use Precautions/About this camera Recordable time of movies Recordable time of movies (ILCE-QX1) Approximate maximum movie times (total of all movie files) that can be recorded on a memory card in the camera. (h (hour), m (minute)) The recordable time may vary depending on the shooting conditions and the memory card.
- Page 62 Precautions/About this camera Battery life that can be used Battery life and number of images that can be recorded (ILCE-QX1) The battery life of use/number of images which can be recorded with the charged battery (supplied). Shooting still images: Approx. 440 images Typical movie shooting: Approx.
- Page 63 Using Sony microSD memory card (sold separately). Temperature of 25°C (77°F). The number of still images that can be recorded is based on the CIPA standard, and is for shooting under the following conditions. (CIPA: Camera & Imaging Products Association) Shooting once every 30 seconds.
-
Page 64: Input And Output Connectors
White balance: Automatic, Daylight, Shade, Cloudy, Incandescent, Fluorescent (Warm White/Cool White/Day White/Daylight), Flash, Color temperature File format: Still images: JPEG (DCF, Exif, MPF Baseline) compliant, RAW (Sony ARW 2.3 Format) Movies (MP4 format): Video: MPEG-4 AVC/H.264 Audio: MPEG-4 AAC-LC 2ch... - Page 65 Effective pixel number of camera: Approx. 20.4 Megapixels Lens: Sony G 30× zoom lens, f = 4.3 mm – 129 mm (24 mm – 720 mm (35 mm film equivalent when the image size is 4:3)) F3.5 (W) – F6.3 (T) While shooting movies (16:9): 26.5 mm –...
- Page 66 Audio: MPEG-4 AAC-LC 2ch Recording media: Memory Stick Micro media, microSD memory cards Input and Output connectors Multi Terminal*: USB communication USB communication: Hi-Speed USB (USB 2.0) Supports Micro USB compatible device. Power, general Power: Rechargeable battery pack NP-BN, 3.6 V Power consumption (during shooting): Approx.
- Page 67 " " and "PlayStation" are registered trademarks of Sony Computer Entertainment Inc. In addition, system and product names used in this manual are, in general, trademarks or registered trademarks of their respective developers or manufacturers. However, the ™ or ® marks are not used in all cases in this manual.
- Page 68 GPL/LGPL. Source code is provided on the web. Use the following URL to download it. http://www.sony.net/Products/Linux/ We would prefer you do not contact us about the contents of source code. Licenses (in English) are recorded in the internal memory of your camera. Establish a Mass Storage connection between the camera and a computer to read licenses in the "PMHOME"...
- Page 69 [75] Troubleshooting About this camera Shooting Why can't I use flash? (ILCE-QX1 only) Press the (Flash pop-up) button to pop up the flash. You cannot use the flash in the following situations: (Night Scene) is selected in (Superior Auto). During movie recording.
- Page 70 [80] Troubleshooting PlayMemories Mobile Wi-Fi connection Why can't I connect via Wi-Fi? Install the newest "PlayMemories Mobile" from below website. http://www.sony.net/pmm/ [81] Troubleshooting PlayMemories Mobile Wi-Fi connection Why can't I connect with NFC? If the power of the camera is turned off, continue to touch without moving the smartphone until the lens of the camera extends.
- Page 71 Movies are not transferred automatically. Select (Settings) [See In-Camera Images], then select movies to transfer to the smartphone. [84] Troubleshooting PlayMemories Mobile Shooting/transferring Why is the live view image not displayed smoothly on my smartphone? Depending on the performance of the smartphone, or the reception environment, the image may not be displayed smoothly.
Need help?
Do you have a question about the ILCE-QX1 and is the answer not in the manual?
Questions and answers