
Summary of Contents for Flaman Fitness Deluxe X12103
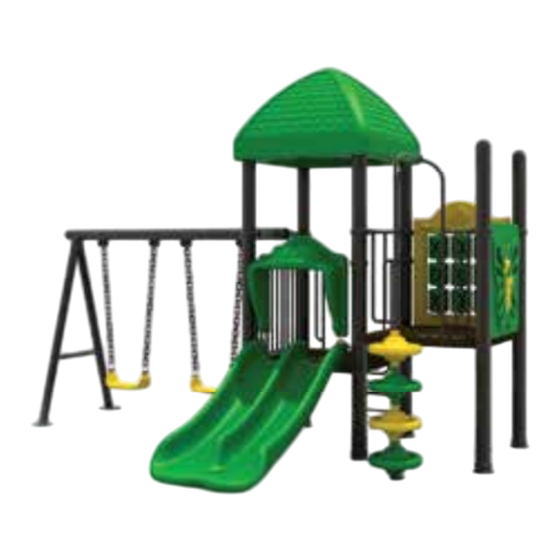
- Page 1 ASSEMBLY – The Deluxe Playground ModEL X12103 Please note: The swing bay is an available option for residential use only...
- Page 2 ASSEMBLY – The Deluxe Playground ModEL X12104 The Pieces The ParTs NoT iNcluded: Minimum 8’ Ladder W – ½” x ¼” Ring Bolts: 28 Pieces A – 10’ Pole with 1 Platform Ring, 2 Attachment Rings: 1 Piece X – ¼” Ring Nuts: 28 Pieces B –...
- Page 3 BEforE You BEgin – Check Ring Heights on Poles A, B, C, D, E1 & E2 iMportAnt! Poles A, B, C, D, and E have various numbers of Rings on them. These Rings sometimes slide in transit so it’s crucial that you measure and reset e1&e2 the ring heights, if necessary, before starting Assembly.
- Page 4 pArtS – The Deluxe Playground ModEL X12104 W – ½” x ¼” Ring Bolts: GG – 2 ¼“ Self Tapping Screws: FF – 1” Self Tapping Screws: 28 Pieces 4 Pieces 8 Pieces (bag may include more) Z – 1.5” x 3/8” Platform/Railing Y –...
- Page 5 StEp 1 – Attach Poles A, B, C, D to Platform F1 pArtS Posts A, B, C, D, (1) Platform F, (4) Bolt Z, (4) Nut AA, (8) Washer HH * It doesn’t matter which Platform F you use first. From here forward, the one you choose will be referred to as Platform F1...
- Page 6 StEp 2 – Attach stairs V & stair Railing to Platform F1 pArtS Stairs V (2) Bolt Z (6) Washer HH (2) Stair Railing K (2) Ring Clamp EE & DD 75” (4) Bolt W sTEP 2B (4) Nuts X (2) Bolt Y, (2) Nut AA 75”...
- Page 7 StEp 3 – Attaching slide and slide roof pArtS Double Slide Q (4) Bolt Z (4) Washer HH Double Slide Roof R (4) Ring Clamp EE & DD (8) Bolt W 75” (8) Nut X sTEP 75” 51” 32” 32” 51”...
- Page 8 StEp 4 – Attach step H to Platform F1 pArtS Platform Step H (3) Bolt Z (3) Nut AA (6) Washer HH sTEP 4A 32” 32” sTeP 4a 32” sTeP 4a – attach step h to Platform f1 imPorTaNT! DO nOt tighten bolts until the end of step 5. Attach the Platform Step H to Platform F, between Poles C and D, using (3) Bolts Z, (6) Washers HH, and (3) Nuts AA (Order: bolt, washer, step/platform, washer, nut).
- Page 9 StEp 5 – Attach Platform F2 to Platform F1 pArtS Second Platform F (2) Pole E (5) Bolt Z (5) Nut AA (10) Washer HH 32” sTeP 5a sTEP 5B sTEP 5A 32” 44” 32” 32” 32” sTeP 5B sTeP 5a – attach Platform f2 to step h sTeP 5B –...
- Page 10 StEp 6 – Attach Railing J to Platform F1 pArtS Railing J (2) Ring Clamp EE & DD (4) Bolt W (4) Nut X (2) Bolt Y (2) Nut AA (4) Washer HH sTEP 6B 75” sTeP 6B 75” 32” 32”...
- Page 11 StEp 7 – Attach spinning Bead Wall to Platform F2 pArtS Spinning Bead Wall P1 (2) Ring Clamp EE & DD (4) Bolt W (4) Nut X (3) Bolt Z (3) Washer HH 86.5” sTeP 7a 86.5” 44” 44” sTeP 7B 44”...
- Page 12 StEp 8 – Attach Climbing Pole to Platform F2 pArtS Climbing Pole Railing L (2) Ring Clamp EE & DD (4) Bolt W (4) Nut X (2) Bolt Y sTeP 8c (2) Nut AA sTEP 8B (4) Washer HH, Climbing Pole T 86.5”...
- Page 13 StEp 9 – Attach Butterfly Wall to Platform F2 pArtS Spinning Bead Wall P2 (2) Ring Clamp EE & DD (4) Bolt W (4) Nut X (3) Bolt Z (3) Washer HH 86.5” sTeP 9a 86.5” 44” 44” sTeP 9B 44”...
- Page 14 StEp 10 – Attach Roof to Platform F1 pArtS Roof U (4)Self Tapping Screws GG (8)Self Tapping Screws FF sTeP 10a sTEP 12A sTeP 10a View from below sTeP 10a – centre roof and attach to Platform f1 imPorTaNT! If people assembling roof are not tall enough, you wIll Place Roof U on top of Posts A, B, C, D.
Need help?
Do you have a question about the Deluxe X12103 and is the answer not in the manual?
Questions and answers