Table of Contents
Advertisement
Quick Links
Advertisement
Table of Contents

Related Manuals for Acclaim Lighting XB-R1


Summary of Contents for Acclaim Lighting XB-R1
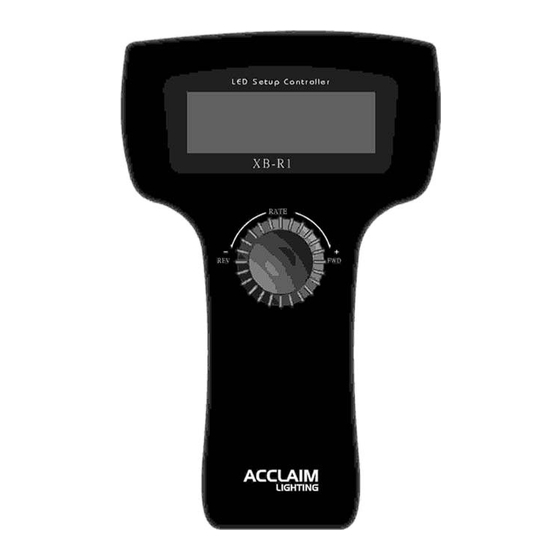
- Page 1 LED Setup Controller XB-R1 USER’S MANUAL Rev 1.2 No. 24-004-1656-00...
-
Page 2: Product Description
User can set desired LED effects and the “Glide Effect” through this controller. The XB-R1 offers built-in chargeable battery for user’s convenient operation, and it can also supply power to its connected LED unit (must be DC 24V) via a 3&5-Pin female connector. To optimize the performance of this product, please read the instructions carefully to familiarize you with the basic operations. - Page 3 Unit Numbers in the same Group for convenient application (See the “Setup With Answer” operation guide for details). Turn on the power switch at the backside of this unit, the XB-R1 will be powered on and the LCD will show you the first display:...
- Page 4 User’s Manual 4.1 Setup No Answer If you select the “Setup No Answer” function mode, then press the multi-selector, the LCD will show you as below: ←① < Cancel > ←② Name: xxx… ←③ > Unit Group: xxx ←④ > Confirm ①...
- Page 5 User’s Manual When the cursor is at this position, pressing the multi-selector will return to the above display page(II). *For your reference, we respectively take the RGB, AUTO and MANUAL modes for example: (1) RGB Work Mode: In RGB Work Mode, user can rotate the multi-selector clockwise or counterclockwise to select relevant items (Unit Number: 1~999, Glide Effect: Yes/No, Address Set: 1~512).
- Page 6 User’s Manual (3) MANUAL Work Mode: If you set the Work Mode as “MANUAL”, the LCD-display will immediately show you as below: < > Unit Number: > Work Mode:MANUAL > Blue/Duration: ↓ > Red /Speed: > Green/Dimmer: > Confirm to send >...
- Page 7 User’s Manual once automatically, user can select the next LED by changing Unit Number and Unit Group. < Unit Group: XXX > Unit Number Mode Unit Number:XXX > LED Unit Setup Total Channel:XXX > Data Sending! Addr: XXX Confirm > Please Wait…...
- Page 8 If you select the “Setup With Answer” function mode, then press the multi-selector, the LCD-display will show you as below: Scanning LED Unit Please Wait… If there is no LED unit connected to this XB-R1 setup controller, LCD will show you like this: < Scan Complete. No LED Unit In Line...
- Page 9 User’s Manual ③ It is necessary to scan LED Units for all parameters before entering the Setup With Answer. And the scanning time depends on numbers of units. User should try again according a hint menu when some errors occur. If you move the cursor to the top-left corner and press the multi-selector, LCD will show you: <...
- Page 10 User’s Manual Auto Fadetime: 0%-100%. ↑ > Auto Program: Setup With Answer > Auto Speed: LED Unit Setup > Auto Fadetime: Data Sending! > Confirm to send Please Wait… Select the “Confirm” item and press the multi-selector, LCD will show you the above display. (When adjusting relevant parameters, the being-controlled LEDs will respond sensitively.
- Page 11 User’s Manual User can call up Semiautomatic Setup With Answer function by rotating the multi-selector and selecting the “Selective Copy”, then press the multi-selector, the LCD will show you as below: < > XXXXXXXXXXX… > Unit Group: Page(I) > Unit Number: <...
-
Page 12: Dmx Controller
User’s Manual Unit Group:1~100; Unit Number:1~999; Total Channel:1~48. ① It is necessary to set the first LED properly in Setup With Answer Menu before entering. ② DMX Addresses of LEDs depend on work modes. ③ Work Mode settings for all LEDs Unit should be compatible. If not, it will return to the previous menu automatically. - Page 13 User’s Manual (2) 512 Channel Mode: If you set the Mode as “512 Channel Mode”, the LCD-display will immediately show you as below: > DMX Mode Select > Channel:[XXX-XXX] Single Channel > 000 000 000 000 000 512 Channel > 000 000 000 000 000 Auto Chase >...
-
Page 14: Specifications
OFF: the backlight always keeps in its “off” state (no backlight always). 6 Specifications Model No. …... ………………………………………………………………………………………XB-R1 Power supply …………………………………………………………………………..DC 9-24V, 500mA Output ………………………………………………………………..3-pin & 5-pin female XLR sockets LCD-display…………………………………………………………..……….….…….. 4×20 characters Dimensions……………………….……………………………………………………. 200×160×55mm Weight…………………………………………………………………………….…………………..
Need help?
Do you have a question about the XB-R1 and is the answer not in the manual?
Questions and answers