Advertisement
Quick Links
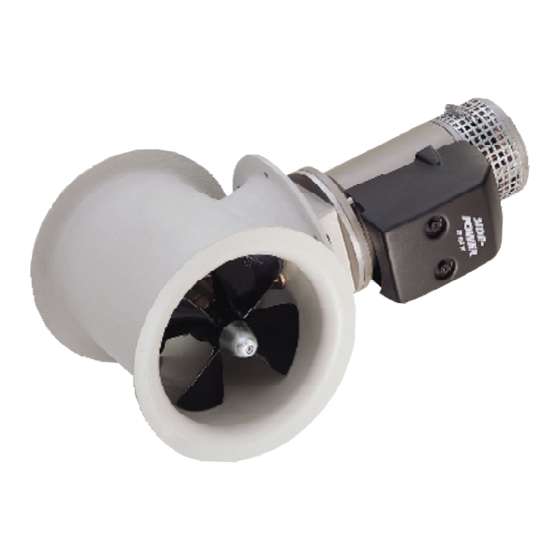
SIDE-
®
POWER
IMPORTANT NOTICE:
This manual is to be used in addition to the regular
installation manual for the Sidepower thruster.
This manual is intended for professionals only, and
does not contain all detailed work instructions for
what must be done to ensure correct and safe
installation of the sternthruster.
SLEIPNER MOTOR AS
P.O. Box 519
N-1612 Fredrikstad
Norway
Tel: +47 69 30 00 60
Fax:+47 69 30 00 70
Stern thruster
installation
manual
www.side-power.com
sidepower@sleipner.no
© Sleipner Motor AS 2005
Advertisement

Subscribe to Our Youtube Channel
Summary of Contents for SLEIPNER MOTOR AS Side-Power SP30Si
- Page 1 SLEIPNER MOTOR AS P.O. Box 519 N-1612 Fredrikstad Norway Tel: +47 69 30 00 60 www.side-power.com Fax:+47 69 30 00 70 sidepower@sleipner.no © Sleipner Motor AS 2005...
-
Page 2: Installation
Installation To achieve maximum effect, reliability and durability from your Sidepower Sternthruster, a correct installation is very important. Please follow the instructions carefully, and make sure that all checkpoints are carefully controlled. Make sure that there are enough space both inside and outside the transom of the boat (see FIG 1). W.L. - Page 3 BOLT ON INSTALLATION Once the place for the installation has been decided, hold the tunnel in place in the horizontal position and mark the bolt holes. Remove the tunnel and it is then possible to calculate and mark the centre (see Fig. 1). It is important that the tunnel flange sits flush on the transom.
- Page 4 WARNING! MOULD IN INSTALLATION Cut of the bolting flange on the stern-tunnel Mould in installation is ONLY for stern GRP tunnels. Grind off the gelcoat both inside and outside the remaining “tube” atleast 10 cm down on the Composite stern tunnels “tube”...
- Page 5 THE STERN-THRUSTER MUST BE KEPT DRY AT ALL TIMES It is very important that you do everything possible to ensure that the thruster stays dry at all times. The electromotor and and solenoid system is not to be considered as waterproof, and will be dammaged if they keep getting wet (rust and corriosion).
- Page 6 THE STERN-THRUSTER MUST BE KEPT DRY AT ALL TIMES Description of illustrations: A : All draining holes or other open- ings from wet areas into the thruster installation compartment must be sealed. B: Originally non-sealed bulkhead C: Stringers in the boats lenght directions, normally there are drain holes through these from side-compartments...
-
Page 7: Special Installation Instructions
SPECIAL INSTALLATION INSTRUCTIONS Sidepower SP 55 Si As the motorbracket are completely inside the stern-tunnel, the oil-pipe must be changed to an elbow connection so that the oil hose will not be bent, preventing from constrictions. Remove the straight hose pipe in the bracket. Install the elbow hose pipe connection that came with the stern-tunnel, be sure to use a sealant on the threads, but not so much that it closes the oil feed into the bracket. - Page 8 REMOTE INSTALLATION OF THE ELECTRONIC BOX. As the electronic controlbox and its contact are the most sensitive parts on the thruster, we advice that these are removed from the thruster and fitted in a high place in the boat so to secure these from water ingress, even if the thrusters compartment gets flooded.
- Page 9 ELECTRICAL INSTALLATION OF STERNTHRUSTER SYSTEMS PS ! This is additional information especially for sternthruster installations, and the installation manual for the thruster you are installing must be used complementary. If a bow thruster is also installed, we strongly advice to use seperate battery banks for the two thrusters to avoid extreme voltage drop if both thrusters were to be used at the same time, and to ensure maximum performance.
- Page 10 ELECTRICAL INSTALLATION OF STERNTHRUSTER SYSTEMS To use the Sidepower dual joystick panel with previously installed Sidepower bowthruster with the older 3 lead electric system. Please contact your distributor / dealer to purchase an upgrade kit to rebuild your existing bow- thruster to the new 4 lead electric system.
-
Page 11: Installation Checklist
This manual is in addition to the general thruster manual, so this must be read and understood also ! IMPORTANT NOTICE Sleipner Motor AS assumes no responsibility or liability for the installation of any components. Skilled installers should be used, and there might be unforeseen factors that can make one or more installation instructions wrong or not entirely correct for the boat in question.
Need help?
Do you have a question about the Side-Power SP30Si and is the answer not in the manual?
Questions and answers