
Summary of Contents for Trade Tested GS509-V1
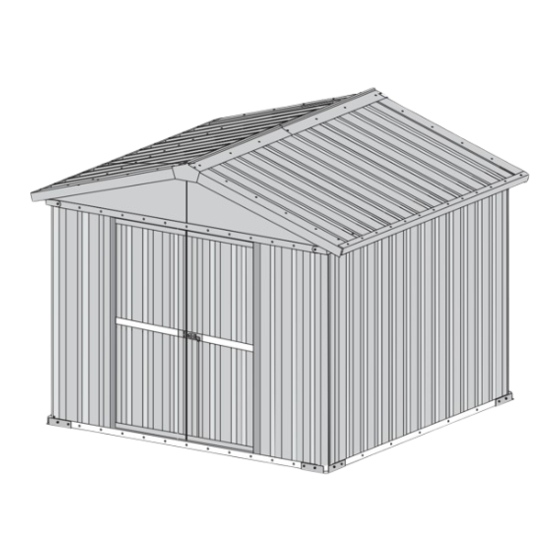
- Page 1 GS509-V1 GARDEN SHED OWNER’S MANUAL AND ASSEMBLY INSTRUCTIONS overall size: 3270 x 3070 x 2150mm shed size: 3070 x 3070 x 2100mm door size: 1480 x 1750mm floor size: 3030 x 2650mm GARDEN SHED OWNER’S MANUAL AND ASSEMBLY INSTRUCTIONS...
-
Page 2: Before You Begin
Before You Begin ● Check local building codes regarding shed location and any other local requirements. ● Check the packing list on page iv to make sure you have all of the necessary parts. ● Separate everything in the cartons by the part number while reviewing the parts list. ●... - Page 3 Flooring & Foundations A solid shed starts with a level floor and foundation. This is the single most important factor in making your shed as watertight and stable as possible. It also makes the assembly process as simple as possible. We recommend the following foundation options: OPTION 1 - WOODEN FLOOR We sell wooden floor kits designed to match your shed.
-
Page 4: Assembly Overview
Assembly Overview Step 1: Check all parts against the component list Step 2: Assemble the rear wall panels Step 3: Assemble the side wall panels Step 4: Assemble the front wall panels Step 5: Constructing the walls and gables Step 6: Assemble the ridge beam Step 7: Assemble the roof Step 8: Fitting Wall Bracing... - Page 5 ASSEMBLY INSTRUCTIONS...
-
Page 6: Parts List
Door Channel U175 Door Square tube 1750 D173 Door Bar H074 Door Brace 1110 Z111 Bolt(door outside) Bolt(door outside) Bolt(door inside) Bolt(door inside) Hinge Hinge If you’re missing anything, just head to the Trade Tested website and get in touch. - Page 7 Assemble the rear wall panels Part #W180 x8 Large Rib Small Rib Lay the wall panels out with the large rib overlapping the small. All panels should overlap by one corrugation. #U155 x4 The notched end of #U155 and #U079 must be used at either end of the panel Notched ends are orientated...
- Page 8 Tek Screw Screw from the outside in, as per the pre-drilled holes in the frame. Do not add screws to the top and bottom holes at each end of the panel. These need to be left undone. Assemble the side wall panels Joint outside #W180x8 #U155x4...
- Page 9 Tek Screw All pre-drilled holes should line up with the peaks of the steel sheet. If this varies squeeze together or stretch out the panels to make sure they line up. Do not add screws to the top and bottom holes at each end of the panel. These need to be left undone.
- Page 10 #U148x1 #Z148x1 #U155x4 Make sure you attach the bottom #U155 frame into the slot frst. Then slide the base of the door frame inside the bottom frame. #Z148 #U155 #U155 #U148 Bottom #U155 Make sure that the holes are on the correct side before fixing in place.
- Page 11 Constructing the walls and Gables To form a flush corner, make sure flaps overlap. Corner Waterproof Anchor x4 Tek Screw tapes To form a flush corner connection, make sure the end corrugations overlap as shown above.When adding the lower corner brackets, place a spirit level or block of wood underneath the corner of the shed.
- Page 12 Assemble the ridge beam C190 C190x2 C115x2 Tek Screw C115 C115 C190 When assembling the roof beam, avoid placing screws too close to each end. Some play is needed in order to slide the beam over each gable ridge #U042x2 #L030(L)x2 #L030(R)x2 #Bolt and nut...
- Page 13 Assembling the roof Weather Stripping #P165x16 #V155x2 Plastic Ridge End Cap Tek Screw Screw the door side of the roof on first (do not start the rear side yet). INSIDE OUTSIDE Plastic Ridge End Cap Adding the roof #V155 Equidistant holes on the roof channel (G) #V155 When attaching roof panels, align them to the central roof beam, NOT to the walls...
- Page 14 Fitting Wall Bracing Z130x12 Rivet Electric drill Riveting gun 2.38cm 155cm 130cm 180cm 22cm 130cm 2.38cm 155cm 307cm for 2 sides wall 130cm 180cm 22cm 130cm 307cm for back wall First drill a hole from inside of wall panel, then fixed by revits from outside. please make 2 holes in middle of connection point and other equidistant holes for the rest of brace.
- Page 15 Assembling the door D173x2 #U175 x 4 Square tube Rivet #E175 x 410 x2 #E175 x 350 x2 #U074x4 #U074x1 #U175 #U175 #E175 x 410 x1 #E175 x 350 x1 #U074x1 Rivet Rivet Out side of door In side of door #E175 x 350 #E175 x 410 insert D173 square...
- Page 16 Z111x4 Bolt(door outside)x1 H074x2 Hingex4 Rivet H074 H074 H074 D173 D173 Use the drill bit to drill pilot holes through the door bracing into the door sheeting.Flip the door back over to the front side facing up. Using the pilot holes drilled before, fix the door bracing from the front with Rivet and Spacer.
- Page 17 door center strip galvanized handle rivets with washer door top strip door bar door bottom strip door inside hinges handle hasp hasp on door double door door outside inside bolt for double door...
- Page 18 Tek Screw Philips Head Screw Rivet Bolt When first fitting doors, attach the hinges to the shed using the Philips Head Screws. This makes it easier to change the position later if required to get a good fit. The screws can be changed for rivets when the door position is finalised.
- Page 19 Door Adjustment Tips Check that the doors are properly aligned when closed, then if needed adjust door frame/jamb/hinges accordingly. To create or reduce space, adjust the door frames (which have been left unfastened as per Step 3 - C) by sliding them back and forth until the doors sit square.
-
Page 20: Care And Maintenance
Care & Maintenance FINISH For a long lasting finish, periodically clean and wax the exterior of your unit. Remember to make sure you remove any metal drill filings after construction as this may cause corrosion. Touch up scratches as soon as you notice them. ROOF Keep the roof clear of leaves and snow with a long handled, soft-bristle broom. - Page 21 Still having trouble? Just give us a call or send us an email. Head over to tradetested.co.nz or tradetested.com.au for all of our contact details and opening hours. We will be able to help.
Need help?
Do you have a question about the GS509-V1 and is the answer not in the manual?
Questions and answers