Table of Contents
Advertisement
Quick Links
Advertisement
Table of Contents

Summary of Contents for DAZUINFO XferMax X8
- Page 1 User Manual XferMax X8 Memory Card Backup Device...
- Page 2 This equipment has been tested and found to comply with the limits for a Class B digital device, pursuant to Part 15 of the FCC Rules. These limits are designed to provide reasonable protection against harmful interference in a residential installation. This equipment generates uses and can radiate radio frequency energy and, if not installed and used in accordance with the instructions, may cause harmful interference to radio communications.
- Page 3 Agreement of Usage About the responsibility of compensation for data loss Although the data stored in the equipment is precious but the technology could not ensure 100% safety of the data at present. The falling of equipment, computer virus, fault of equipment hard disk and the fault of the equipment itself may result in data loss.
- Page 4 Safety Instructions Neither use this product in wet environment nor operate this product with wet hands. If the liquid enters the product, it is required to turn off the power supply and take out the battery immediately, and deliver the product to the designated repair shop. Do not use such product that has been corroded by the liquid.
-
Page 5: Table Of Contents
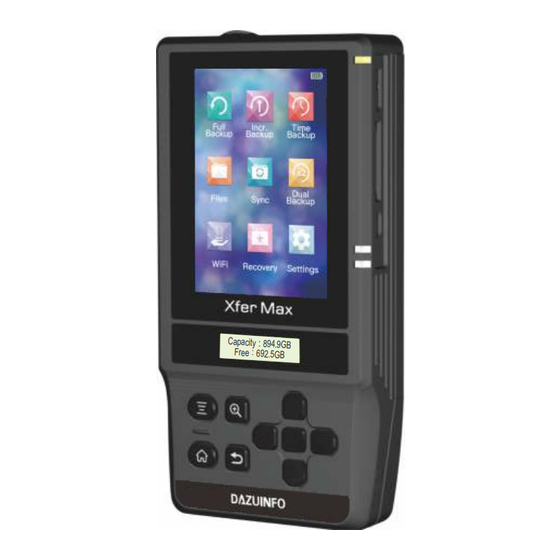
Table of Contents Know the Product Page 1 Component Name Page 3 Turn on the Power Supply/Battery Charging Page 4 Main Functions Memory Card Backup File Management Page 6 Full Backup Page 11 File Management Page 8 Incremental Backup Page 14 Files Copy in Batch Page 9 Time Backup... - Page 7 Component Name Top View Dust Cap Power Supply Switch Reset Key USB3.0 Host Interface CFast2.0(option) CF(option) Left Side Front View Right Side Hard Disk Indicator Lamp Colored LCD Charge Indicator Lamp Capacity:894.9GB Monochrome LCD Free:692.5GB Zoom in / Return to Previous Page Arrow Keys Menu...
- Page 8 Component Name Explosive View of Back Side Replaceable HDD/SSD Detachable Hard Disk Rear Cap Fixing Clip of Hard Disk Detachable Battery Rear Cap Please confirm that the thickness of the hard disk replaced must be 7.5/9.5/15mm. After replacing the hard disk, ensure that the fixing clip has been installed properly.
- Page 9 Turn on Power Supply Push the power supply switch to the left, and hold by about 5s. After the power supply is turned on, the LCD will display the splash screen. Push the switch by about 5s After the battery is used up, the product will be in protection state automatically , and the LCD could not display any contents.
- Page 10 Main Functions Backup all data in memory card to internal storage media. Backup only new data to internal storage media. Backup all data in memory card to internal storage media on time basis. Backup all data in memory card to internal and external storage media.
-
Page 11: Time Setting
Time Setting When starting this product for the first time, it is required to set correct time for product to operate properly. Select ‘Settings’ Select ‘Date Time’ Press the middle key to finish time setting. Capacity: 894.9GB Capacity: 894.9GB Free: 692.5GB Free:... -
Page 12: Full Backup
Full Backup Data stored in memory card will be copied to the hard disk completely. After full backup, system will create a folder with specific name automatically in the hard disk. Full Backup User Interface 1. Insert Memory Card Capacity: 894.9GB Free:... - Page 13 Full Backup The LCD will enter OFF state for saving battery and the backup information will be displayed in the small LCD in the full backup process. The backup progress can be checked on the small LCD by pressing any key. When the LCD is lit up, pressing the Return key for long time can terminate the backup operation.
-
Page 14: Incremental Backup
Incremental Backup Only the newly added data in the memory card will be copied into the hard disk. If the memory card is subjected to incremental backup for the first time, the system will create a new folder in the hard disk and carry out full backup operation. -
Page 15: Time Backup
Time Backup The data in the memory card will be copied into the folder of corresponding date of the hard disk according to the time information. For example, the images shot on March 1, 2017 will be copied into the folder '/Time-based Backup/2017-03-01'. -
Page 16: Dual Backup
Dual Backup The data in the memory card can be copied into the internal hard disk and the external hard disk automatically. This function could provide double safety protection for the user with relatively low cost. The power of internal battery of the product could not drive two hard disks at the same time. Therefore, it is necessary to ensure that the charger adapter has been connected properly to the product when carrying out dual backup operation. -
Page 17: File Management
File Management The file management enable image browse, file copy/pasting and file deletion functions. The images can be picked up easily without computer. Press the middle key to open the File management in Select ‘Files’ selected device or folder list mode Capacity:... - Page 18 Image Browse The product is designed with dedicated zoom up/down keys. The image may be zoomed up to 100% with single operation. At this moment, 1 pixel of the image is just corresponding to 1 pixel of the LCD. Image browse mode interface Press the middle key to open the selected image EXIF...
- Page 19 Image Selection After entering image browse mode, it is easy to copy the favorite images into the folder “My Favorite Files” of the hard disk and select favorite images. Select 'Favorite' Press Menu key to open Select Finished file management Image Browse Mode...
-
Page 20: Files Copy In Batch
Files Copy in Batch It is allowed to select more than one files for batch copy operations. Press key display the Select the file Press key to Select ‘Edit’ file management menu to be copied display menu Press key to Batch copy finished Select the folder Select copy... -
Page 21: Connecting To Computer
Connecting to Computer This product can be used as a standard external hard disk. The data in the product can be accessed through the computer. Turn off the power supply of this product, connecting the MicroUSB3.0 interface to the USB interface on rear end of the computer. -
Page 22: File Synchronization
File Synchronization Data can be synchronized to external hard disk. This function provide further safety feature, and only increases little cost. The internal lithium battery of the product is unable to drive two hard disks at the same time. Thus, it is necessary to ensure that the charger adapter has been connected to the product when carrying out the file synchronization. -
Page 23: Images Recovery
Images Recovery If the memory card is formatted by mistake, or the images in the memory card are deleted by mistake, try to recover the images with the 'Recovery'. Please insert a memory card into the product. Select 'Recovery' in the main menu, the images will be stored in the folder “Recover Images”... -
Page 24: Check Health Information (Smart) Of Hard Disk
Check Health Information (SMART) of Hard Disk Checking the health information-SMART of the hard disk regularly is an important way for ensuring data safety. S.M.A.R.T is the acronym of Self-Monitoring, Analysis And Reporting Technology. This technology mainly monitors and record the predictable mechanical fault in the hard disk, and report before the fault occurs so as to prevent the data content from being damaged. -
Page 25: Password On Boot Setting
Password on Boot Setting The product supports power-on password setting for enhancing data safety further. The password consists of 4 digits. Other operations could be implemented only after correct password has been inputted. Select ‘Settings’ and Select Press Finish select ‘Password On Boot’ ‘Enable Password’... -
Page 26: Firmware Update
Firmware Update Please download firmware from the official website, and uncompress it into the memory card. Please confirm that the suffix of the uncompressed file is .SPF. Insert the memory card containing xxx.SFP file into corresponding slot, and then select 'Settings'- 'Firmware'- 'Firmware Update' in the main menu. Select ‘Firmware Update’... -
Page 27: Hard Disk Formatting
Hard Disk Formatting The product may be fitted with 2.5” SATA mechanical hard disk or solid state disk. For obtaining the optimal data backup performance, it is recommended to format as ExFAT file system. It is also allowed to re-format the hard disk if necessary. -
Page 28: Mobile Phone Join Wifi
Mobile Phone Join WiFi Open the menu, select “Join Router”, select the wireless network to join and input the password. The system will switch over to Internet mode. In this mode, the mobile phone could access to the product in same wireless network. Select menu options Select “Join WLAN”... -
Page 29: Backup Setting
Backup Setting Select 'Settings', select 'Backup Setting' and select the image preview function when turning on or off backup operation. The system also supports to modify the naming rule for backup folder. Select ‘Settings’ and Select image preview switch Change the naming Select ‘Device Info’... - Page 30 Specification Memory Card Slot 1 x CFast2.0 (optional) 1 x CF(optional) 1 x SD/MMC/SDHC/SDXC(optional) 1 x XQD(optional) Micro USB3.0 SuperSpeed 5Gbps USB3.0 Type A SuperSpeed 5Gbps USB Host End SATA 2.5inch,9.5mm or 7.5mm height HDD/SSD Interface WiFi Module Wi-Fi IEEE802.11n 150Mbps MicroUSB DC 5V/2A Power 3.5"320x480 IPS LCD...
- Page 32 Ningbo Dazu Info & Sys Co.,Ltd. http://www.dazuinfo.com May 10, 2018 Version 1.0 Made in China...
Need help?
Do you have a question about the XferMax X8 and is the answer not in the manual?
Questions and answers