Table of Contents
Advertisement
Quick Links
Advertisement
Table of Contents

Summary of Contents for Tohnichi SB-FH2
- Page 1 MODEL: SB-FH2 Operating Instruction To use this product properly and safely, please read this operating instruction carefully before use. If you have any question about the product and its operations, please contact your nearest distributor or Tohnichi Mfg. Co., Ltd.
- Page 2 To customers: Before using this product, please read this operating instruction carefully to use it properly. If you have any question, please contact your nearest distributor or Tohnichi Mfg. Co., Ltd. This operating instruction should be stored in a safe place.
-
Page 3: Table Of Contents
■ Contents 1. Outline 2. Feature 3. Components 4. Specifications 5. External Figure and Part of Name 6. Precaution for Use 6-1. Power Source 6-2. Usage Environment 6-3. Precaution for Handling the Antenna 7. Handling 7-1. Basic Settings 7-2. How to Use 7-3. -
Page 4: Outline
The old setting box (SB-FH256) could not be replaced without removing the screw and removing the panel when replacing the battery. However, the SB-FH2 can be easily replaced without using tools. ● Uses the worldwide 2.4GHz frequency band (ISM band) Contact Tohnichi for status of wireless certification acquisition for each country. -
Page 5: Specifications
Specifications Model SB-FH2 Frequency band 2..402GHz - 2.479GHz 1 MHz interval 78 kinds Communication method Spread spectrum (FHSS) Modulation GFSK Group channel 256 (000-255) In/Output RS232C Power source [DC] V 9 V alkaline battery x 1 Antenna Dipole antenna Temperature... -
Page 6: External Figure And Part Of Name
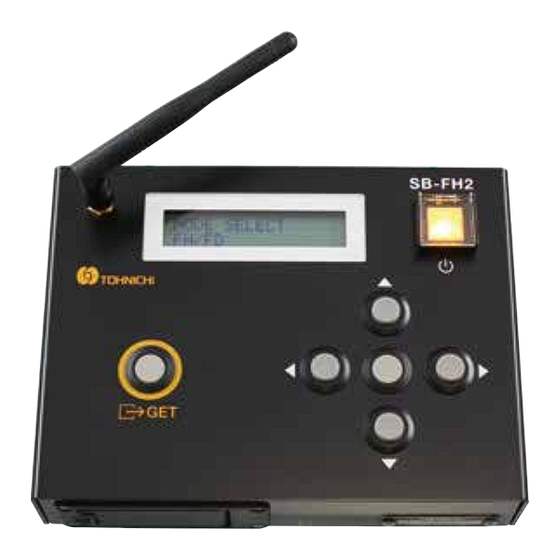
External Figure and Part of Name Dipole Antenna Connector Display RS232C Connector Battery Cover Serial No. ● Dipole antenna connector Connector for attaching a dipole antenna. ● Power switch Power ON/OFF the main unit ● GET button For confirmation of the currently settings of the transmitter or receive ●... -
Page 7: Precaution For Use
6-3. Precaution for Antenna Refer to the following instructions when mounting or dismounting an antenna on R-CM, M-FH or SB-FH2. Do not turn antenna itself. Hold the antenna and turn the notched end. Otherwise, antenna joint of the receiver will be damaged, and the receiver cannot receive signals definitely. -
Page 8: Handling
Handling 7-1. Basic Settings 0 0 0 0 0 0 Upper row: Current setting 0 0 0 0 0 0 N E W Bottom: Update Group Judgment code 3-digits ID 000 - 255 0 - 3 000 - 999 Cursor Next page 0 0 0 0 0 0 0 Upper row: Current setting... - Page 9 ● Change of settings 1. Press the GET switch to display the current setting in the upper row, and press the SET switch to send the lower setting. * When sending the settings, only the items displayed are sent without sending the settings on another page. 2.
-
Page 10: How To Use
7-2. How to Use * Be sure to set one unit at a time. If multiple transmitters and receivers are set to the setting mode at the same time, they cannot be set correctly. 1. Attach the dipole antenna (standard accessory) to the setting box. 2. - Page 11 ● Setting mode selection table ● FH/FD The same operation as the old setting box SB-FH256 is possible, and the group, judgment code, and 3-digit ID can be changed. ● TRANSMITTER Available to change the settings of the new transmitters T-FHM/T-FH and FHW Refer to “7-2-1.
- Page 12 7-2-1. TRANSMITTER mode 1. When select TRANSMITTER mode, the following receiver selection screen will be displayed. If you are now using R-CM with M-FH module and selected "R-CM(M-FH)" as the model selection, select "R-CM" or otherwise select "R-FH". Refer to 7-2-2. R-CM mode" for setting details, if not select "R-FH". R E C E I V E R S E L E C T R - C M...
- Page 13 ● Setting mode selection table for transmitter ● CH SETTING Changeable of transmitter's Group channel, Judgment code, 3-digit ID, and 7-digit alphanumeric ID. By GET button to show current setting value on the upper row and send setting value of the bottom by SET. * Only the settings for the currently displayed page will be sent.
- Page 14 7-2-2. R-CM mode 1. When the R-CM mode is selected, the following model selection screen is displayed. When use the new transmitter T-FH or T-FHW and set at “R-CM” on the receiver selection screen in “TRANSMITTER” mode, select “R-CM (M-FH)”. Refer to “7-2-1.
- Page 15 7-2-3. REMOTE SETTING mode 1. When REMOTE SETTING mode is selected, the following screen will be displayed. Press the GET button. If you select 7-digits ID of the target R-CM, and press the GET button then only one target will be searched. * The unique remote setting ID is attached on the back side of M-FH radio module.
- Page 16 4. When the setting BOX shift to R-CM mode, change the setting. For details, refer to “7-2-2. R-CM mode”. If the target R-CM does not enter setting mode, “GET (RF) ERROR!” or “NOT FOUND” is displayed, so approach the target R-CM and search again. 5.
-
Page 17: Battery Replacement
7-3. Battery Replacement If the POWER button LED does not light on yellow, or if nothing is displayed on the LCD display, it is the battery life. Refer to following instruction to replace a new battery. ③ ④ ① ② * Insert the battery paying attention to the polarity. -
Page 18: Trouble Shooting
Trouble Shooting Check the items in the table below before judging that the device has a breakdown. After checking the items, if the device still has a trouble, contact your nearest distributor or Tohnichi Mfg. Co., Ltd. Symptoms Causes Corrective actions Press the SET switch for 1 sec. -
Page 19: Dimensions
Dimensions... - Page 20 ■Tohnichi Shanghai Mfg. Co., Ltd. 东仁扭矩仪器(上海)有限公司 Tel.+86 21 3407 4008 Fax.+86 21 3407 4135 RM.5 No.99 Nong1919, Du Hui Road, Minhang, Shanghai, P.R.China ● All rights reserved. No reproduction or republication without written permission. ● ©Tohnichi Mfg. Co., Ltd. All Rights Reserved. 10.19.EN...
Need help?
Do you have a question about the SB-FH2 and is the answer not in the manual?
Questions and answers