Table of Contents
Advertisement
Quick Links
Advertisement
Table of Contents

Subscribe to Our Youtube Channel
Related Manuals for Elektron Cycles

Summary of Contents for Elektron Cycles
- Page 1 Model:Cycles User Manual...
- Page 2 Elektron may also make improvements and/or changes in the products and programs described in this document at any time without notice. In no event shall Elektron be liable for any special, indirect, or consequential damages or any damages whatsoever resulting from loss of use, data, or profits, whether in an action of contract, negligence, or other action, arising out of or in connection with the use or performance of this information.
- Page 3 (including amplifiers) producing heat. 7. Do not put the PL-4 Protective Cover (Elektron accessory) on the unit while the unit is powered on. 8. This product, by itself or in combination with amplifiers, headphones or speakers, is capable of produc- ing sound levels that may cause permanent hearing loss.
-
Page 4: Table Of Contents
3.4 SETTING UP AND STARTING THE MODEL:CYCLES ........ - Page 5 TABLE OF CONTENTS 8.3 COPYING A PRESET ............... 21 8.4 THE PRESET MENU .
- Page 6 TABLE OF CONTENTS 10.3.2 DECAY ................. . 37 10.3.3 MACHINE PARAMETERS .
- Page 7 TABLE OF CONTENTS 12.7 DEVICE ................. . . 46 12.7.1 USB MODE .
-
Page 8: Introduction
1. INTRODUCTION 1. INTRODUCTION Thank you for purchasing Model:Cycles. The Model:Cycles is an easy-to-use FM based groovebox. It fea- tures Elektrons world-renowned sequencer and pairs this with one function-per-knob sound mangling and a top of the line sound engine. 1.1 CONVENTIONS IN THIS MANUAL We have used the following conventions throughout the manual: •... -
Page 9: The Model:cycles
This is the way we have balanced simplicity with flexibility, and our vision is that you will explore this with an adventurous mindset. Model:Cycles is a love letter to both the groovebox paradigm and the FM sound. We hope that you will enjoy creating music with the Cycles as much as we enjoyed making it. -
Page 10: Panel Layout And Connectors
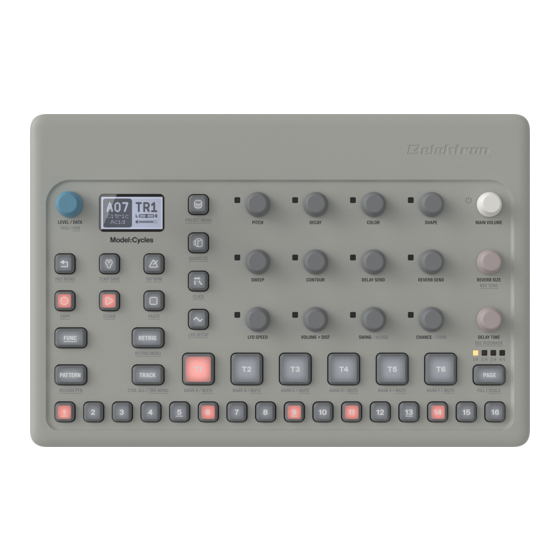
3. PANEL LAYOUT AND CONNECTORS 3. PANEL LAYOUT AND CONNECTORS 3.1 FRONT PANEL 1. LEVEL/DATA sets the overall volume level of the active track. You also use it to set parameters and navigating menus. The secondary function sets the track pan. 2. - Page 11 RETRIG SETUP menu. [TRIG] + [RETRIG] opens the TRIG REPEAT menu. 17. [FUNC] key. Press and hold [FUNC], and then press another key to access the secondary function of that key. The secondary functions are written in underlined text on the Model:Cycles front panel. 18. [LFO] opens the LFO menu.
-
Page 12: Rear Connectors
Model:Cycles. 4. If you want to use MIDI to control the Model:Cycles, connect the MIDI OUT port of the device you wish to send data from to the MIDI IN port of the Model:Cycles. If the MIDI OUT/THRU port is set to function as THRU, it duplicates the data arriving at the MIDI IN port, so it can be used for chaining MIDI units together. -
Page 13: Quick Start
4. QUICK START 4. QUICK START This quick start guides you through some of the basic operations to start using the Model:Cycles right away. First, connect it as described in section “3.4 SETTING UP AND STARTING THE MODEL:CYCLES” on page 12. -
Page 14: Loading A Preset To A Track
In the PRESET FOLDER menu, highlight a folder and then press and hold LEVEL/DATA for a second. A popup appears. Select “LOAD FOLDER” Press “YES” to load up to six presets from that folder to Model:Cycles six tracks. For more information, please see “8.4.2 PRESET FOLDER MENU” on page 22. -
Page 15: Overview Of The Model:cycles
A project contains 96 patterns. General settings and states are also stored in the project. When a project is loaded it becomes the active working state of the Model:Cycles. From here it is possible to edit the patterns and presets of the project. Every time the Model:Cycles is switched on, it boots to the active working state, the active project. -
Page 16: Send Midi
5. OVERVIEW OF THE MODEL:CYCLES 5.2.2 SEND MIDI All sequencer tracks on the Model:Cycles can also be set to send its sequencer data through the MIDI OUT or USB ports to control external, MIDI equipped, gear. Each track sends note, note length and ve- locity data over MIDI. -
Page 17: The User Interface
6. THE USER INTERFACE 6. THE USER INTERFACE 6.1 MAIN SCREEN The screen shows the information used for real-time interaction and editing the Model:Cycles. The illustra- tion below shows the Main screen. 1. Current bank and pattern 2. Active track 3. - Page 18 6. THE USER INTERFACE In the NAMING menu, turn the LEVEL/DATA knob to navigate between the character positions. Press and hold [FUNC], and then turn the LEVEL/DATA knob to select a character for the highlighted position. [FUNC] + [BACK] deletes the character before the highlighted position. Press and hold [FUNC], and then press LEVEL/DATA to toggle between upper and lower case character.
-
Page 19: Model:cycles Controls
7.3 PADS The Model:Cycles can be played using the [T1–6] pads The responsive pads are made of sturdy synthetic rubber and are velocity sensitive. Pressing a pad triggers its track preset and also sets the pads track to active. -
Page 20: Chromatic Mode
7. MODEL:CYCLES CONTROLS MIDI program change messages 0–95 selects pattern 1–96 (A01–F16) on the Model:Cycles. Additional- ly, MIDI CC messages can be sent to control various aspects of the Model:Cycles. For more information, please see “APPENDIX A: MIDI SPECIFICATIONS” on page 51. -
Page 21: Presets
8.4 THE PRESET MENU In this menu you can see and navigate all the folders and presets in your Model:Cycles. Here you can perform a number of actions on the presets and folder Press [FUNC] + [MACHINES] to open the PRESET menu. -
Page 22: Preset Folder Menu
8. PRESETS RENAME PRESET Here you can rename the selected preset. Opens a NAMING menu. DELETE PRESET Deletes the selected preset. Opens a confirmation window. SEND AS SYSEX Sends the selected preset as sysex data. COPY TO LOCKS Copies the selected preset to the LOCKS folder from where it can be preset locked. For more information, please see “9.12.2 PRESET LOCKS”... -
Page 23: Saving A Preset To The +Drive
8. PRESETS 3. Use the LEVEL/DATA knob to navigate the folder structure to the preset you want to load. Press [BACK] to navigate up one level in the folder hierarchy if needed. Press the [TRIG] key of the active track while browsing to listen to the preset currently highlighted. You can also press and hold the [TRIG] key to let the sequencer play the highlighted preset. -
Page 24: The Sequencer
9. THE SEQUENCER 9.1 ABOUT PATTERNS The sequencer of the Model:Cycles stores information in patterns. The patterns are the primary data con- tainer for the Model:Cycles. A pattern controls the playback of the six tracks and various pattern-specific aspects of the tracks and contains up to six presets (one for each track). Each of the six banks, A to F, contains 16 patterns, which means 96 patterns are available for each project. -
Page 25: Pattern Tempo
“4.4 SETTING THE TEMPO” on page 13. 9.3 EDITING A PATTERN Model:Cycles offers two main modes of input when editing or creating a pattern, GRID RECORDING mode and LIVE RECORDING mode. In these modes, you can add two types of trigs: note trigs and lock trigs. -
Page 26: Track Setup Menu
Will, when checked, send the tracks NOTE, VELOCITY, and TRIG LENGTH sequencer data to the Mod- el:Cycles MIDI OUT for control of external MIDI devices. The data are sent on the track’s MIDI channel set in the CHANNELS menu. For more information, please see “12.3.3 OUT CHAN” on page 43. -
Page 27: Retrig Setup Menu
9. THE SEQUENCER 1. In GRID RECORDING mode, press and hold one or several [TRIG] keys and then turn SWING to access the TRIG NUDGE menu that shows the time offset for the chosen sequencer trig(s) on the active track. 2. -
Page 28: Placing A Retrig On An Individual Sequencer Step
9. THE SEQUENCER 9.7.1 PLACING A RETRIG ON AN INDIVIDUAL SEQUENCER STEP 1. In GRID RECORDING mode, press and hold one or several [TRIG] keys and then press [RETRIG] to access the TRIG REPEAT menu that shows the retrig actions for the chosen sequencer step(s) on the active track. -
Page 29: Scale Menu
• A 2X SCL setting is useful for increasing the base resolution of the step sequencer to 32nd notes. A 3/4X setting is useful when Model:Cycles is playing alongside other instru- ments set to the same BPM, and you want Model:Cycles to play triplets. -
Page 30: Preset Locks
This powerful feature makes it possible to use several presets on the same sequencer track. On Model:Cycles you can preset lock up to 64 different presets in each pattern. The locked presets are added to the LOCKS folder in the root of the PRESET menu. For more informa- tion, please see “8.5 THE LOCKS FOLDER”... -
Page 31: Machine Locks
9. THE SEQUENCER 3. Use the LEVEL/DATA knob to navigate the folder structure to the preset you want to lock to the trig. Press [BACK] to navigate up one level in the folder hierarchy if needed. Press the pad of the active track while browsing to listen to the preset currently highlighted. -
Page 32: Fill Mode
9. THE SEQUENCER NEI is true if the most recently evaluated trig condition on the neighbor track was true. (PRE and PRE conditions on the neighbor track are ignored and not evaluated.) The neighbor track is the track before the active track. For example, track 3 is the neighbor track of track 4. NEI and NEI conditional trigs on track 4 evaluate the conditional trigs placed on track 3. -
Page 33: Temporary Save And Reload Pattern Commands
9. THE SEQUENCER Individual sequencer tracks can be copied, pasted and cleared in the same way as patterns but GRID RECORDING mode must be active. Trigs, complete with all parameter lock settings, can be copied, pasted and cleared as well. GRID RE- CORDING mode needs to be active to access this functionality. - Page 34 Model:Cycles. For more information, please see “12.3.1 SYNC” on page Please note that the chain are lost when you create a new chain or when you select a new bank/pattern. Also, chains cannot be saved and are lost when you switch the Model:Cycles off.
-
Page 35: Track Related Parameters
The Control All operation is also available for the track LEVEL/PAN and also for the PUNCH and GATE settings. 10.2 MACHINES Model:Cycles has six different FM-based machines that each focus on a specific type of sound. Any machine can be assigned to any track and can be parameter locked. Press [MACHINES] to open the MACHINES menu. - Page 36 10. TRACK RELATED PARAMETERS Color Shape Sweep Contour • For more information about the SHAPE parameter settings for the Chord machine, please see “APPENDIX C: UNISON AND CHORD SETTINGS” on page 52. • The MACHINES parameter can be parameter locked. In GRID RECORDING mode, press and hold a [TRIG] key, and then press [MACHINES] twice to open the MACHINES menu.
-
Page 37: Track Parameters
CHANCE setting. For example, if you set CHANCE to 70% and a FILL trig condition on the trig, the trig will only (and always) play when the Model:Cycles is in FILL mode. For more information, please see “9.12.5 FILL MODE” on page 32. -
Page 38: Gate
10. TRACK RELATED PARAMETERS 10.5 GATE Press [GATE] to set the envelope to GATE mode. The [GATE] key toggles GATE mode on/off. • GATE OFF The sound envelope goes directly from being triggered (Note On) to the decay phase and ignores Note Off messages and the LEN parameter setting. -
Page 39: Dep
10. TRACK RELATED PARAMETERS 10.6.4 DEP Depth sets the depth and polarity of the LFO modulation. Both negative (inverted) and positive modula- tion depth is possible. A center setting, 0, equals no modulation depth. (-64–63) • Press and hold [LFO] and then turn a TRACK PARAMETER knob to set that knobs pa- rameter as an LFO modulation destination. -
Page 40: Fx Parameters
11. FX PARAMETERS 11. FX PARAMETERS In this chapter we will have a look at the Model:Cycles effect parameters. 11.1 REVERB The Reverb send effect controls the persistence, and ambient characteristics, of the sound reverberations. It can simulate many different sonic locations, from huge spaces to small rooms. -
Page 41: Config Menu
12. CONFIG MENU 12. CONFIG MENU The CONFIG menu offers settings that affect Model:Cycles and here you can also manage Patterns and Projects. Press [SETTINGS] to access the CONFIG menu. Use LEVEL/DATA to browse and change the settings. Press LEVEL/DATA to select list items, or to open folders. -
Page 42: Project
Controls how Model:Cycles receives and sends MIDI clock and transport commands. Use LEVEL/DATA to browse and change the settings. CLK IN will, when set to ON, make Model:Cycles respond to MIDI clock and MIDI transport messages sent from external devices. -
Page 43: In Chan
AUTO IN selects the MIDI channel for the AUTO channel that gives access to the currently active track. If an external MIDI keyboard connected to Model:Cycles sends MIDI data on this channel, the keyboard controls the active track. This is useful when for example quickly changing between the active audio tracks to play different Sounds. -
Page 44: Filter
• USB makes Model:Cycles send MIDI data to the USB port only. • M+U makes Model:Cycles send MIDI data to both the MIDI OUT and USB ports. This setting will slow the data transfer over USB down to the max speed for data transfer over MIDI. -
Page 45: Int Out
Sets if the reverb effect sends audio to the MAIN OUT, HEADPHONES OUT, and USB or not. 12.4.6 USB GAIN Sets the gain level of the audio sent from the USB audio host to the Model:Cycles. This setting only affects the audio sent from the USB audio host to the analog MAIN OUT and HEADPHONES outputs. -
Page 46: Upgrade
When you send backup data to the Model:Cycles, it overwrites all data in the active project 12.6 UPGRADE Here you can upgrade the Model:Cycles OS. To send the OS syx file, use our free Elektron Transfer soft- ware. The OS syx file and Elektron Transfer can be downloaded from the Elektron website. -
Page 47: Startup Menu
OS data, and “READY TO RECEIVE” are shown on the screen. For the transfer to be possible, the device sending the OS syx file must be connected to the MIDI IN port of Model:Cycles. To send the OS syx file, use our free Elektron Transfer software. -
Page 48: Key Shortcuts
14. KEY SHORTCUTS 14. KEY SHORTCUTS You can use these key shortcuts to quickly perform certain tasks. GENERAL [FUNC] + [RECORD] performs a copy command. Action depends on the currently active page or mode. [FUNC] + [PLAY] performs a clear command. Action depends on the currently active page or mode. [FUNC] + [STOP] performs a paste command. - Page 49 14. KEY SHORTCUTS [TRIG] + [PLAY] to remove the parameter locks in the TRIG NOTE menu on a trig in GRID RECORDING mode. MUTES [FUNC] + [T1-6] keys mutes/unmutes tracks. FILL MODE Press and hold [PAGE] to activate FILL mode for as long as [PAGE] is held. Press [TRACK] + [PAGE] to latch FILL mode.
-
Page 50: Technical Information
Unit power consumption: 2–4 W depending on LED/ jack, 5 V DC, 1 A LCD brightness Battery In: Center positive 5.5 × 2.1 barrel jack, 4–10 Compatible Elektron power supply: PSU-4 V DC PHYSICAL SPECIFICATIONS Dimensions: W 270 × D 180 × H 39 mm (10.7” × 7.1” × 1.6”) (including knobs and feet) Weight: approximately 0.8 kg (1.8 lbs) -
Page 51: Appendix A: Midi Specifications
APPENDIX A: MIDI SPECIFICATIONS APPENDIX A: MIDI SPECIFICATIONS This appendix lists the specifications of the Control Change (CC) messages for the Model:Cycles. A.1 TRACK PARAMETERS A.3 LFO PARAMETERS TRACK PARAMETERS LFO PARAMETERS Parameter CC MSB Parameter CC MSB Note Speed... -
Page 52: Appendix B: Modulation Destinations
APPENDIX B: MODULATION DESTINATIONS APPENDIX B: MODULATION DESTINATIONS The following are the modulation destinations for the Model:Cycles’s LFO and Velocity: VELOCITY • Pitch • Pitch • Fine Tune • Fine Tune • Decay • Decay • Color • Color • Shape •... -
Page 53: Index
INDEX INDEX +DRIVE 15 OS UPGRADE 46, 47 BACKUP 45 bi 8, 36, 52 PAD CONFIGURATION MENU 19 PADS 19 PANEL LAYOUT 10 CHAINS 33 PARAMETER EDITING 35 CHROMATIC MODE 20 PARAMETER LOCKS 29 CLICK 28 PARAMETER REVERT 35 CONDITIONAL LOCKS 30, 31, 32 PATTERNS CONNECTORS 12 Description 15... - Page 54 INDEX SEQUENCER 24 Chance 37 Conditional locks 30, 31, 32 Editing a pattern 25 Micro timing 26 Parameter locks 29 Pattern control 24 Retrig setup Menu 27 Scale Menu 29 Selecting bank and pattern 24 Swing 37 TRIG NOTE menu 28 Trig repeat menu 27 SETTINGS MENU 41 Audio 44...
Need help?
Do you have a question about the Cycles and is the answer not in the manual?
Questions and answers