Table of Contents
Advertisement
Available languages
Available languages
Quick Links
Advertisement
Chapters
Table of Contents

Subscribe to Our Youtube Channel
Summary of Contents for KDX R-091
-
Page 2: Table Of Contents
CONTENTS 1 BEFORE OPERATION...............................3 PRECAUTIONS..............................3 BATTERY INFORMATION OF REMOTE CONTROL....................3 REMOTE CONTROL DESCRIPTION........................4 LOCATIONS AND NAMES OF CONTROLS......................5 DESCRIPTION OF REAR CABINET........................5 UNIT INSTALLATION............................6 2 COMMON OPERATION..............................7 TURN ON/OFF THE UNIT……………………………………………………………………………………………………………....7 TO SELECT FUNCTION MODE………………………………………………………………………………………………………………..……7 TO ADJUST SOUND LEVEL…………………………………………………………………………………………………………………………..7 TO MUTE SOUND……………………………………………………………………………………………………………………………………….7 TO DISPLAY CLOCK TIME…………………………………………………………………………………………………………………………….7 TO SELECT PRESET EQ…………………………………………………………………………………………………………………………………7 TO REMOVE FRONT PANEL…………………………………………………………………………………………………………………………7... - Page 3 4.15 CHANGE CAPTION LANGUAGE........................13 4.16 CHANGE AUDIO LANGUAGE..........................13 4.17 PROGRAM PLAYBACK............................13 4.18 ID3FUNCTION..............................13 4.19 CARD READER OPERATION..........................13 4.20 VIDEO SYSTEM MENU SETUP OPERATION......................14 4.20.1 SYSTEM SETUP............................14 4.20.2 LANGUAGE SETUP..........................14 4.20.3 AUDIO SETUP............................14 4.20.4 VIDEO SETUP............................15 4.20.5 SPEAKER SETUP............................15 4.20.6 DIGITAL SETUP............................15 5 BLUETOOTH HANDS-FREE SYSTEM..........................16 5.1 ENTER BLUETOOTH MODE............................16 5.2 PARING AND CONNECTION...........................16...
-
Page 4: Before Operation
BEFORE OPERATION PRECAUTIONS SAFETY 1. Power Source: The unit should be connected to power supply only of the type described in the operating instructions or as marked on the unit. 2. The unit is designed for negative terminal of the battery which is connected to the vehicle earth. Please confirm before installation. -
Page 5: Remote Control Description
REMOTE CONTROL DESCRIPTION 1. BACK BUTTON 2. MENU BUTTON 3. POWER BUTTON BUTTON BUTTON BUTTON / CLEAR BUTTON BUTTON 9. SEL BUTTON 10. PLAY/PAUSE BUTTON 11. NUMBER (0~9,+10 /- 10) BUTTONS 12. 10+/PTY BUTTON 13. SETUP BUTTON 14. MODE BUTTON 15. -
Page 6: Locations And Names Of Controls
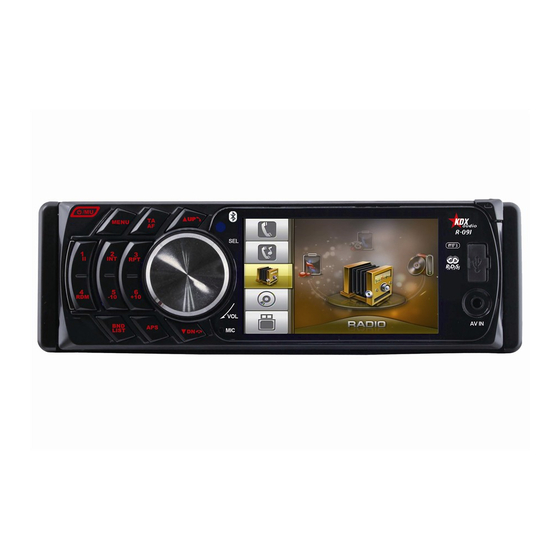
LOCATIONS AND NAMES OF CONTROLS FRONT PANEL UNIT CHASSIS FACE AFTER REMOVINGTHE FRONT PANEL 16. USB JACK 8. APS BUTTON 1. POWER/MUTE BUTTON 9. 1/PLAY/PAUSE BUTTON 17. CARD SLOT 2. MENU BUTTON 18. RESET BUTTON 10. 2/INT BUTTON 3. UP/ DN BUTTON 19. -
Page 7: Unit Installation
CONNECTING PARKING BRAKE LINE TO PARKING BRAKE SYSTEM BUILT IN CAR NOTE: 1. After connecting the parking line, the video on the monitor of the front panel will be displayed only when the hand brake is on. 2. Use the clip end of a ground line provided by manufacturer to connect the fixing screw bolt, use another end of the Ground line to connect the negative pole of the power source. -
Page 8: Common Operation
SD/MMC CARD COMMON OPERATION TURN ON/OFF THE UNIT Under power off mode, press the POWER button to turn on the unit. Under power on mode, press and hold the POWER button on the front panel or briefly press the POWER button on the remote control to turn off the unit. -
Page 9: To Reset The Unit
TO RESET THE UNIT When the display is incorrect or the function buttons are not effective or sound is distorted, press the REL button to detach the front panel from the unit and remove it, then use a cuspidal object to press the RESET button, which will reset to factory default, and re-instate the correct functions 2.10 TO ADJUST SOUND MODE To adjust the sound modes, briefly and repeatedly press the SEL button on the front panel to select one of... -
Page 10: Radio Operation
RADIO OPERATION RADIO INTERFACE 1 BAND BUTTON In the radio mode, press BAND button on the front panel or remote control to select your desired radio band of FM1, FM2, FM3, AM1 and AM2. Press and hold BAND button on the front panel to pop up RADIO INTERFACE 2 as right. -
Page 11: Af [Alternative Frequencies] Button
NEWS – INFORM – SPORTS – TALK - ROCK – CLSROCK – ADLT HIT – SOFT RCK – TOP40 – COUNTRY – OLDES – SOFT – NOSTALIGA – JAZZ – CLASSICL – R&B – SOFT R&B – LANGUAGE – RELMUSC –RETALK – PERSNLTY – PUBLIC – COLLEGE - WEATHER When PTY group is on, pressing the 6 number buttons also can select one of PTY programs as above. -
Page 12: Pause Playback
Select to pause playback. Select to stop playback AUDIO INTERFACE 1 AUDIO INTERFACE 2 Select to playback next chapter/track. Select to playback previous chapter/track. Same as REPEAT button on remote control To select RDM on/off To select audio language. To select LOUD on/off. 4.2 PAUSE PLAYBACK KEYBOARD INTERFACE During playback press the PAUSE button on the remote control to pause the... -
Page 13: Playback With Speed
During JPEG playback press one of the direction ( / / / ) buttons to change the angle of viewing picture that is displaying as follows: >: 90 deg cw; <: 90deg ccw; ^:UP<-->DOWN; v: LEFT<-->RIGHT 4.7 PLAYBACK WITH SPEED During normal playback press and hold the UP/DN button on the front panel or the button on the remote control continuously to fast forward or backward at the following speeds: x2, x4, x8, x20,... -
Page 14: Playback In Zoom Mode
4.14 PLAYBACK IN ZOOM MODE During video playback, press the ZOOM button continuously to enlarge a certain area of the images on the screen with these multiples: ZOOMx2, ZOOMx3, ZOOMx4, ZOOMx1/2, ZOOMx1/3, ZOOMx1/4, ZOOM OFF. Press one of the / / / buttons to select the area you want to enlarge. 4.15 CHANGE CAPTION LANGUAGE During video playback, press the SUBTITLE button repeatedly to select the language of the caption or turn off the caption. -
Page 15: Video System Menu Setup Operation
4.20 VIDEO SYSTEM MENU SETUP OPERATION 1. Press the SETUP button on the remote control to access the VIDEO System Menu on the monitor. 2. There are 6 setup pages in all for the System Menu. Press the button to select an desired setup page. -
Page 16: Video Setup
4.20.4 VIDEO SETUP BRIGHTNESS It is for adjusting the brightness of the video output. CONTRAST It is for adjusting the contrast of the video output. It is for adjusting the hue of the video output. SATURATION It is for adjusting the saturation of the video output. SHARPNESS It is for adjusting the sharpness of the video output. -
Page 17: Bluetooth Hands-Free System
5 BLUETOOTH HANDS-FREE SYSTEM 5.1. ENTER BLUETOOTH MODE Bluetooth mode interface Press MODE button on the remote control repeatedly to select BT mode, it will display BT-Dial interface as right. NOTE: Press MENU button to display mode menu inferface then rotate the VOL knob to select BT mode, finally press SEL button also can enter the mode. -
Page 18: Transfer Audio To Car Audio Player
5.6.3 END A CALL During talking, short press HANG UP button to end the call TRANSFER AUDIO TO CAR AUDIO PLAYER To transfer the audio of a file played by Mobile Phone to the Car Audio Player In the connection status between the Bluetooth devices of the Car Audio Player and a Mobile Phone, if the mobile phone can play audio or video files and support A2DP, when the Mobile Phone plays an audio or video file(For some Mobile Phones, You must select Play by BT firstly),... -
Page 19: Specification
REMOTE CONTROL IS INSENSITIVE OR DOES NOT WORK Check the batteries of remote control and make sure that they are not flat. Direct the remote control to the IR sensor of the player. Check whether there are some obstacles between the remote control and IR sensor. SOME FUNCTION BUTTONS DO NOT WORK Turn off the power, then turn on again. - Page 20 R-091 Ref: 5046 RADIO AM /FM RDS PANTALLA 3.5”, PANEL FRONTAL ABATIBLE Y EXTRAIBLE REPRODUCTOR MP3 / WMA / JPG / BMP /AVI / MPG / MPEG PUERTO USB, LECTOR TARJETAS SD, ENTRADA AUX BLUETOOTH A2DP (AUDIO STREAMING)
- Page 21 INDICE 1. ANTES DE OPERAR CON LA UNIDAD…….........................22 1.1 PRECAUCIONES…............................22 1.2 CONTROL REMOTO, USO E INDICACIONES……....................22 1.3 FUNCIONES CON EL CONTROL REMOTO……………..................23 1.4 LOCALIZAQCIÓN Y FUNCION DE LOS BOTONES……..................24 1.5 PANEL TRASERO…………………………………………………..................24 1.6 METODO DE INSTALACION………………......................25 2. OPERACIONES CON LA UNIDAD……………….......................26 2.1 ENCENDER, APAGAR LA UNIDAD…………….......................26 2.2 SELECCIONAR FUNCION MODE……………......................26 2.3 AJUSTE DE VOLUMEN……………........................26...
- Page 22 4.15 CAMBIAR EL IDIOMA DE LOS SUBTITULOS......................33 4.16 CAMBIAR EL IDIOMA DE REPRODUCCIÓN.......................33 4.17 LISTA DE REPRODUCCIÓN..........................33 4.18 FUNCION ID3..............................33 4.19 OPERACIONES CON LA TARJETA SD …………………………….……................33 4.20 MENU MODO VIDEO Y MENU AJUSTES…….....................34 4.20.1 AJUSTES DEL SISTEMA..........................34 4.20.2 AJUSTES DEL IDIOMA..........................34 4.20.3 AJUSTES DE AUDIO..........................35 4.20.4 AJUSTES DE VIDEO..........................35 4.20.5 AJUSTES DE ALTAVOZ..........................35...
-
Page 23: Antes De Operar Con La Unidad
ANTES DE OPERAR CON LA UNIDAD PRECAUCIONES - Esta unidad debe ser instalada por un equipo profesional a ser posible. - Por favor, siga el diagrama de conexionado para su instalación y para evitar un mal funcionamiento del sistema. Elija el punto de montaje adecuado, de modo que el aparto no interfiera con las funciones normales de conducción. -
Page 24: Funciones Con El Control Remoto
INDICACIONES El mal uso de la batería puede causar un mal funcionamiento del control remoto. Mantenga la batería fuera del alcance de los niños, en caso de ingerir la batería consulte con un doctor inmediatamente. - Use la batería de lítio CR2025 (3V) - Extraiga la batería del control remoto si no va usarlo en un mes o más tiempo 1.3 FUNCIONES CON EL CONTROL REMOTO 1. -
Page 25: Localizaqción Y Funcion De Los Botones
1.4 LOCALIZACIÓN Y FUNCIÓN DE LOS BOTONES PANEL FRONTAL EXTRAIBLE PANEL FRONTAL PARTE FIJA POWER/MUTE USB JACK BOTÓN BOTÓN PUERTO MENU 1/PLAY/PAUSE BOTÓN BOTÓN RANURA TARJETA SD UP/ D 2/INT BOTÓN BOTÓN BOTÓN RESET 3/RPT . BOTÓN COLGAR BOTÓN INDICADOR SEL/VOL 4/RDM BUTTON 20. -
Page 26: Metodo De Instalacion
CONEXIÓN DEL FRENO DE MANO NOTA: Después de conectar el cable de marcha atrás, la imagen de la cámara de marcha atrás se visualizará solo cuando se inserte la marcha atrás. Conecte el cable del freno de mano de color verdea negativo a masa para activar la visualización en el display cuando reproducimos 1 fichero de audio. -
Page 27: Operaciones Con La Unidad
TARJETA SD-MMC OPERACIONES CON LA UNIDAD ENCENDER, APAGAR LA UNIDAD Si la unidad está apagada, pulse el botón POWER para encenderla. Si la unidad está encendida pulse o mantenga pulsado del botón POWER del panel frontal o pulse brevemente el botón POWER del control remoto para apagarla. 2.2 SELECCIONAR LA FUNCIÓN MODE Pulse el botón MENU para acceder al menú... -
Page 28: Resetear La Unidad
RESETEAR LA UNIDAD Antes de utilizar la unidad por primera vez o después de reemplazar la batería del coche o de cambiar las conexiones, deberá realizar un reset. También puede hacer un reset de la unidad si falla alguno de los botones o si el sonido se distorsiona o detecta alguna anomalía en la unidad. -
Page 29: Operaciones Con La Radio
AJUSTES DE FUNCIONES AJUSTES DE FUNCIONES AJUSTES DE REGIÓN: Elija la región dónde se ubique (Europa, America 1, America 2, Japón, Rusia) AJUSTES RDS: active o desactive la función RDS OPERACIONES CON LA RADIO INTERFACE RADIO 1 3.1 BOTÓN BAND (BANDA) En modo de radio, pulse brevemente el botón BAND para cambiar de banda AM a FM: FM1 - FM2 - FM3 - AM1 - AM2... -
Page 30: Botón Pty [ Tipo De Programa ]
3.7 BOTÓN PTY [ TIPO DE PROGRAMA ] Pulse el botón PTY del control remoto brevemente para activar la función PTY, luego pulse los botones + o – del control remoto para seleccionar un tipo de programa como se muestra en la siguiente lista: NOTICIAS –... -
Page 31: Botón Ta [Informacion De Trafico]
3.9 BOTÓN TA [INFORMACIÓN DE TRÁFICO] Pulse el botón TA/AF brevemente para encender y apagar el modo de búsqueda TA. Cuando el modo de búsqueda TA esté activado y se emita un anuncio de tráfico: * Si la unidad está reproduciendo un archivo, ésta cambiará a modo radio temporalmente. * La unidad cambiará... -
Page 32: Selección De Archivos Mediante Los Botones Up/Dn O
4.4 SELECCIÓN DE ARCHIVOS MEDIANTE LOS BOTONES UP/DN O Pulsar brevemente para pasar a la siguiente pista Pulsar repetidamente para pasar a múltiples pistas siguientes Pulsar para retroceder a la pista anterior Pulsar repetidamente para retroceder a múltiples pistas anteriores Pulse brevemente los botones UP/DN del panel frontal o del control remoto durante una reproducción para seleccionar la pista siguiente o anterior. -
Page 33: Reproducción Fotograma A Fotograma
Cada vez que pulse el botón SLOW FWD la velocidad de reproducción variará de acuerdo con la sguiente secuencia: x1/2, x1/3, x1/4, x1/5, x1/6, x1/7, normal. Pulse el botón PLAY para reanudar la reproducción a velocidad normal. NOTA: Ésta función está disponible solamente en modo de video. REPRODUCCIÓN FOTOGRAMA A FOTOGRAMA En modo de reproducción de video, pulse el botón STEP consecutivamente para reproducir el archivo fotograma a fotograma. -
Page 34: Cambiar El Idioma De Los Subtitulos
4.15 CAMBIAR EL IDIOMA DE LOS SUBTITULOS En modo de reproducción, pulse el botón SUBTITLE repetidamente para seleccionar el lenguaje del los subtítulos disponibles o apagar dicha opción. NOTA: Ésta opción depende del archivo de video. 4.16 CAMBIAR EL IDIOMA DE REPRODUCCIÓN En modo reproducción de video, pulse el botón AUDIO del control remoto repetidamente para seleccionar el idioma de reproducción que desee. -
Page 35: Menu Modo Video Y Menu Ajustes
4.20 MENU AJUSTES EN MODO DE VIDEO (SET UP) MENU DE AJUSTES Pulse el botón SET UP del control remoto para acceder al MENU DE AJUSTES que se muestra en el display. Existen 6 páginas de Menú de ajustes. Pulse los botones < o > para cambiar a la página con los ajustes que desee modificar. -
Page 36: Ajustes De Audio
4.20.3 AJUSTE DE AUDIO TECLA Elija ésta opción para seleccionar el tono de audio de la unidad 4.20.4 AJUSTES DE VIDEO BRILLO (BRIGHTNESS) Elija ésta opción para ajustar el brillo de la salida de video. CONTRASTE (CONTRAST) Elija ésta opción para ajustar el contraste de la salida de video. MATIZ O TINTE (HUE) Elija ésta opción para ajustar el matiz de la salida de video. -
Page 37: Sistema Manos Libres Bluetooth
SISTEMA MANOS LIBRES BLUETOOTH ACCEDER AL MODO BLUETOOTH PANTALLA MODO BLUIETOOTH Pulse el botón MODE del control remoto repetidamente para acceder al modo Bluetooth, la pantalla mostrará el menú BLUETOOTH y podrá leer BT-DIAL. NOTA: Pulse el botón MENU para mostrar el MENU BLUETOOTH en el display, luego utilice el potenciómetro del volumen para seleccionar el modo BT y finalmente pulse el botón SEL para acceder al menú... -
Page 38: Rechazar Una Llamada
5.6.2 RECHAZAR UNA LLAMADA Cuando tenga una llamada entrante, pulse el botón DN del panel frontal o el botón APS del control remoto para rechazarla. 5.6.3 FINALIZAR UNA LLAMADA Durante una llamada, pulse el botón DN del panel frontal o el botón DN del control remoto para colgarla. -
Page 39: Solucion De Problemas
6 SOLUCIÓN DE PROBLEMAS Por favor lea detenidamente el manual de usuario antes de empezar a operar con la unidad. Si tiene algún problema con la unidad intente resolverla con las sugerencias que se detallan a continuación. Si el problema persiste por favor contacte con el servicio técnico o el establecimiento dónde compró el producto. -
Page 40: Especificaciones
ESPECIFICACIONES ESPECIFICACIONES GENERALES Voltaje ……………………………………………………….12V masa negativa Consumo……………………………………………………10A máx. Potencia de salida………………………………………4x25W Número de Canales…………………………………….4 Stereo Dimensiones de la unidad…………………………..178x50x110mm USB o SD-MMC Formatos……………………………………………………MP4 / JPEG / MP3 / WMA Formato salida de video……………………………..NTSC Sistema de audio………………………………………24bit/ 96 KHz ESPECIFICACIONES DE VIDEO Formato video……………………………………………16:9 o 4:3 Nivel de salida de video………………………………Composite: 1.1±0.2Vp-p Impedancia de carga…………………………………..75 Ohms...
Need help?
Do you have a question about the R-091 and is the answer not in the manual?
Questions and answers